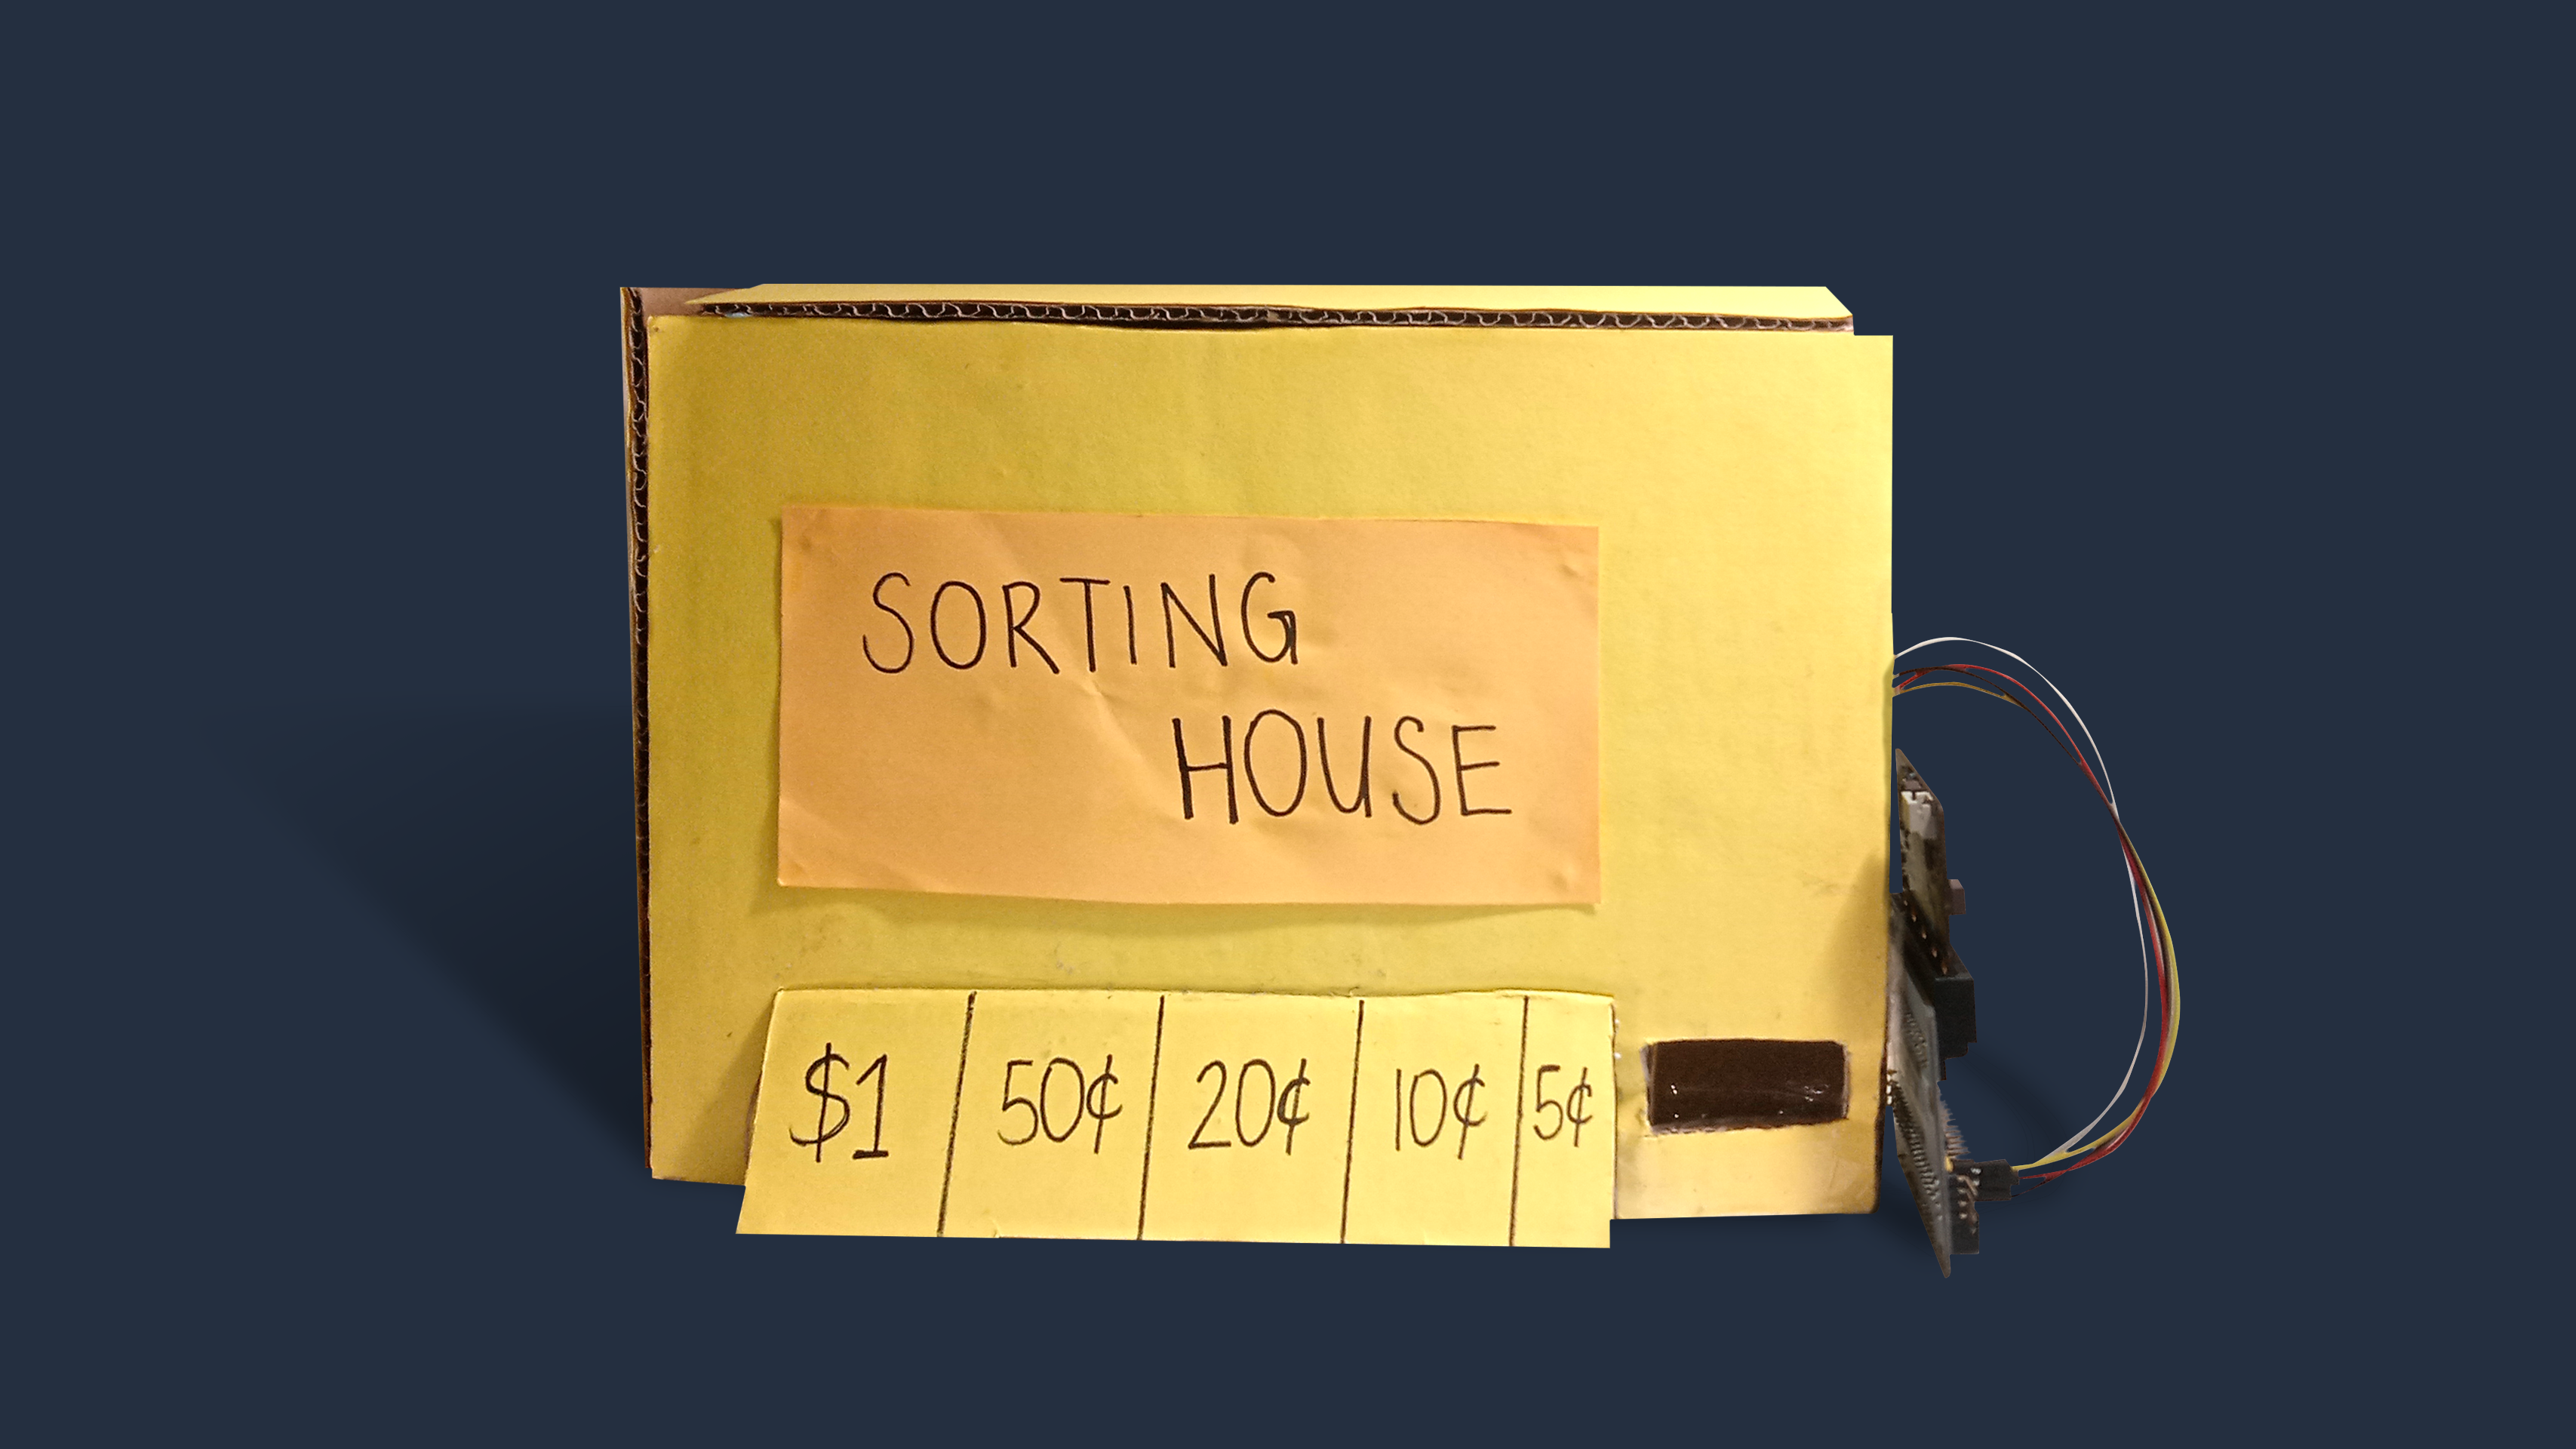
Coin sorter with micro:bit
Make a simple automatic coin sorter, that will detect the value of the coin dropped inside and display the total sum of the coins!
YOU WILL NEED
- 1 x Micro:bit
- 1 x MicroUSB cable
- 1 x Tinkercademy Breakout Board
- 1 x HC-SR04 Ultrasonic Sensor
- 4 x F-F jumper wires
- 5 x coins (5¢, 10¢, 20¢, 50¢, $1)
- 1 x large piece of cardboard
- 1 x Superglue
- Scotch tape
- Penknife
- Pencil / marker
- Ruler
- Colour Paper (optional)
STEP 1
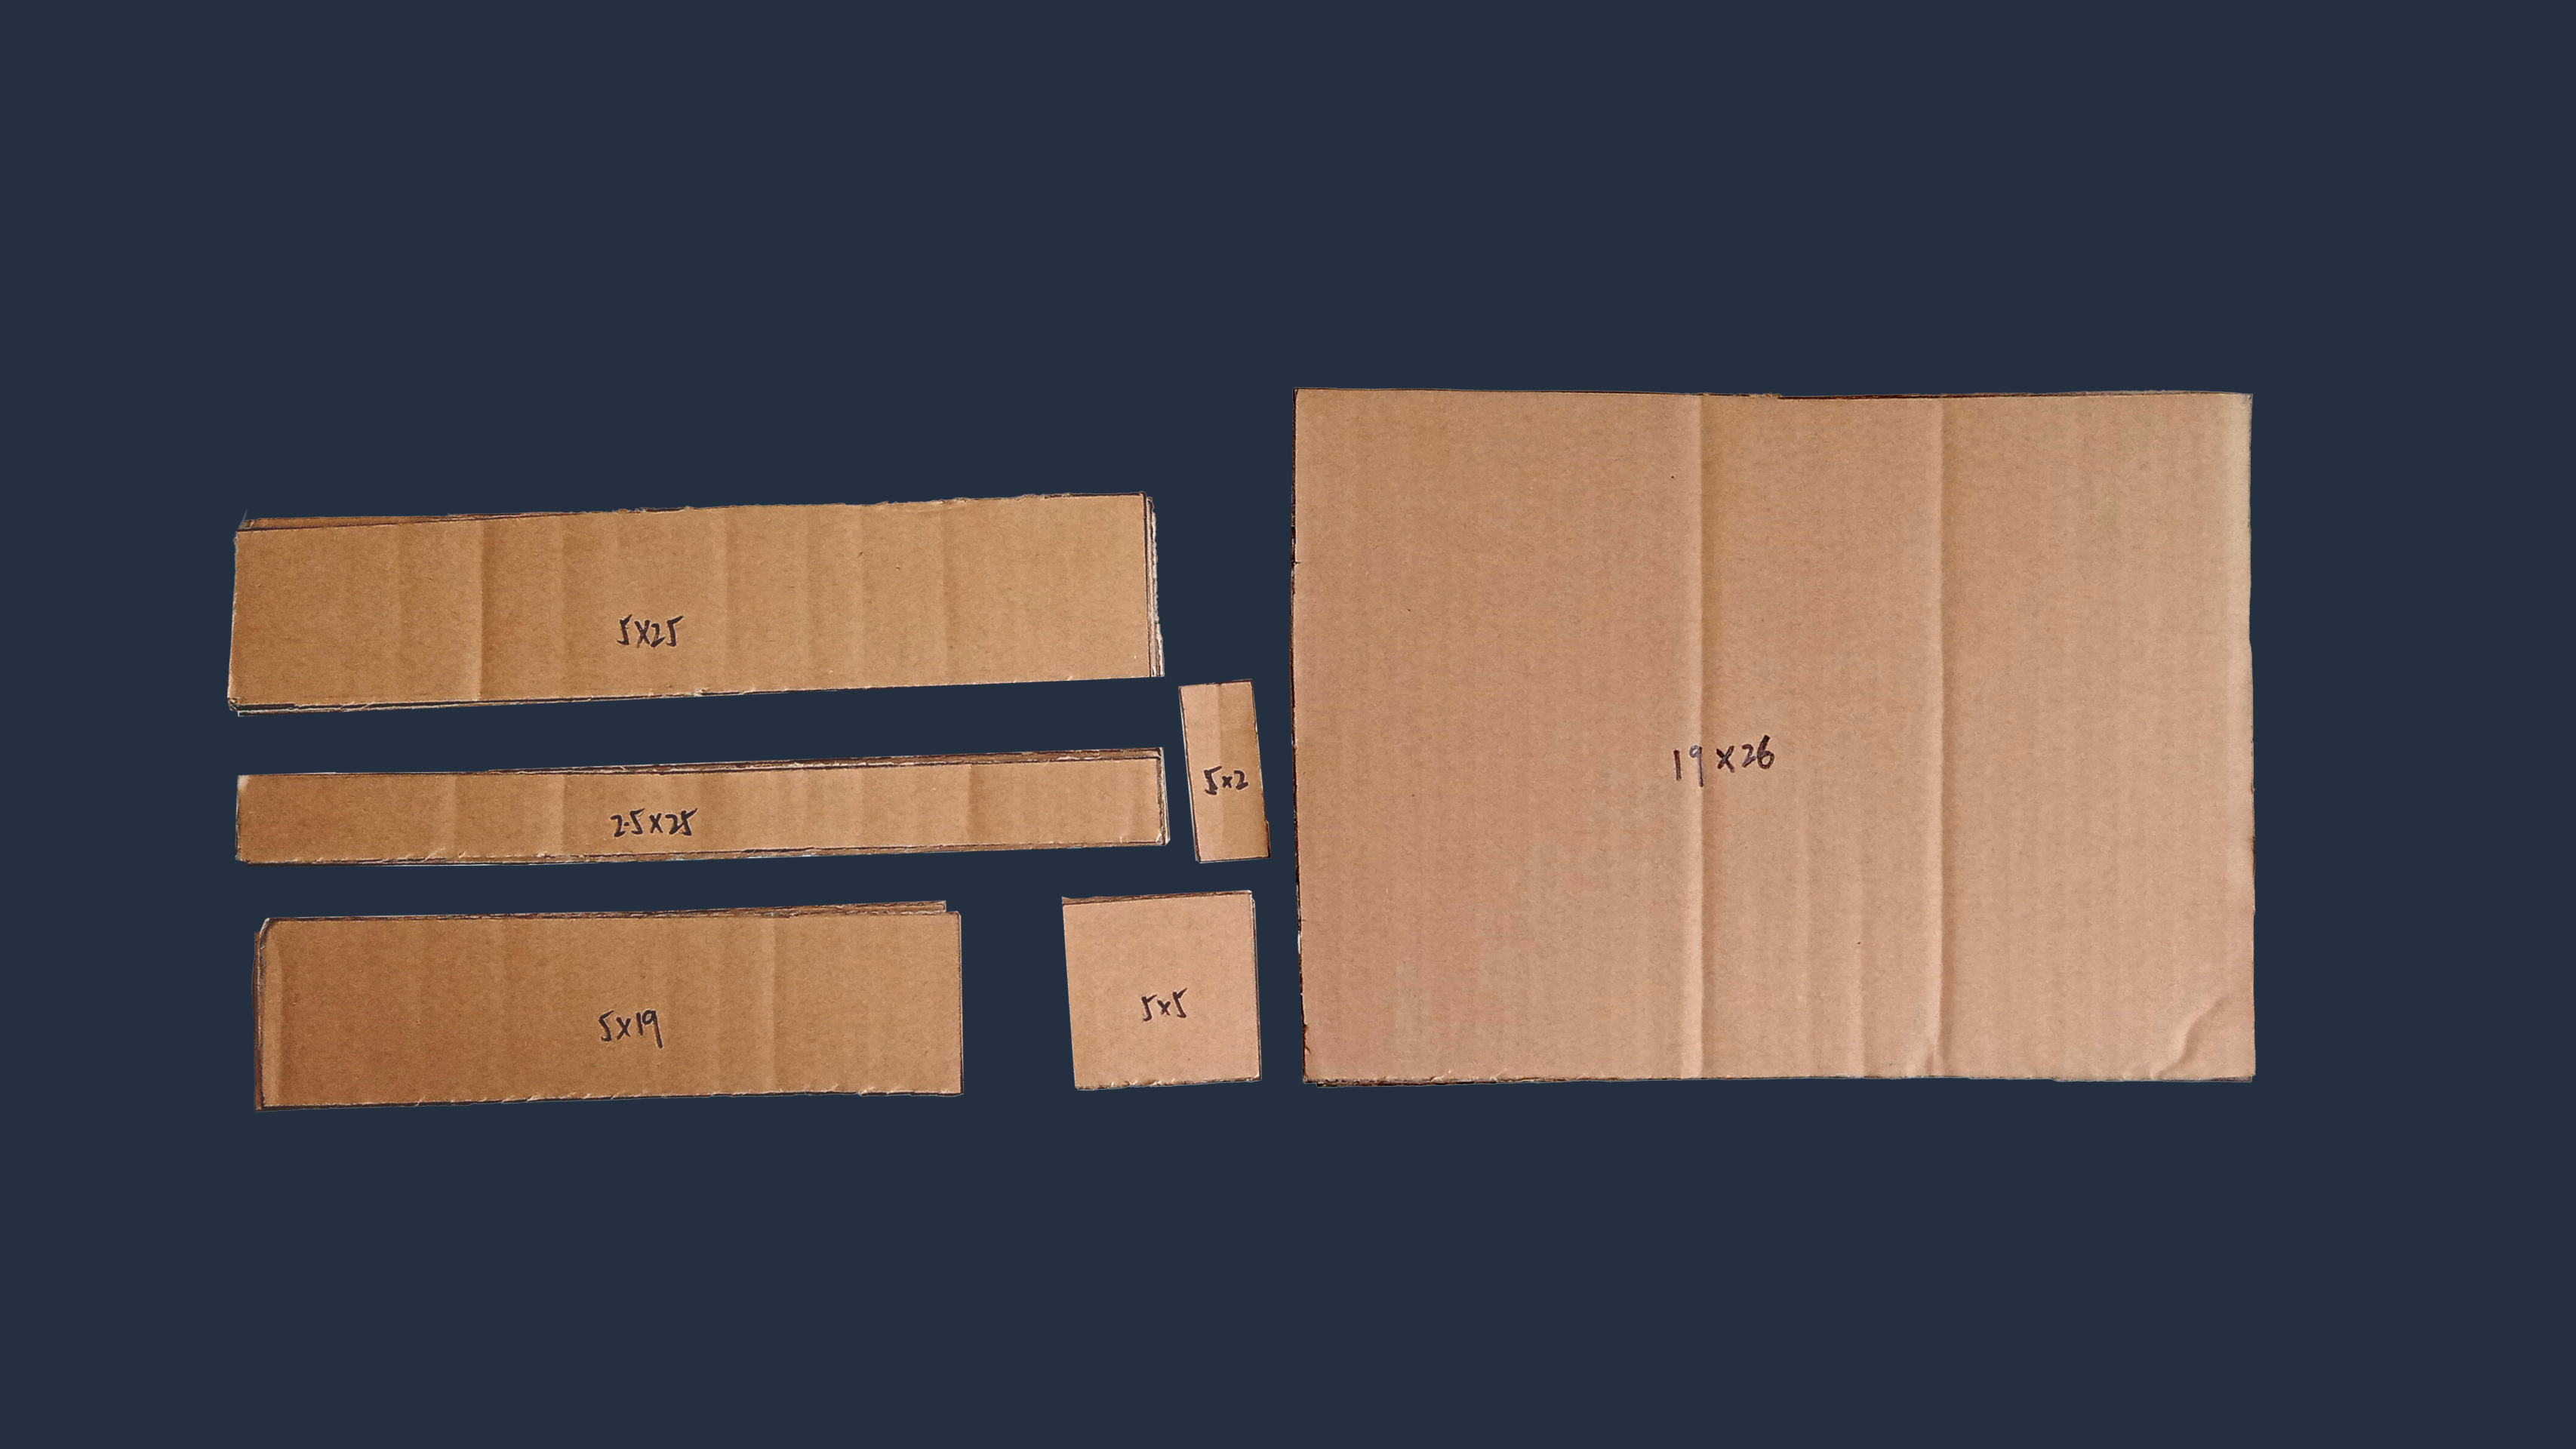
Cutting Cardboard Pieces
(a) Take a large piece of cardboard.
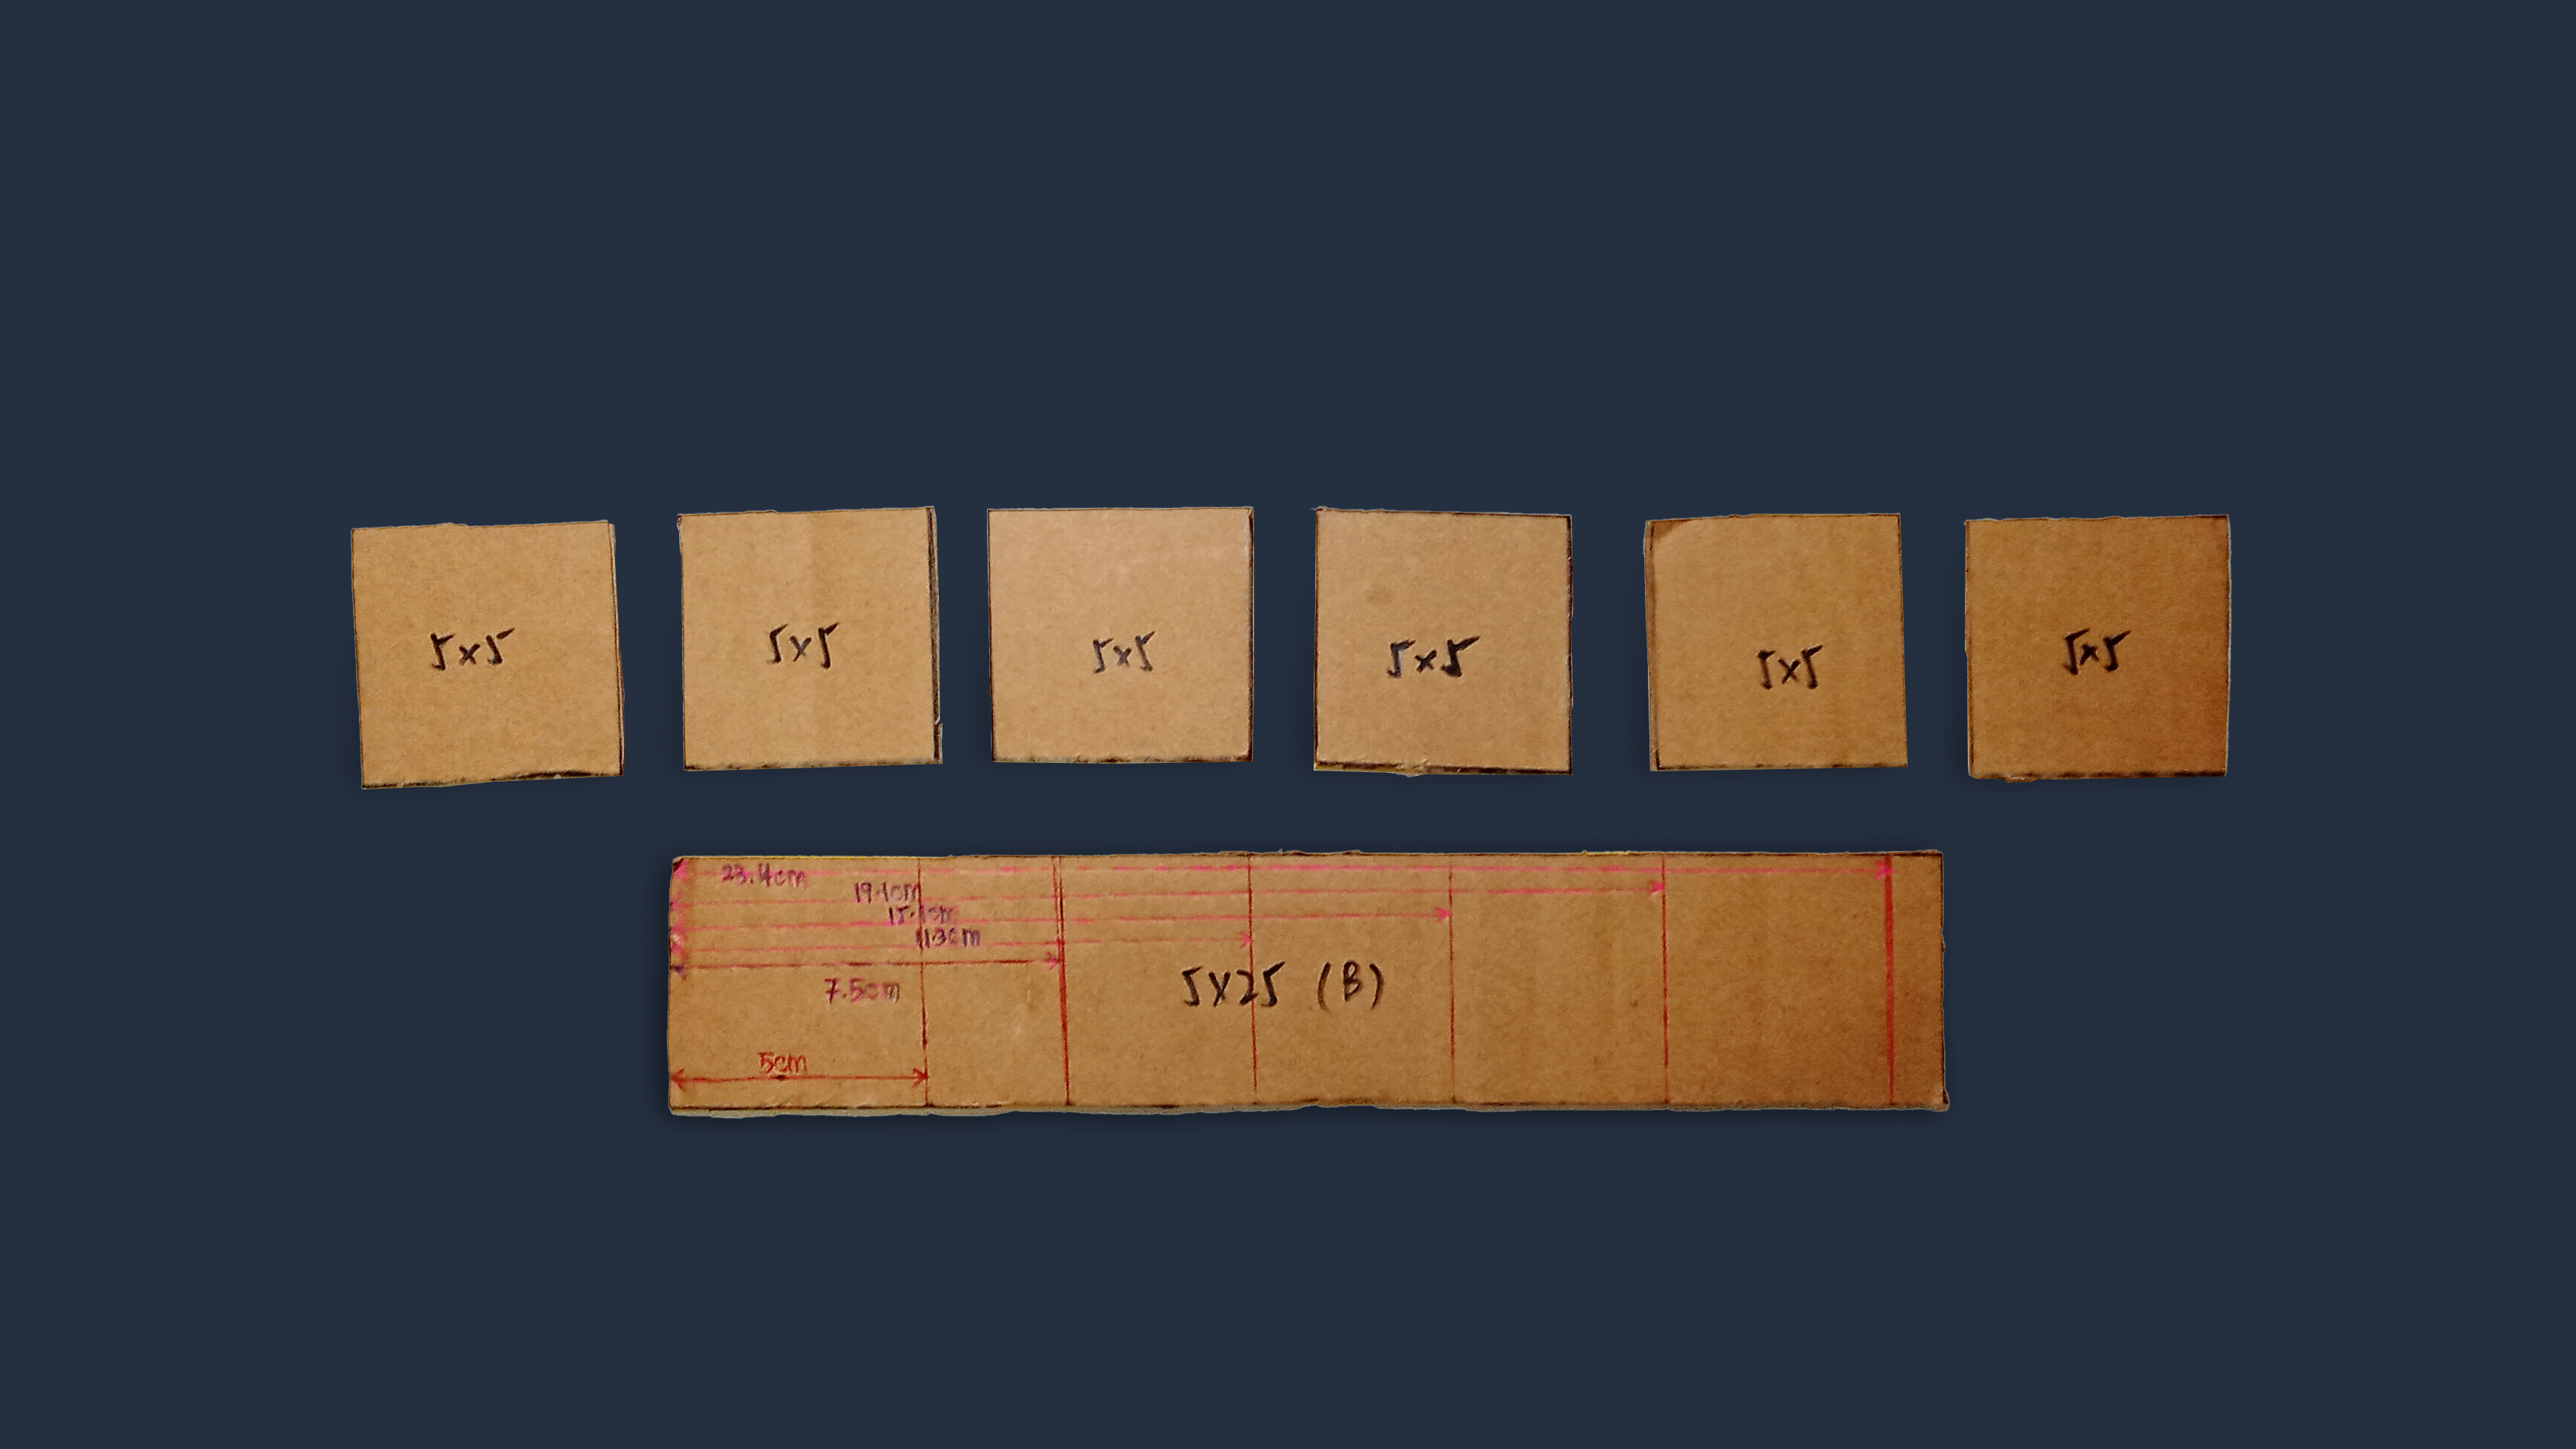
(b) Mark and cut out these individual pieces of cardboard:
• 3 x pieces of 5 x 25cm cardboard
• 2 x pieces of 2.5 x 25cm cardboard
• 2 x pieces of 19 x 26cm cardboard
• 2 x pieces of 5 x 19cm cardboard
• 6 x pieces of 5 x 5cm cardboard
• 1 x piece of 2 x 5cm cardboard
Materials
- Cardboard
- Penknife
STEP 2

Wrapping Cardboard Pieces (Optional)
(a) Take some colour paper and paste them over the front of the cardboard pieces.
(b) There is no need to paste colour paper over one of the 5x25cm cardboard piece (A), the 2x5cm cardboard (E) and the two 2.5x25cm cardboard pieces if you don’t want to. They will not be visible from the outside.
Materials
- Cut out cardboard pieces (from step 1)
- Colored paper
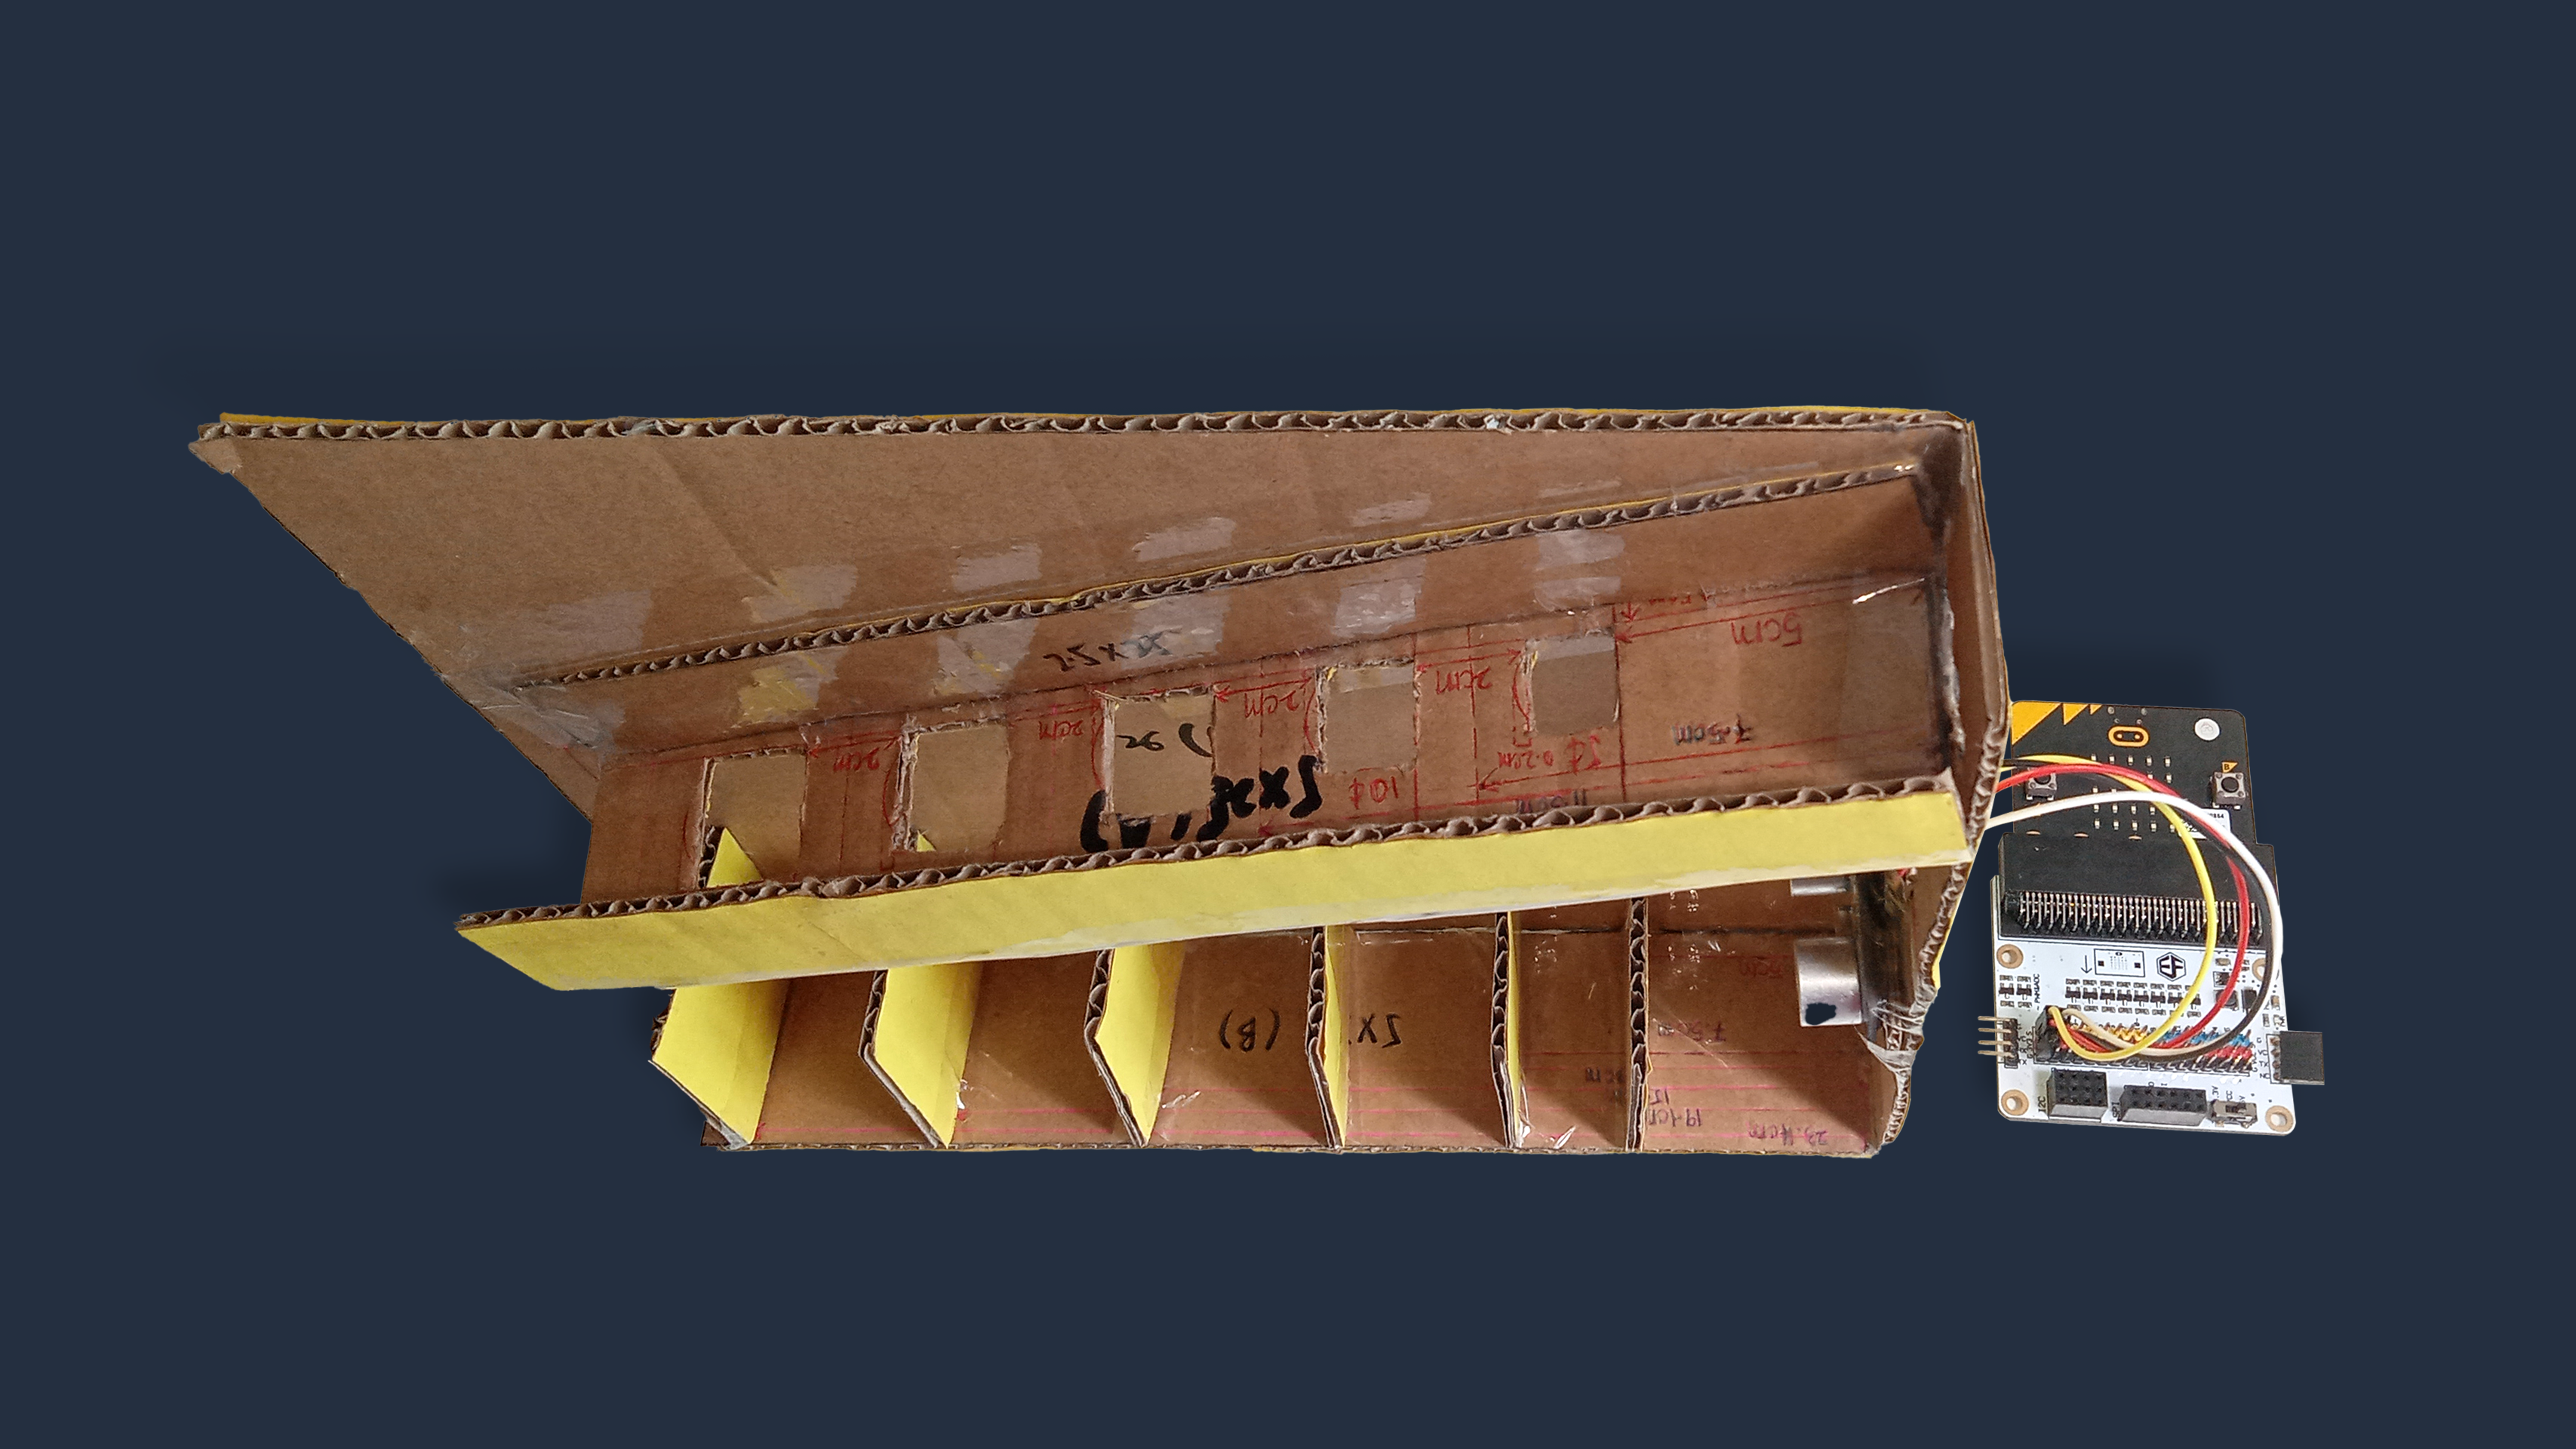
STEP 3
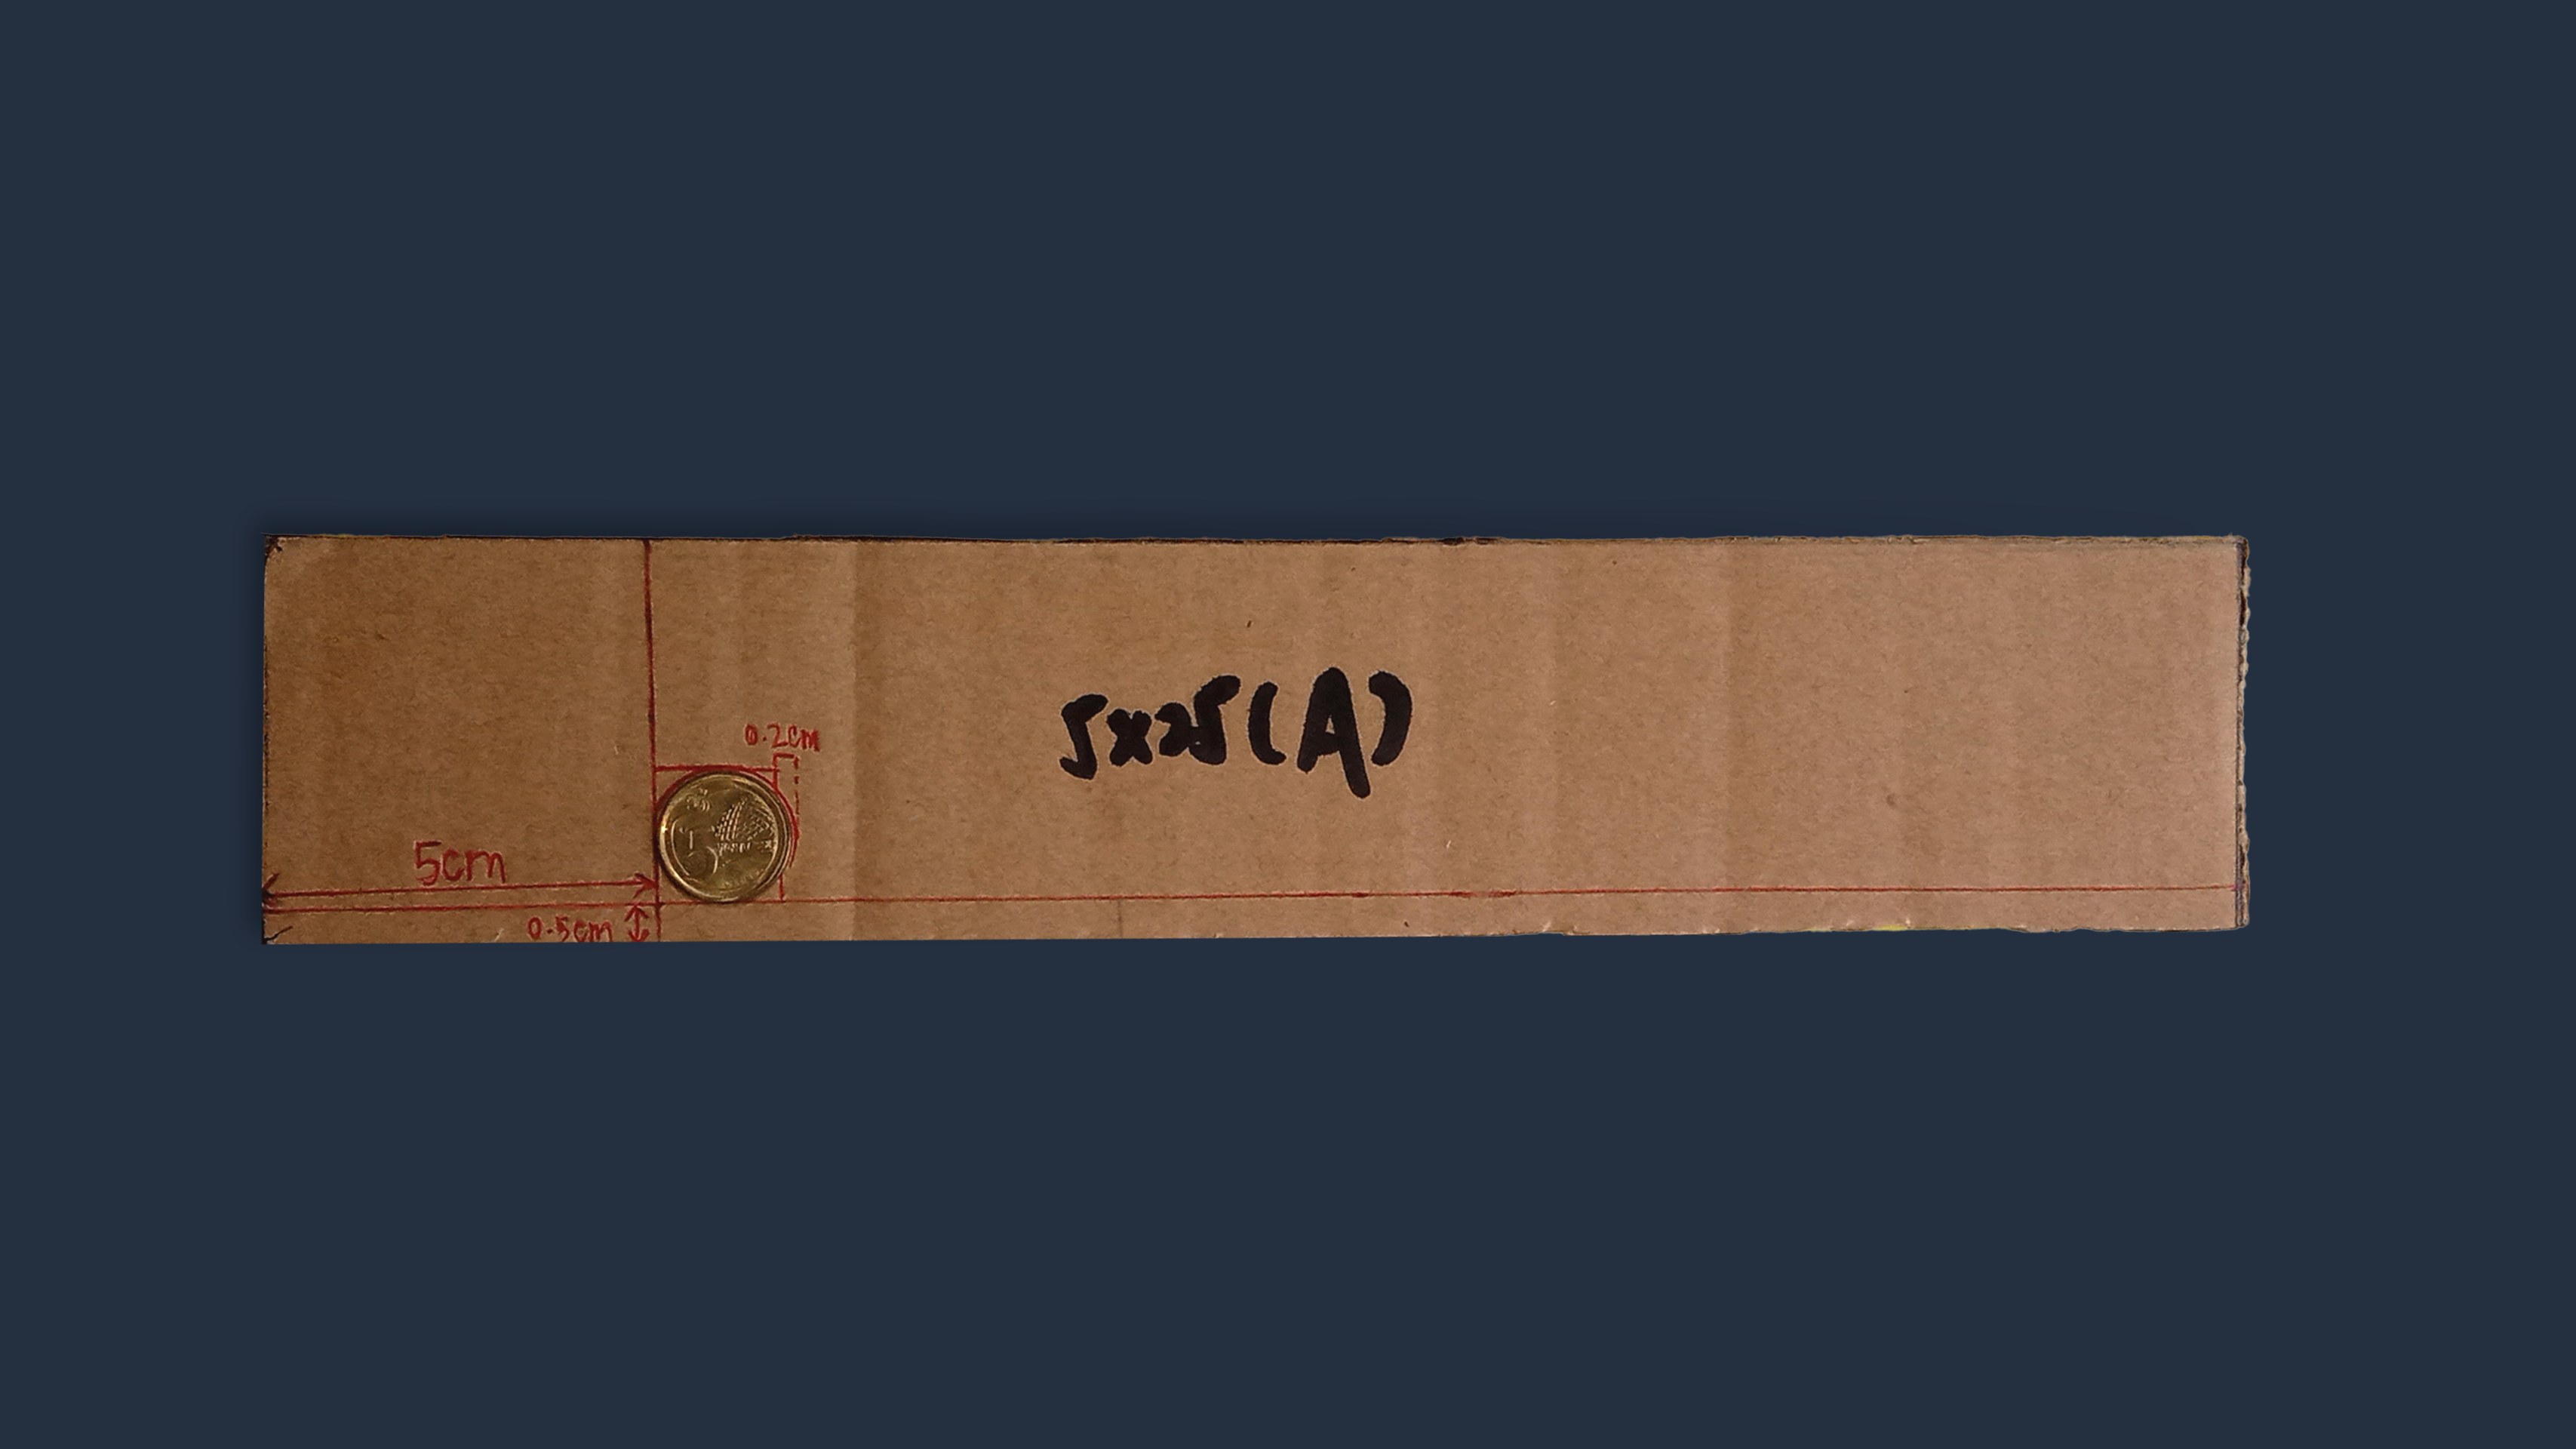
(a) Take a 5x25cm piece of cardboard (A), and turn it to the side without colour paper.
(b) Mark 0.5cm away from the long edge of the cardboard. Draw a horizontal line across.
(c) Mark 5cm away from the short edge of the cardboard. Draw a vertical line down.
(d) Place a 5¢ coin at the corner of these two lines. Trace the edges of the coin.
(e) Draw a rectangle with the same height as the diameter of the coin, and width 0.2cm shorter than the diameter. Shade the rectangle to cut it out later.
(f) Measure 2cm from this rectangle, and draw another vertical line down.
Materials
- Cardboard piece A (from step 1)
- 1 x 5¢ coin
- Penknife
- Ruler
- Marker / Pen
STEP 4
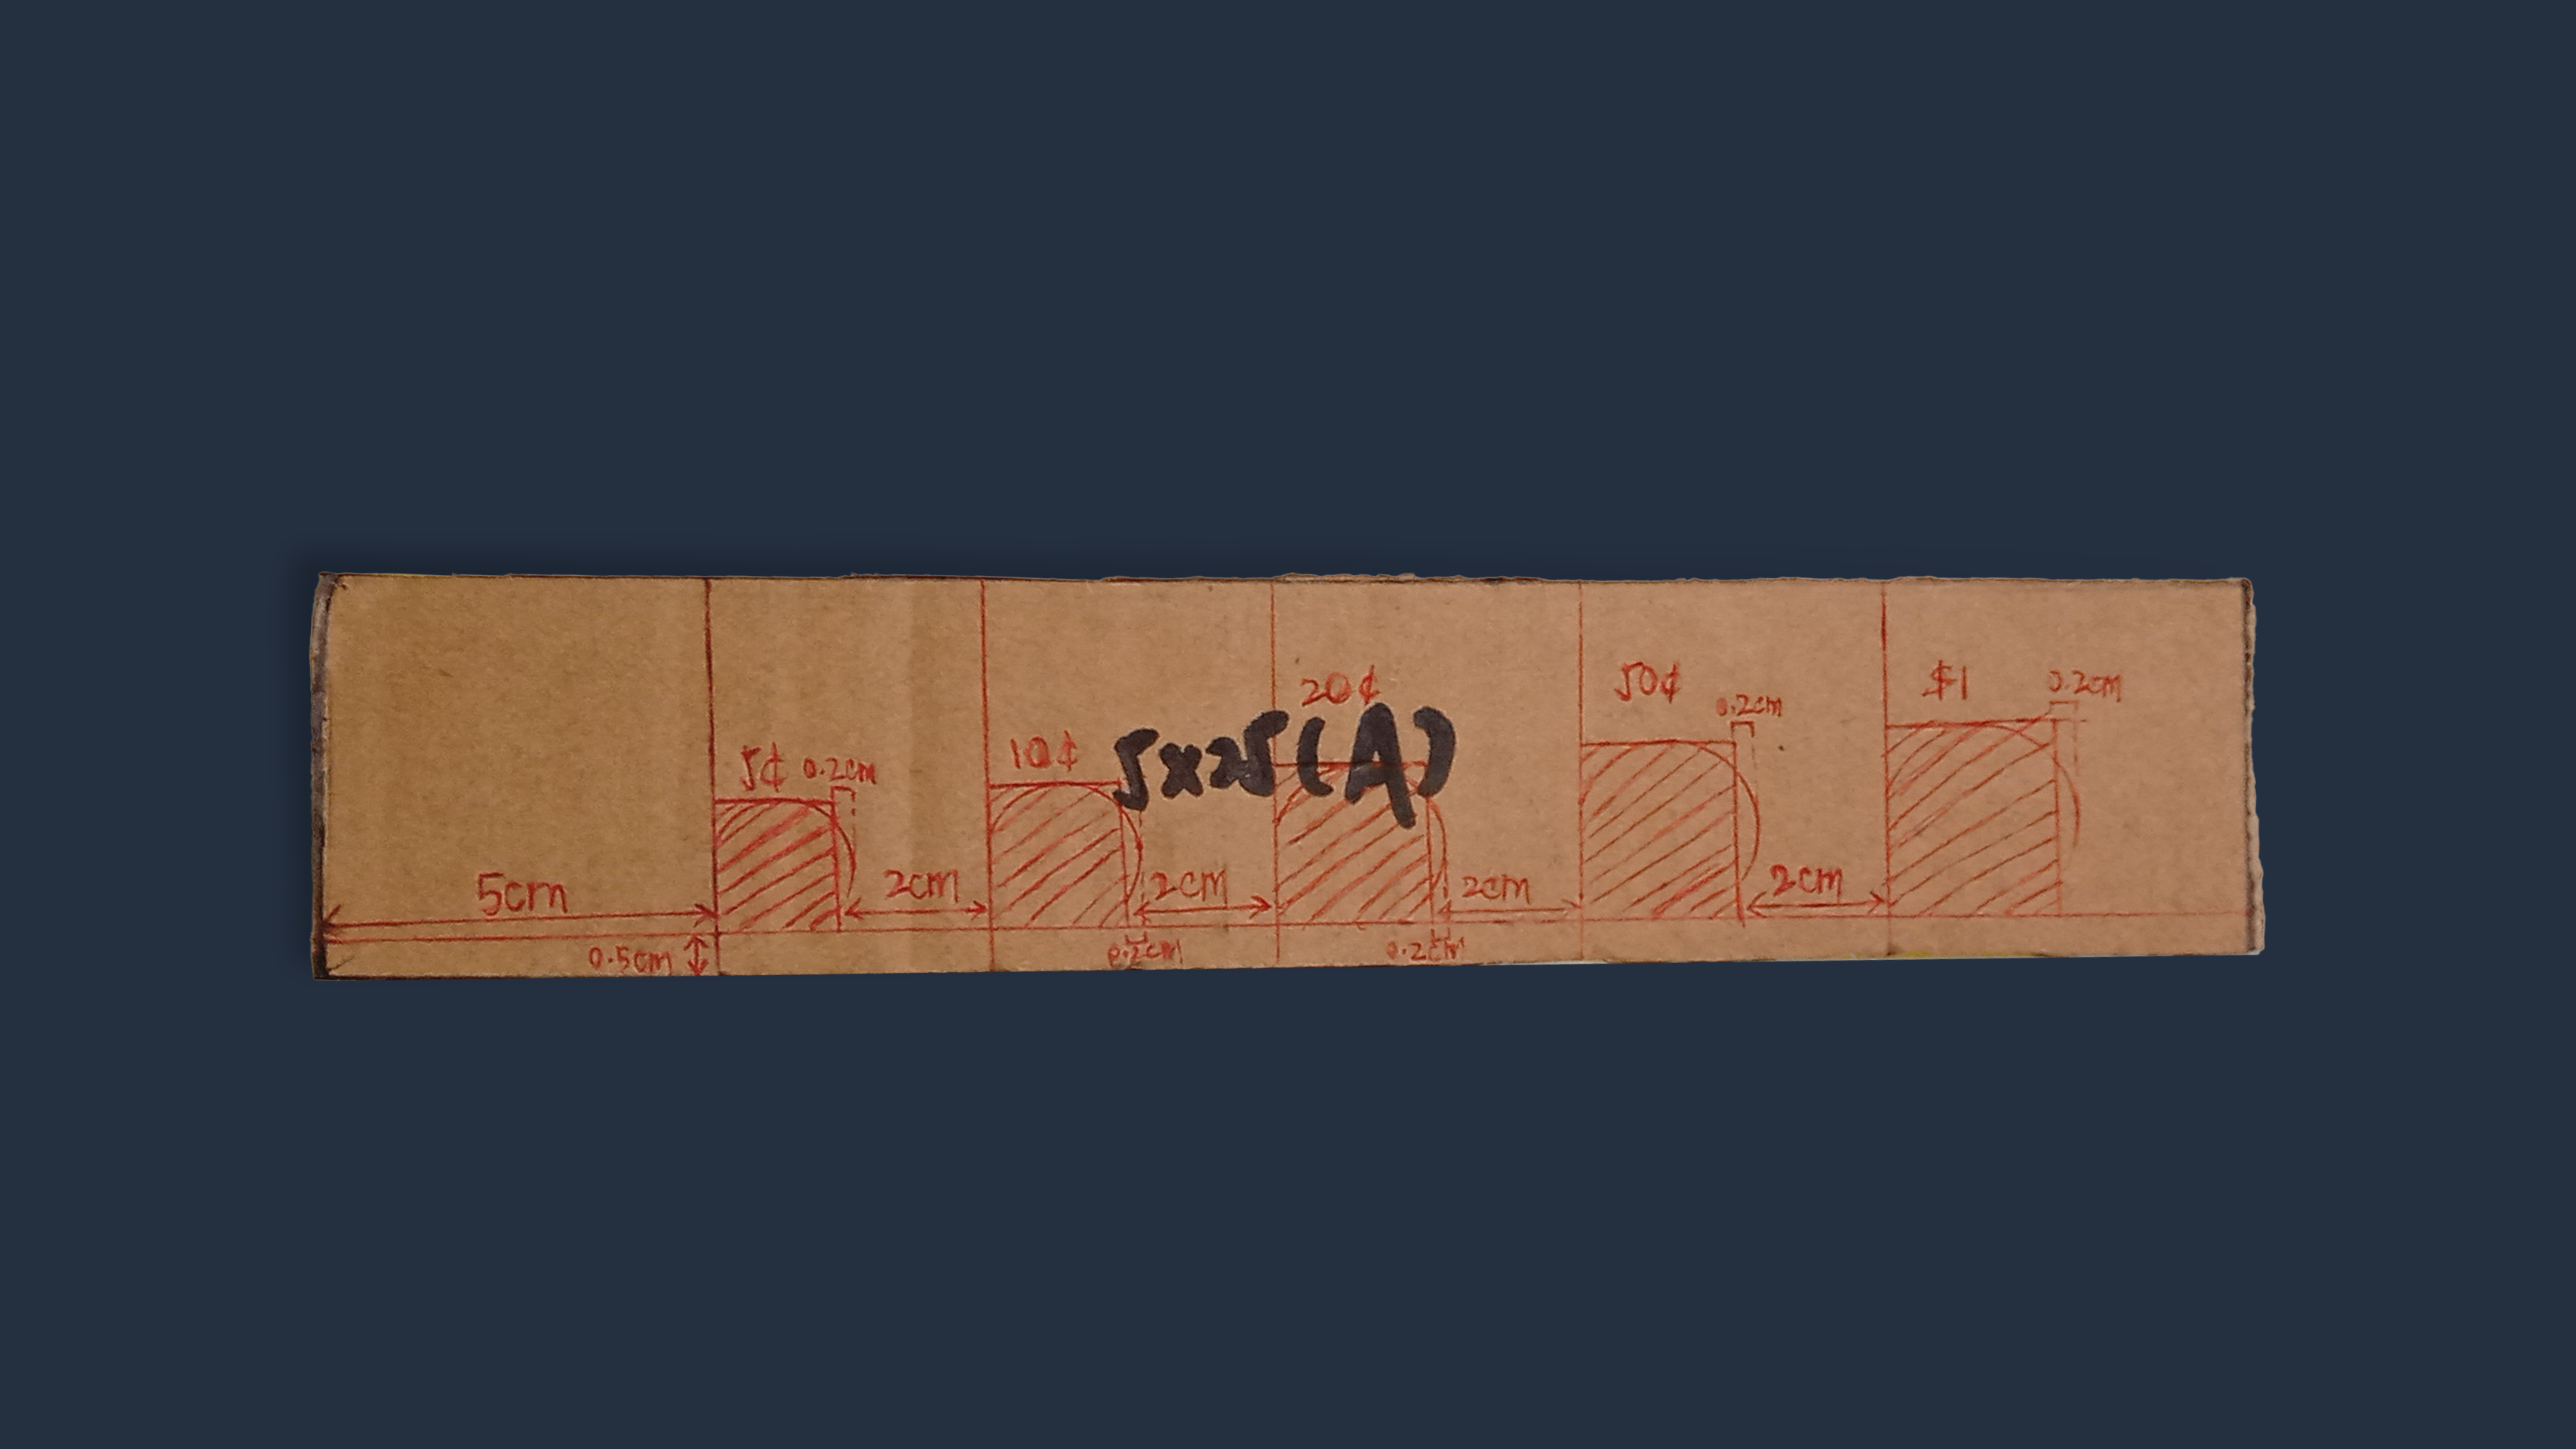
Cardboard A - Cutting the Slots
(a) Repeat step 3 above using a 10 cents, 20 cents, 50 cents and $1 coin, in this order.
(b) Cut out all the shaded rectangles using a penknife.
(c) Flatten the whole piece of cardboard to even out the surface.
(d) Tape the top of the cardboard in smooth scotch tape to reduce friction for the coins to slide down.
Materials
- Cardboard A
- 10 cents, 20 cents, 50 cents and $1 coin
- Penknife
- Ruler
- Marker / Pen
- Scotch tape
STEP 5
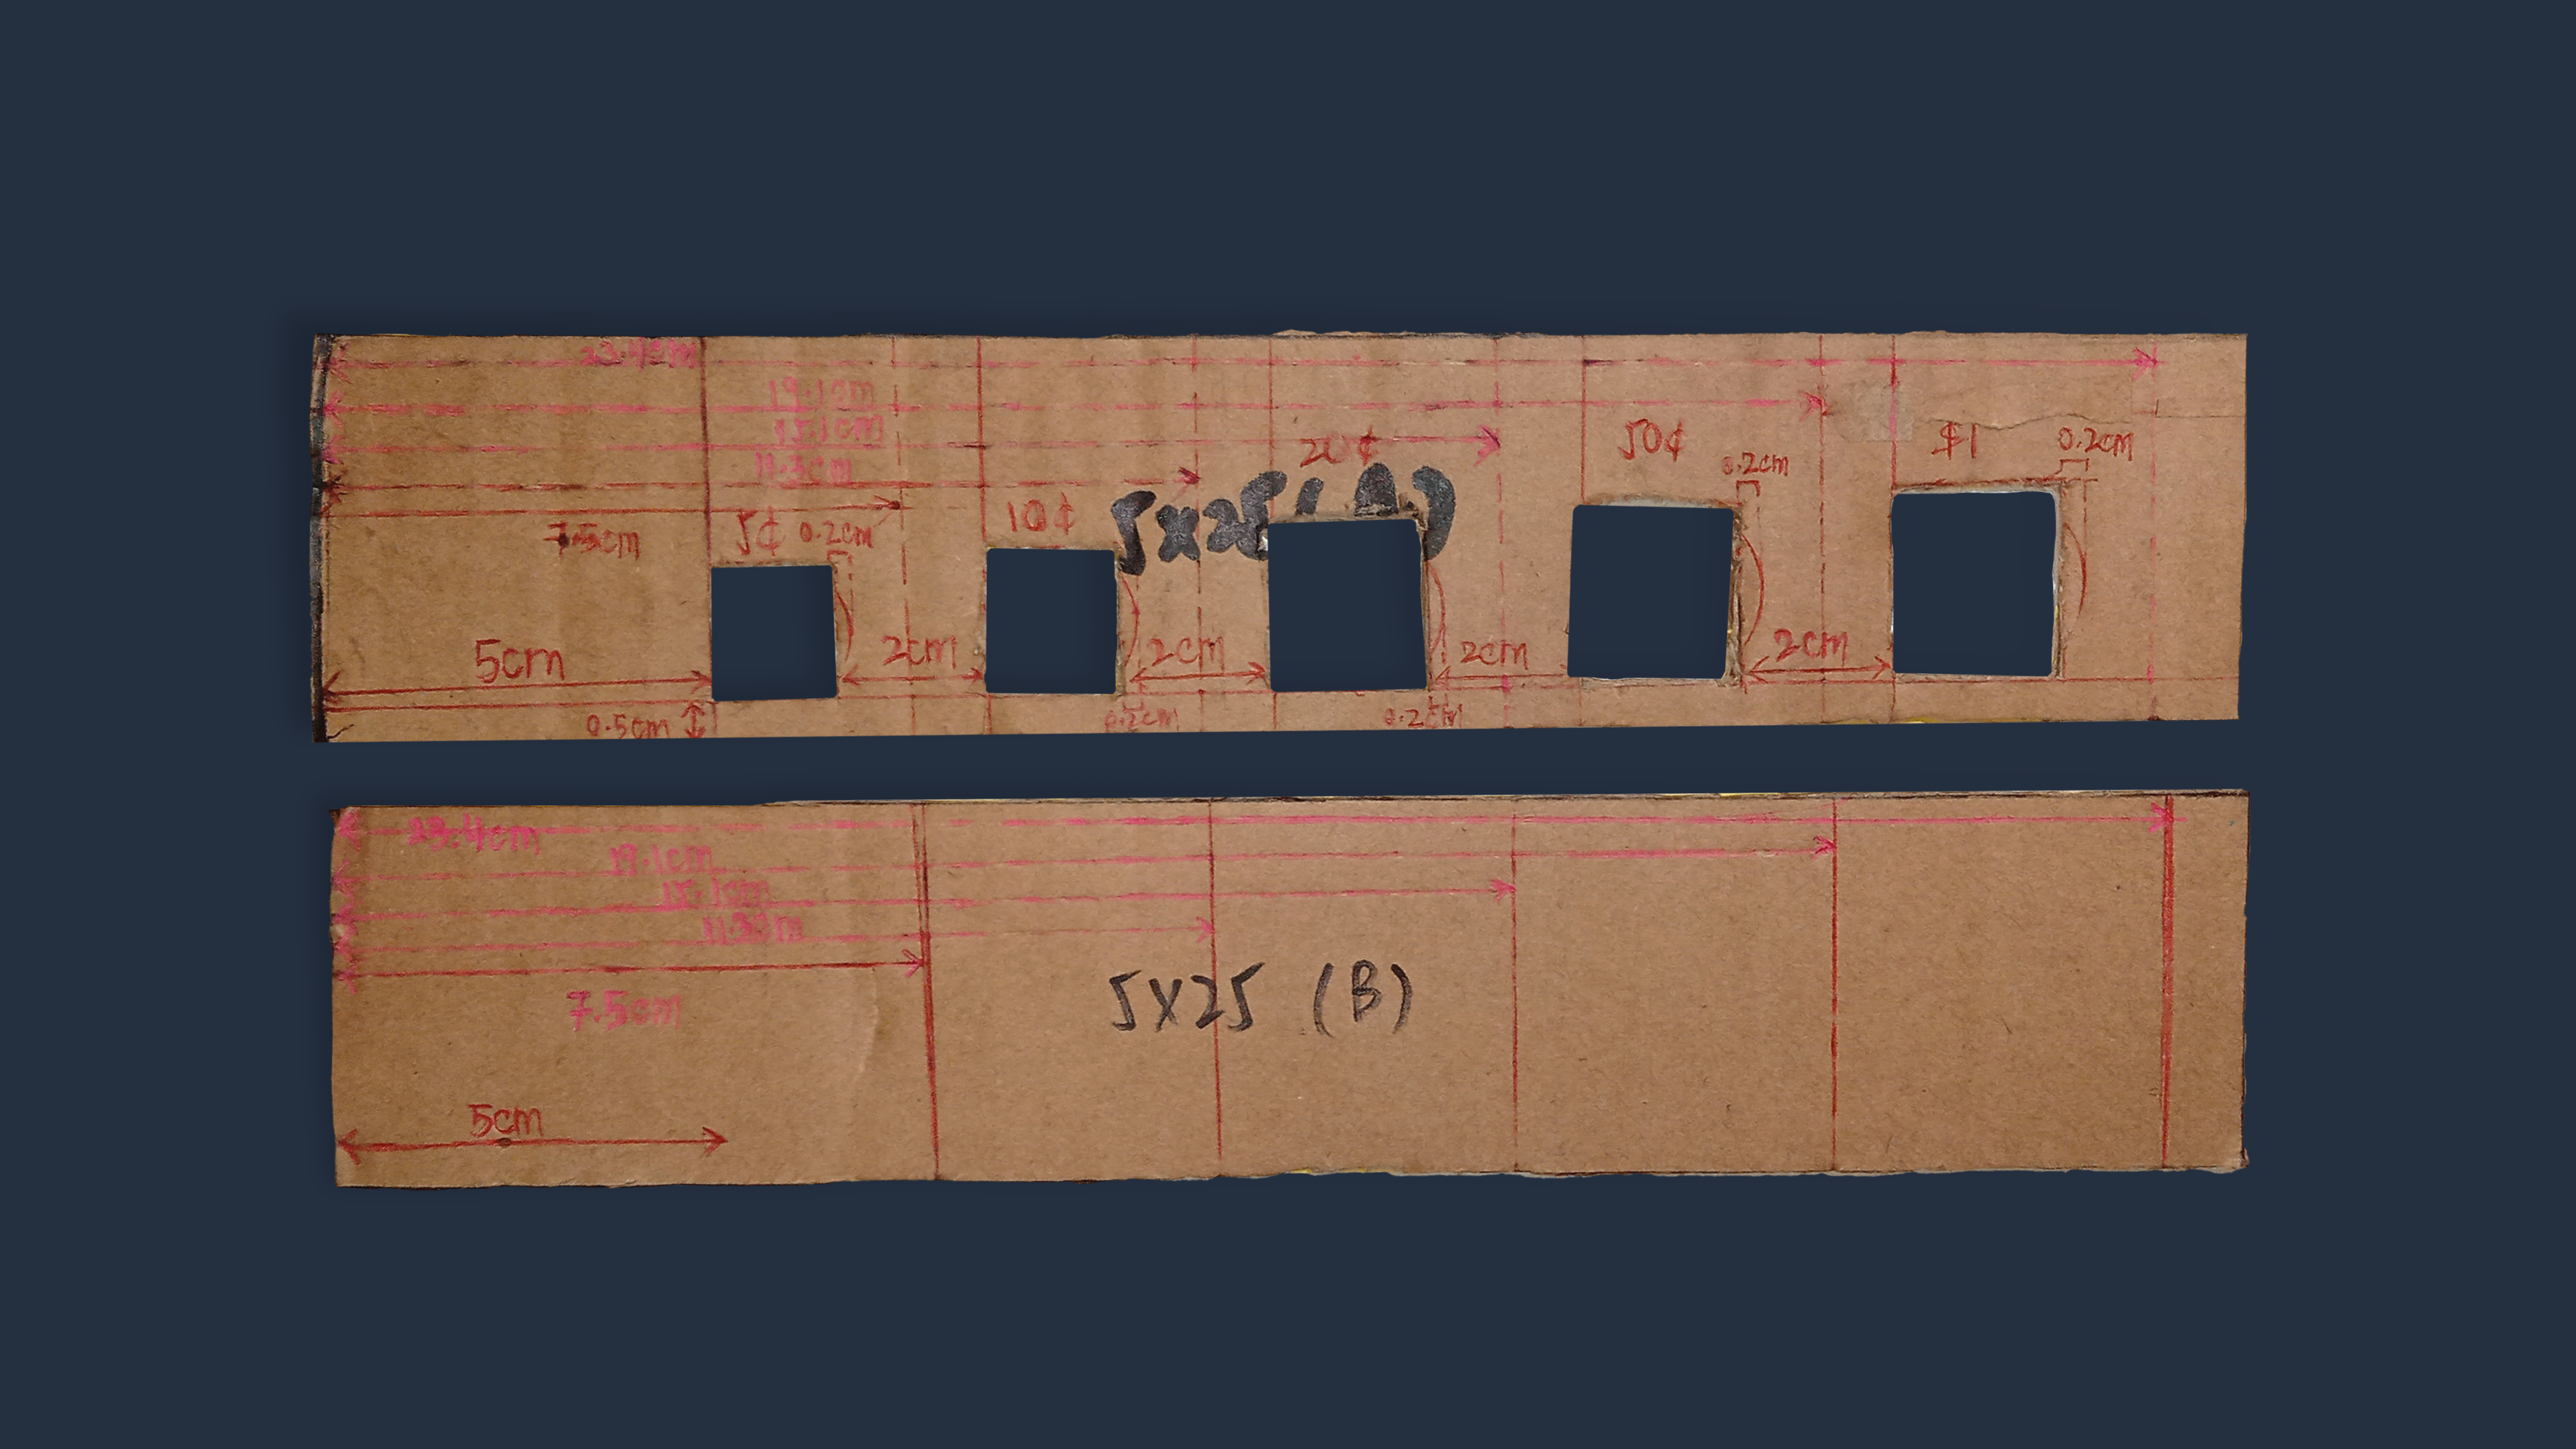
Marking Cardboard B
(a) On the 5x25cm cardboard (A), measure and write down the distance from left edge of the cardboard to the middle of each of the 2cm gaps.
(b) Taking these measurements, draw reference lines on the other piece of 5x25cm cardboard (B) accordingly.
Materials
- Cardboard A
- Cardboard B
- Ruler
- Marker / Pen
STEP 6
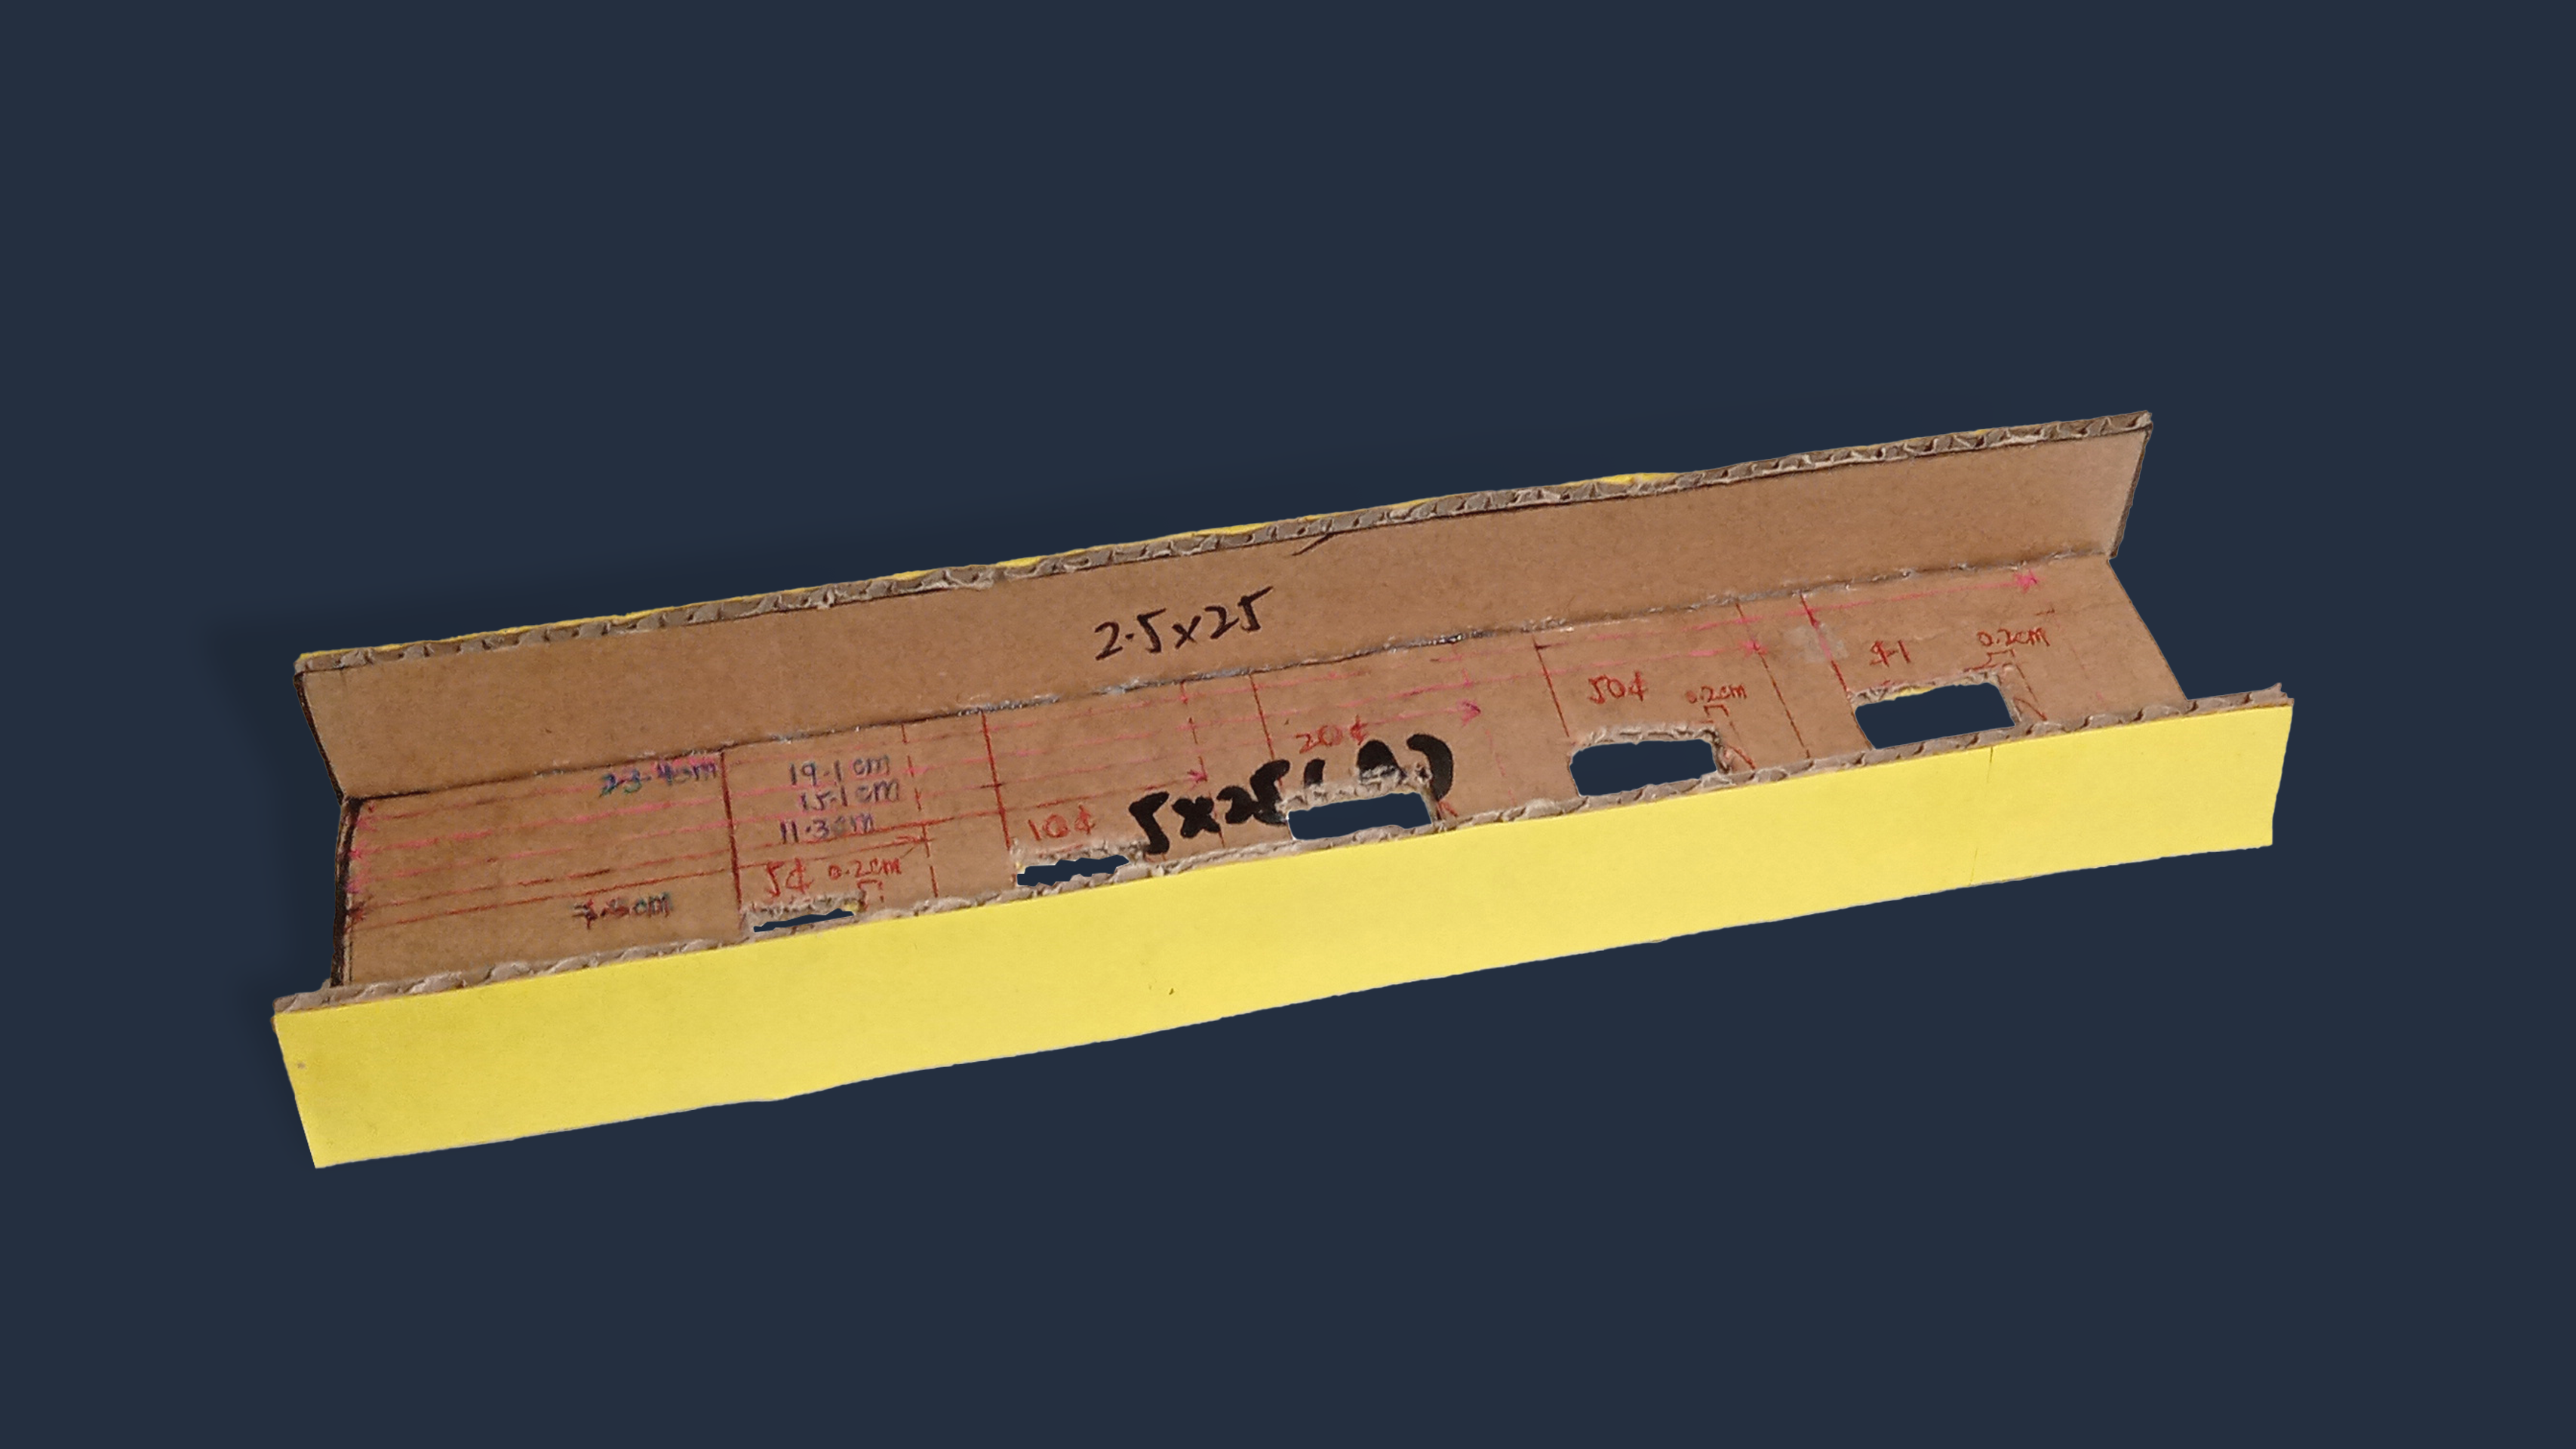
Taping cardboard sides to cardboard A
(a) Paste the two 2.5x25cm pieces of cardboard on to the left and right edges of cardboard A. Make sure to paste them on top of cardboard A, not beside A.
(b) You can also use scotch tape to secure.
Materials
- Cardboard A
- two 2.5x25cm pieces of cardboard
- Scotch tape
STEP 7
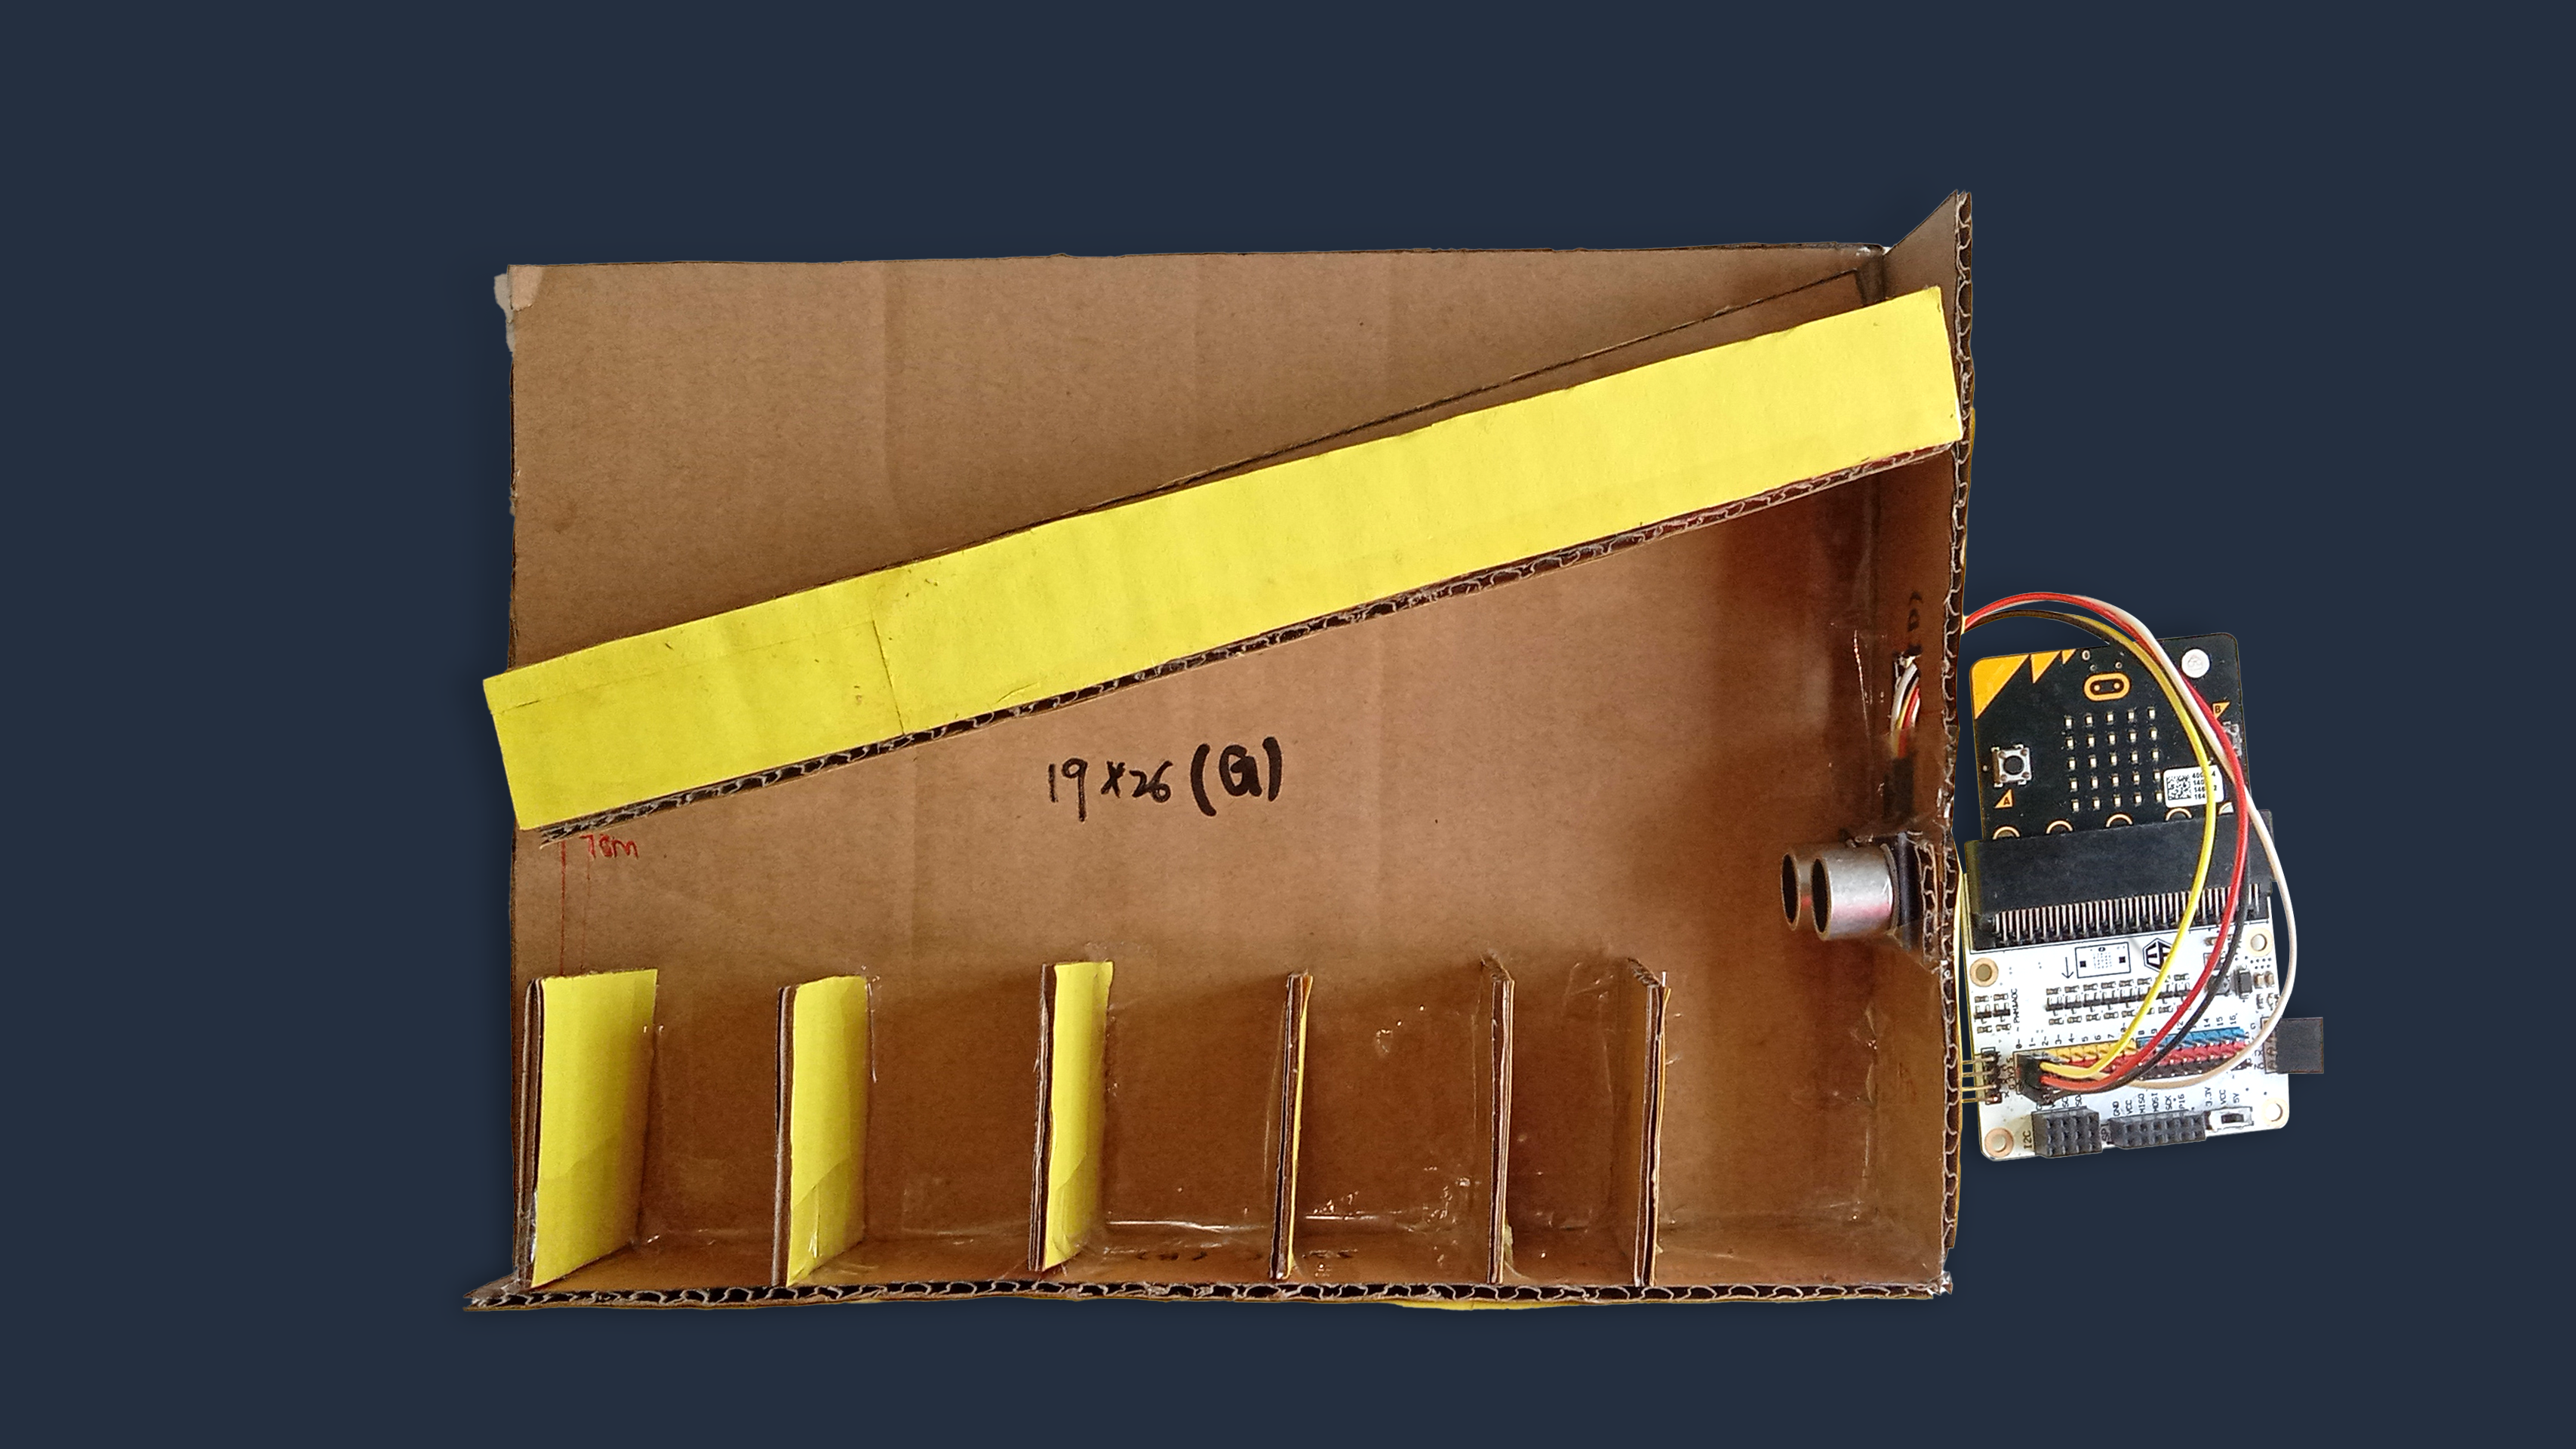
Cardboard C - Front Piece Slot
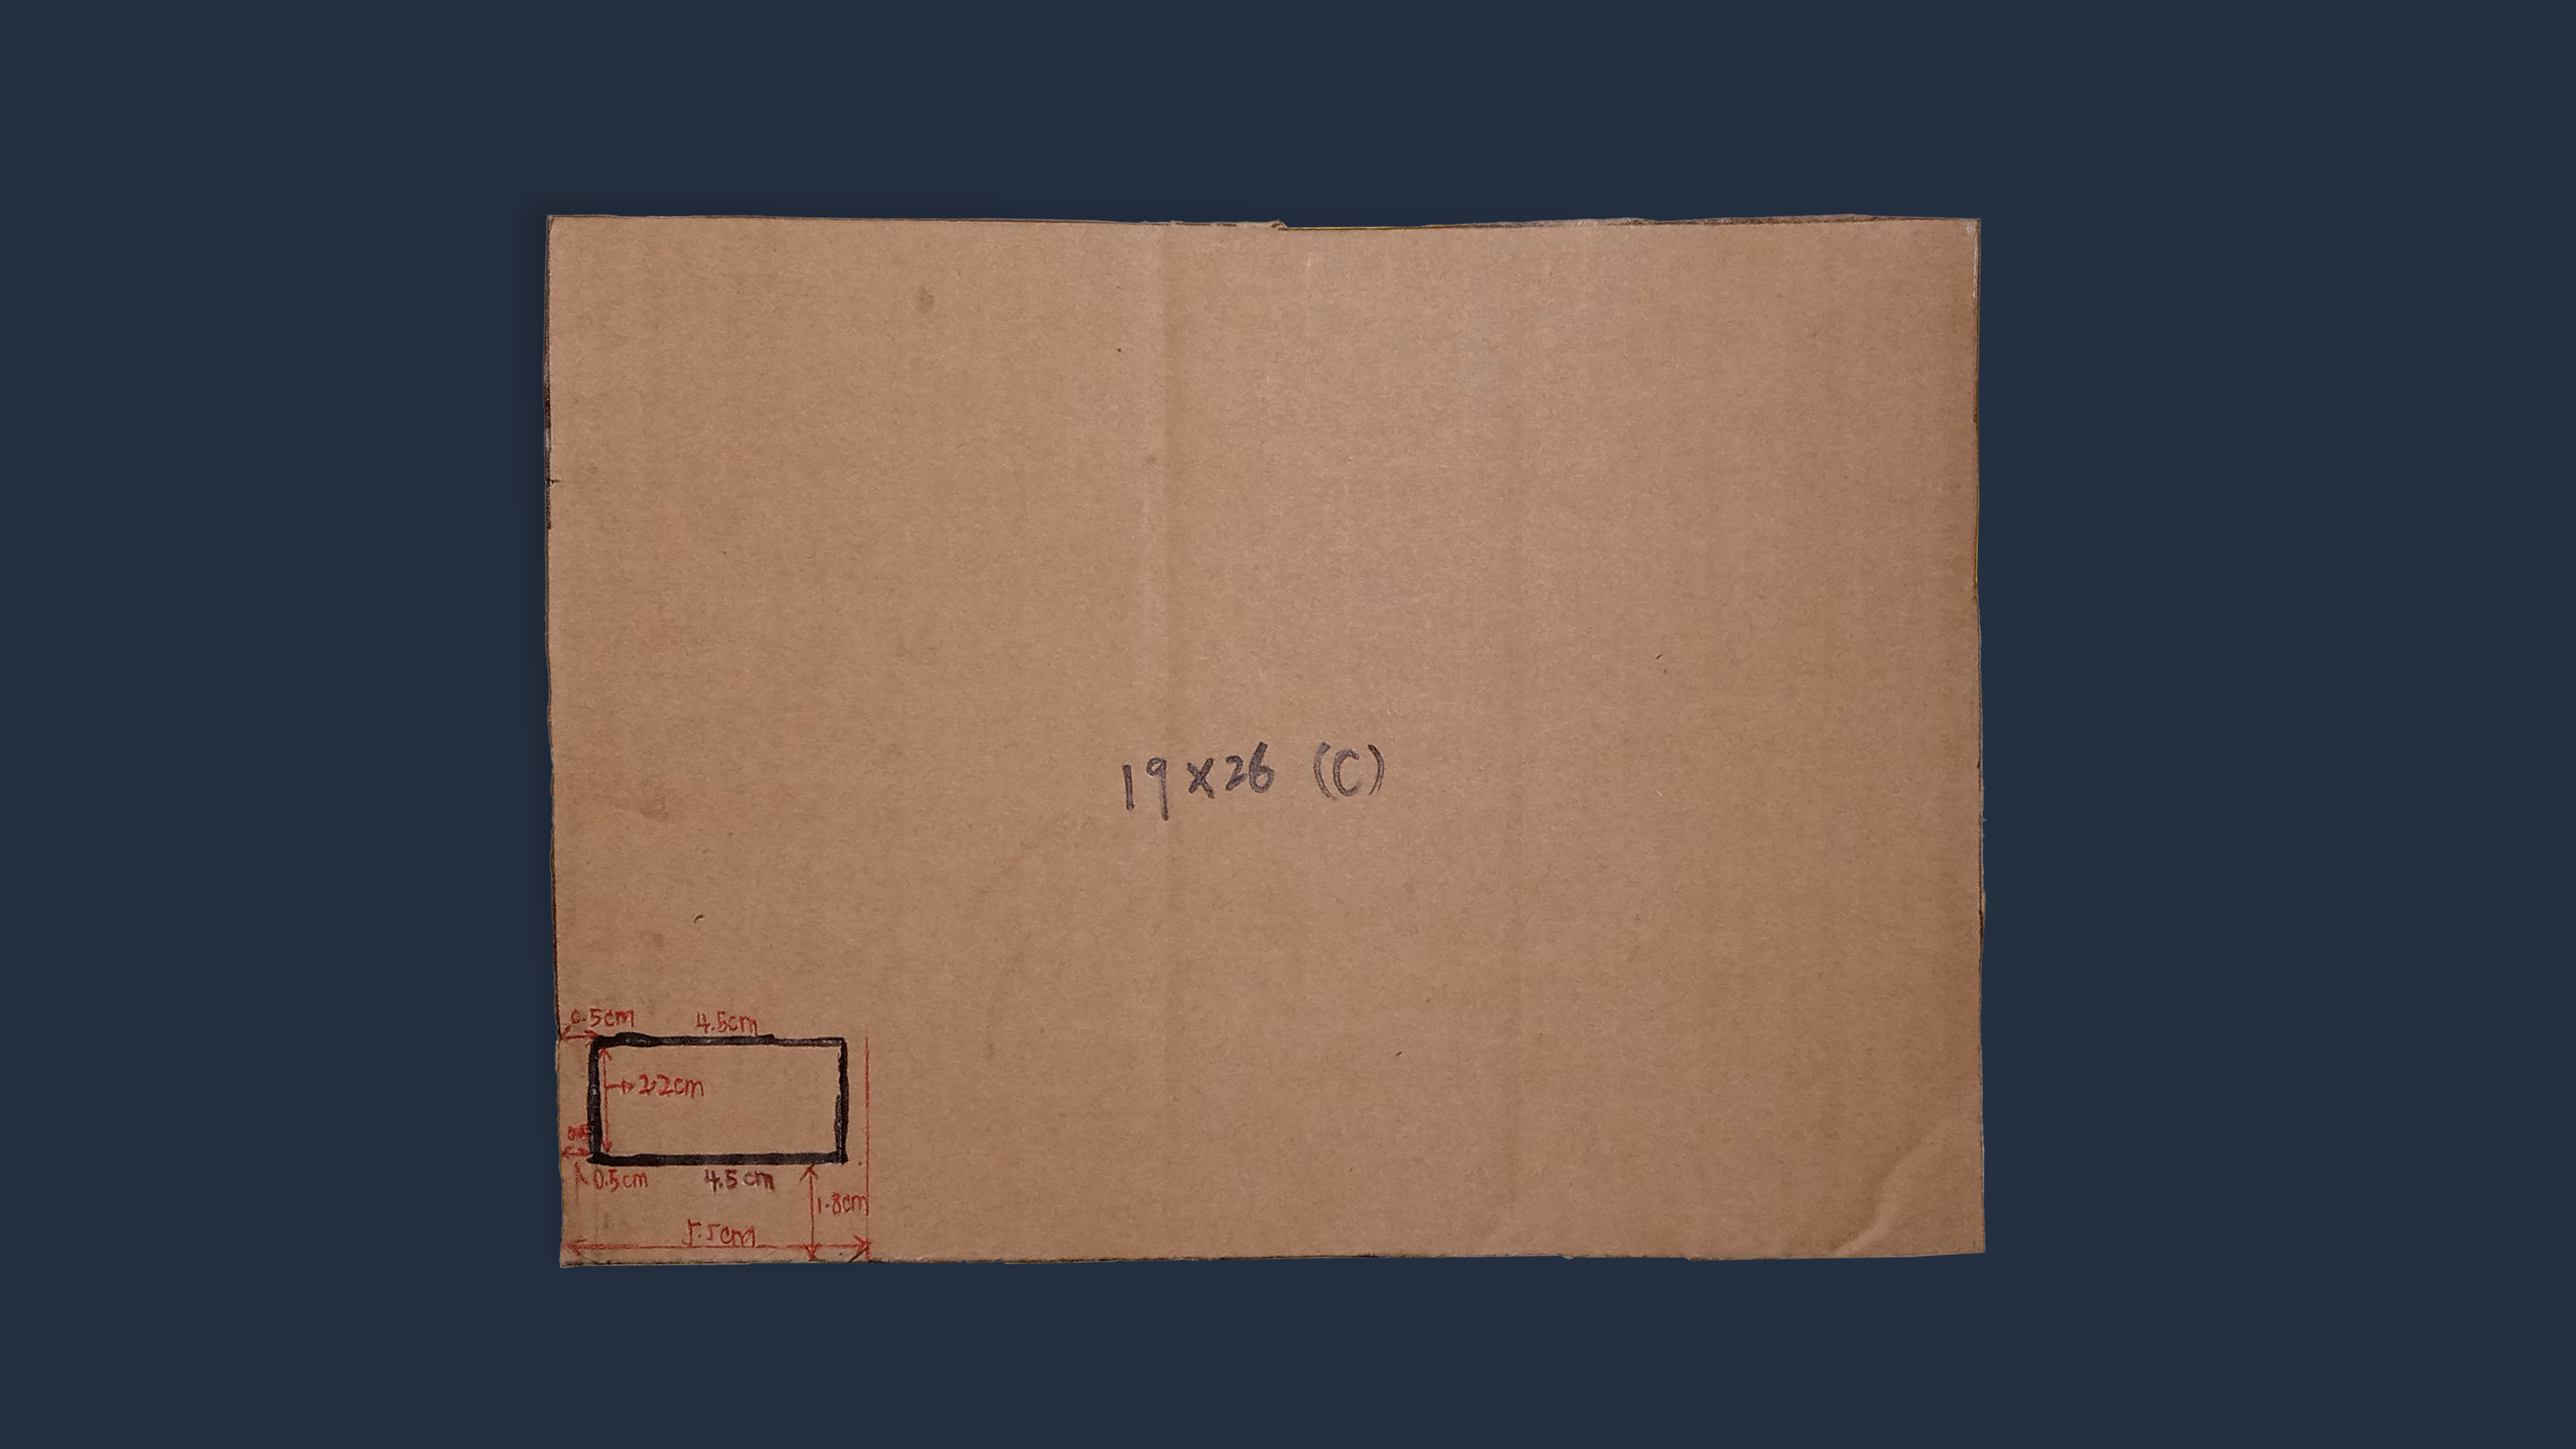
(a) Take a 19x26cm cardboard (C). Again, turn it over to the side with no colour paper.
(b) Draw a horizontal line to mark out 5.5cm from the left bottom corner.
(c) Within the area enclosed by this 5.5cm marking, draw a 2.2cm (height) x 4.5cm (width) rectangle. This rectangle should be 0.5cm away from the left edge of C, and 1.8cm away from the bottom edge of C.
Materials
- Cardboard C (from step 1)
- Marker / Pen
- Ruler
STEP 8
Cardboard C - Front Piece
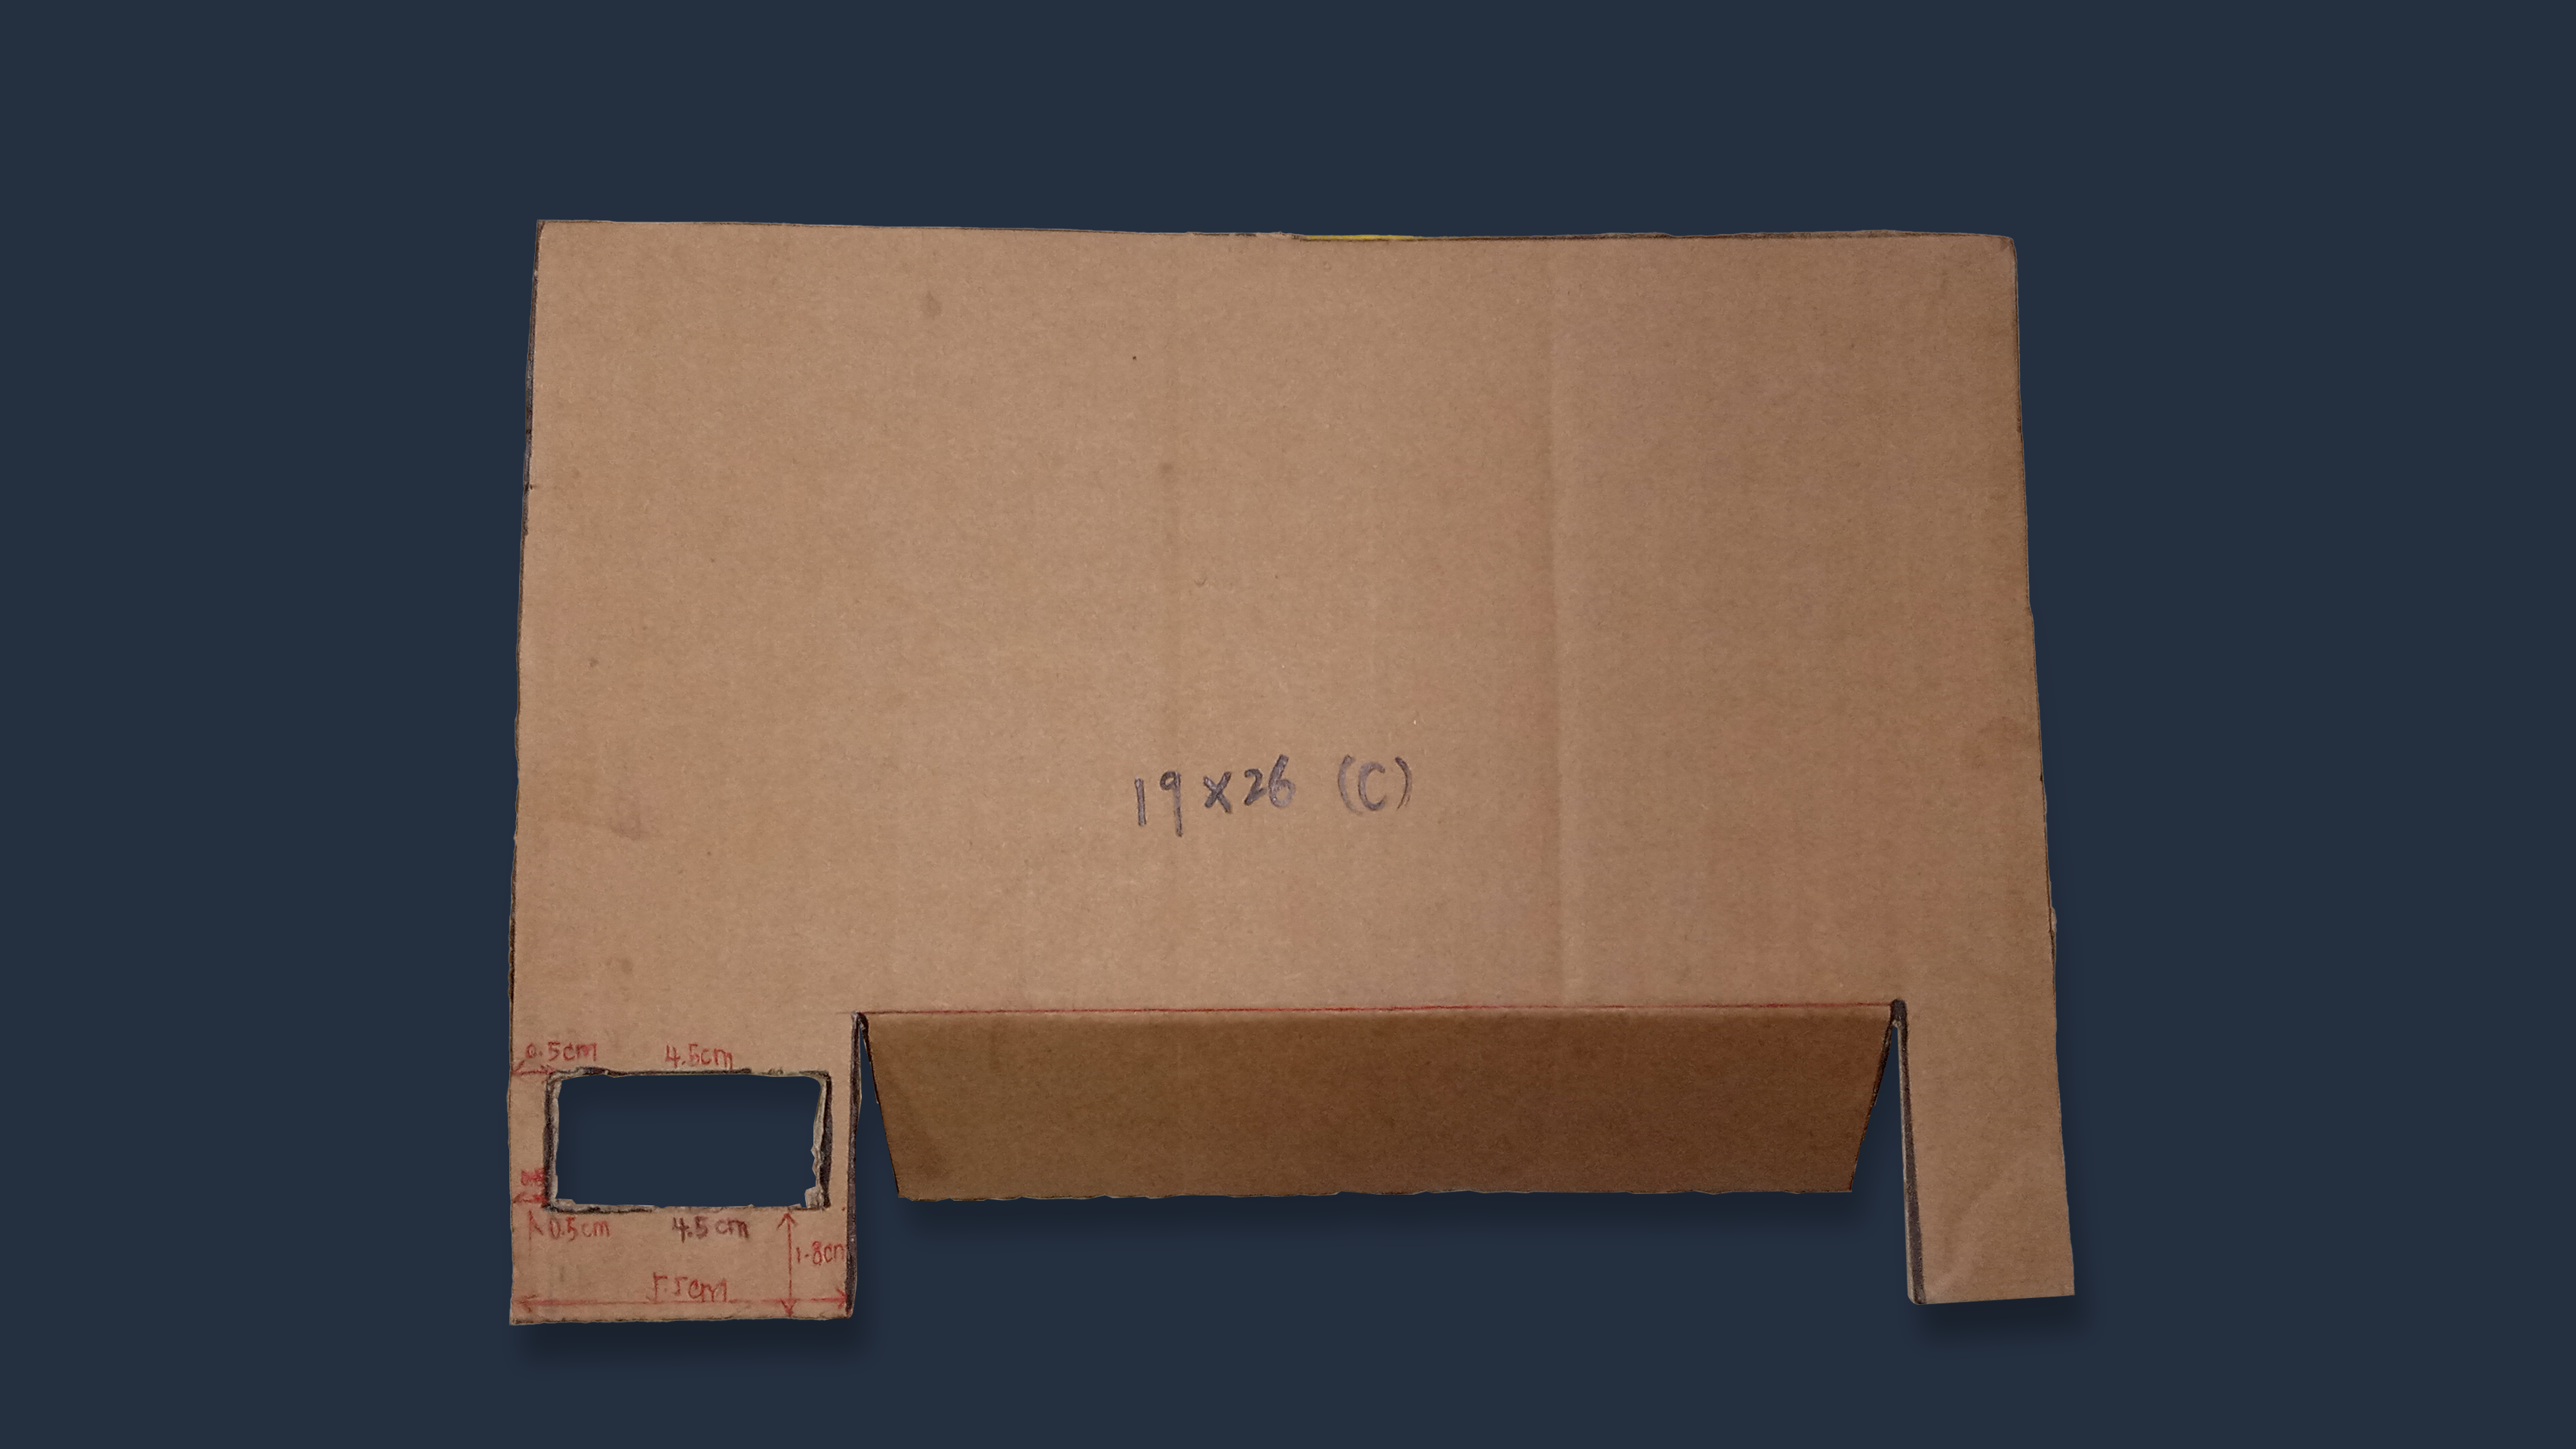
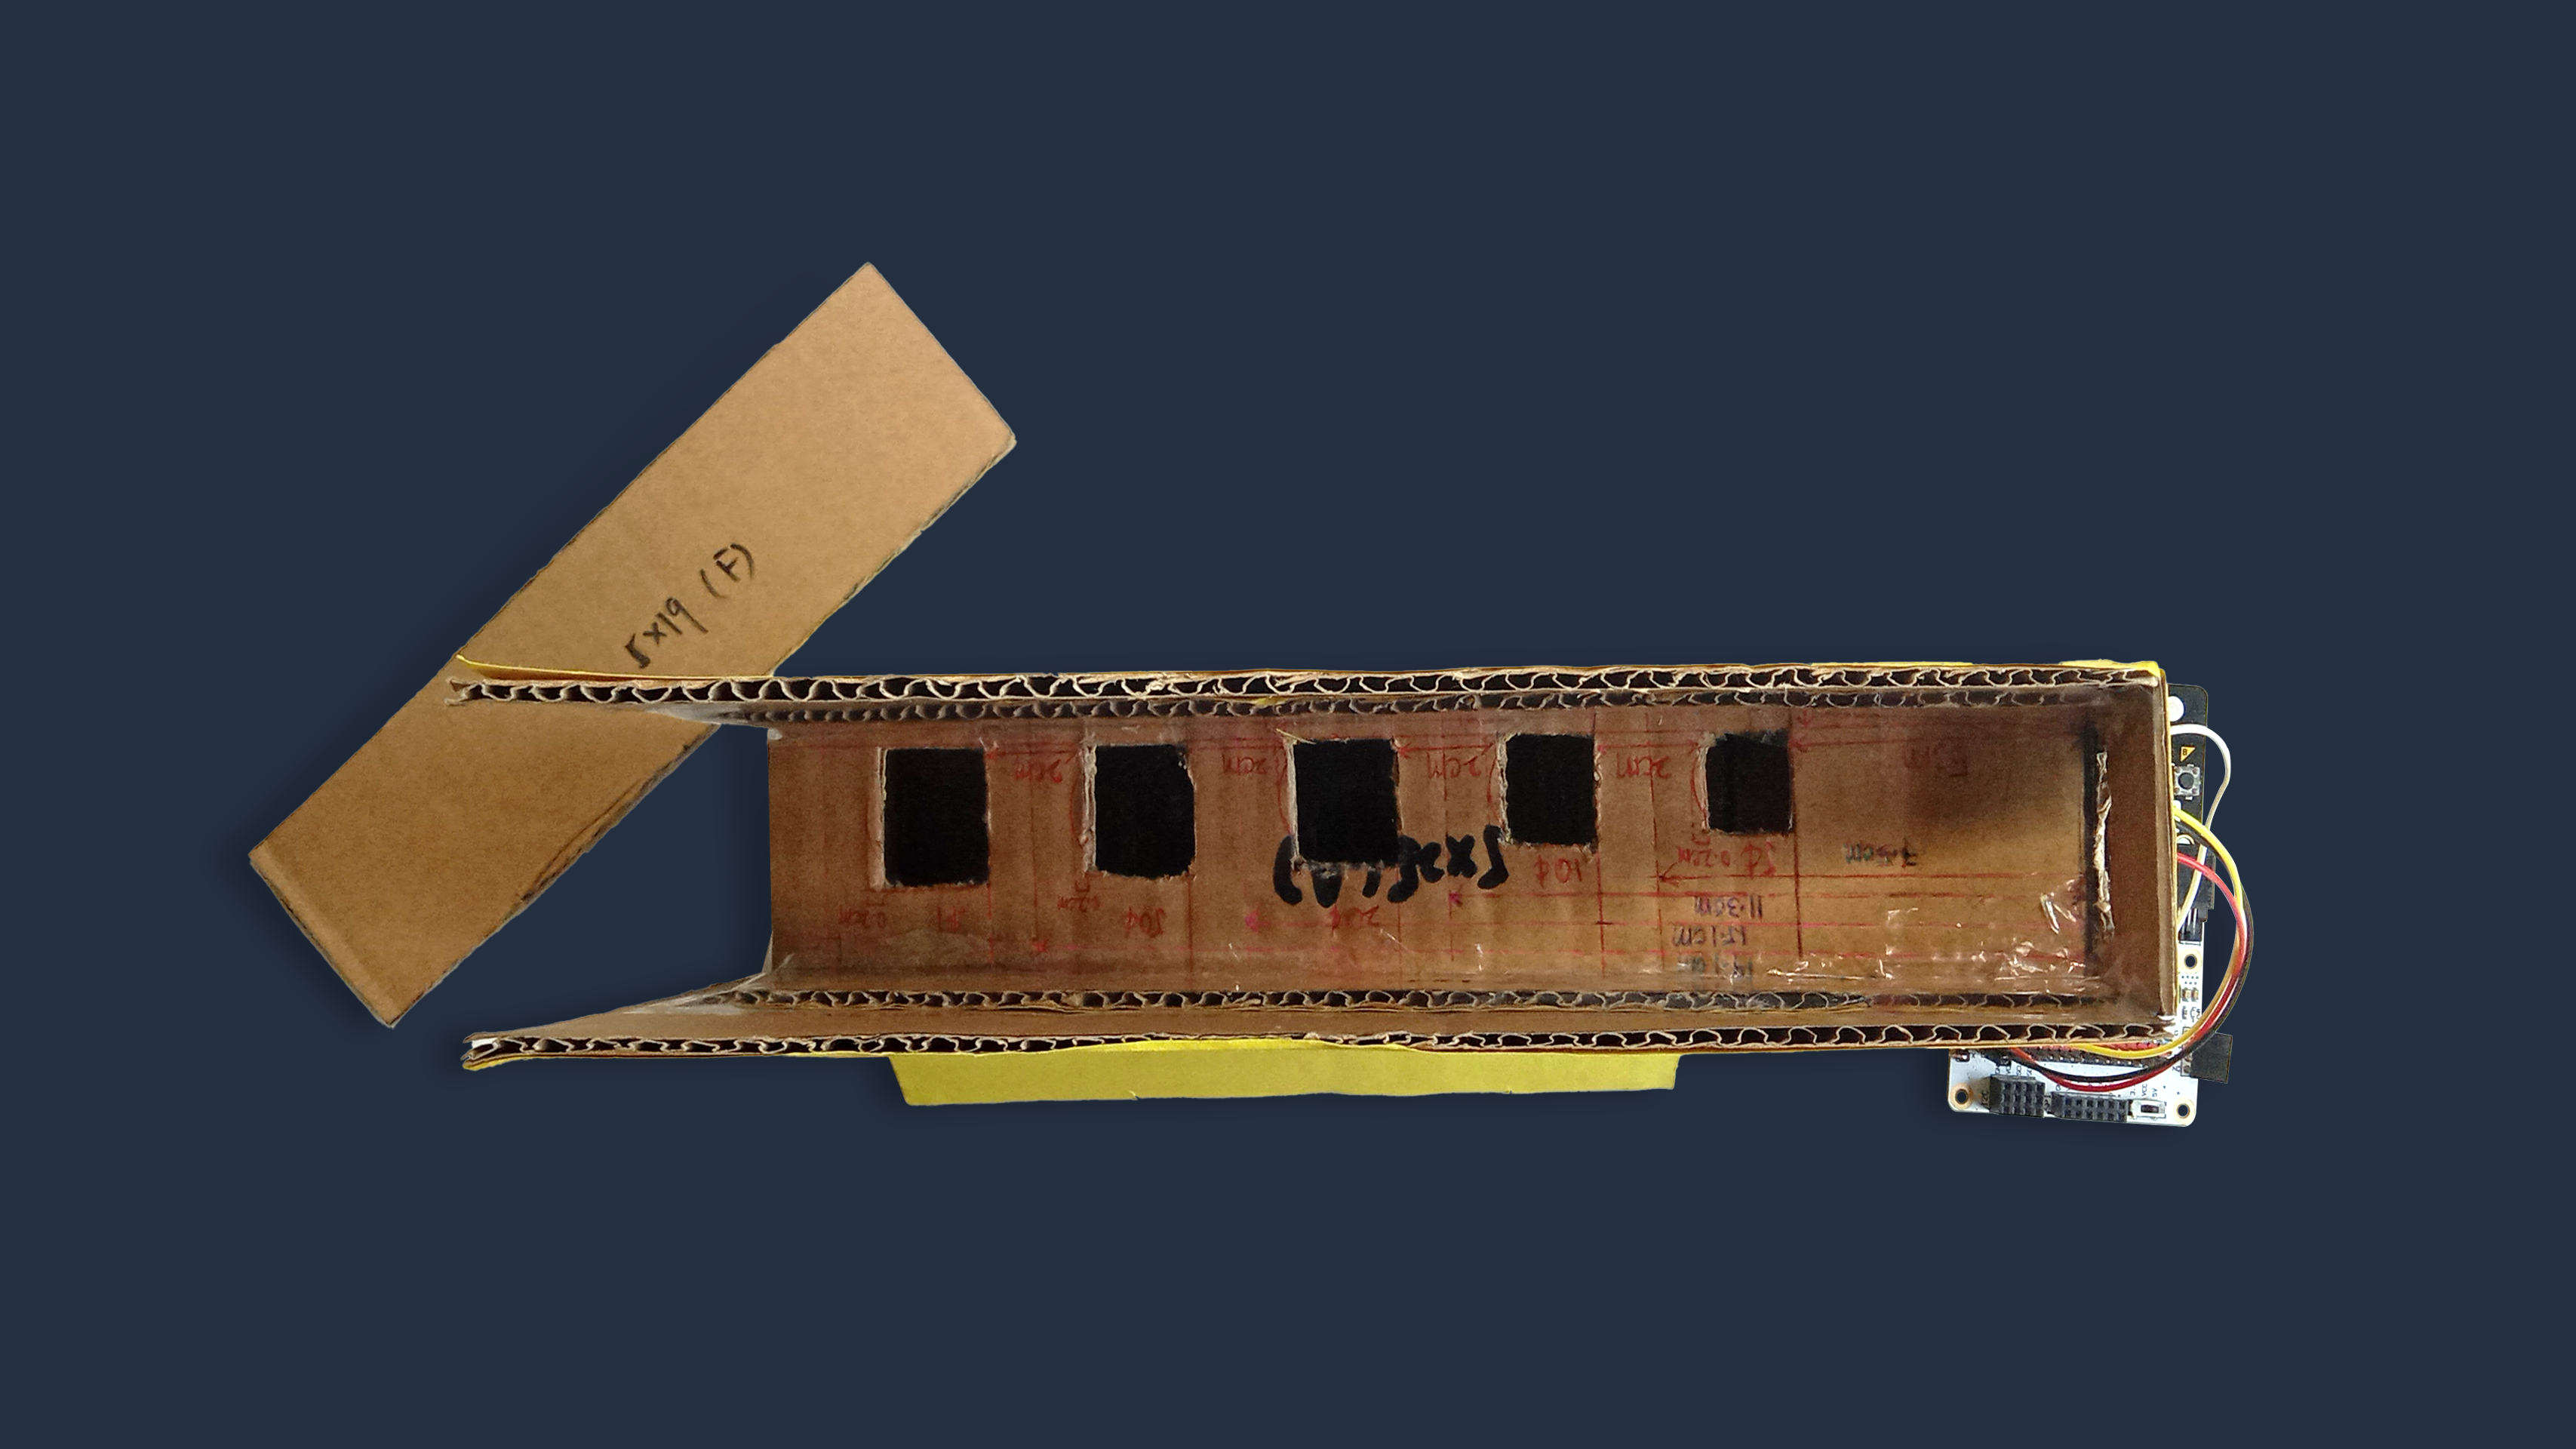
(a) From the 5.5cm marking drawn in step 7, draw a 5cm (height) x 18cm (width) rectangle on C. This will be the door opening of the sorting house.
(b) Cut out the lines on C marked out with the black marker in the picture.
(c) Turn C over to the side with colour paper. Using a ruler, press down the width of the door opening. Bend the 5cm x 18cm rectangle outwards.
(d) If the bottom left corner of C is too flimsy, you can cut out one more rectangular opening like in step 7, and paste it on top of C.
Materials
- Cardboard C (from step 7)
- Penknife
STEP 9

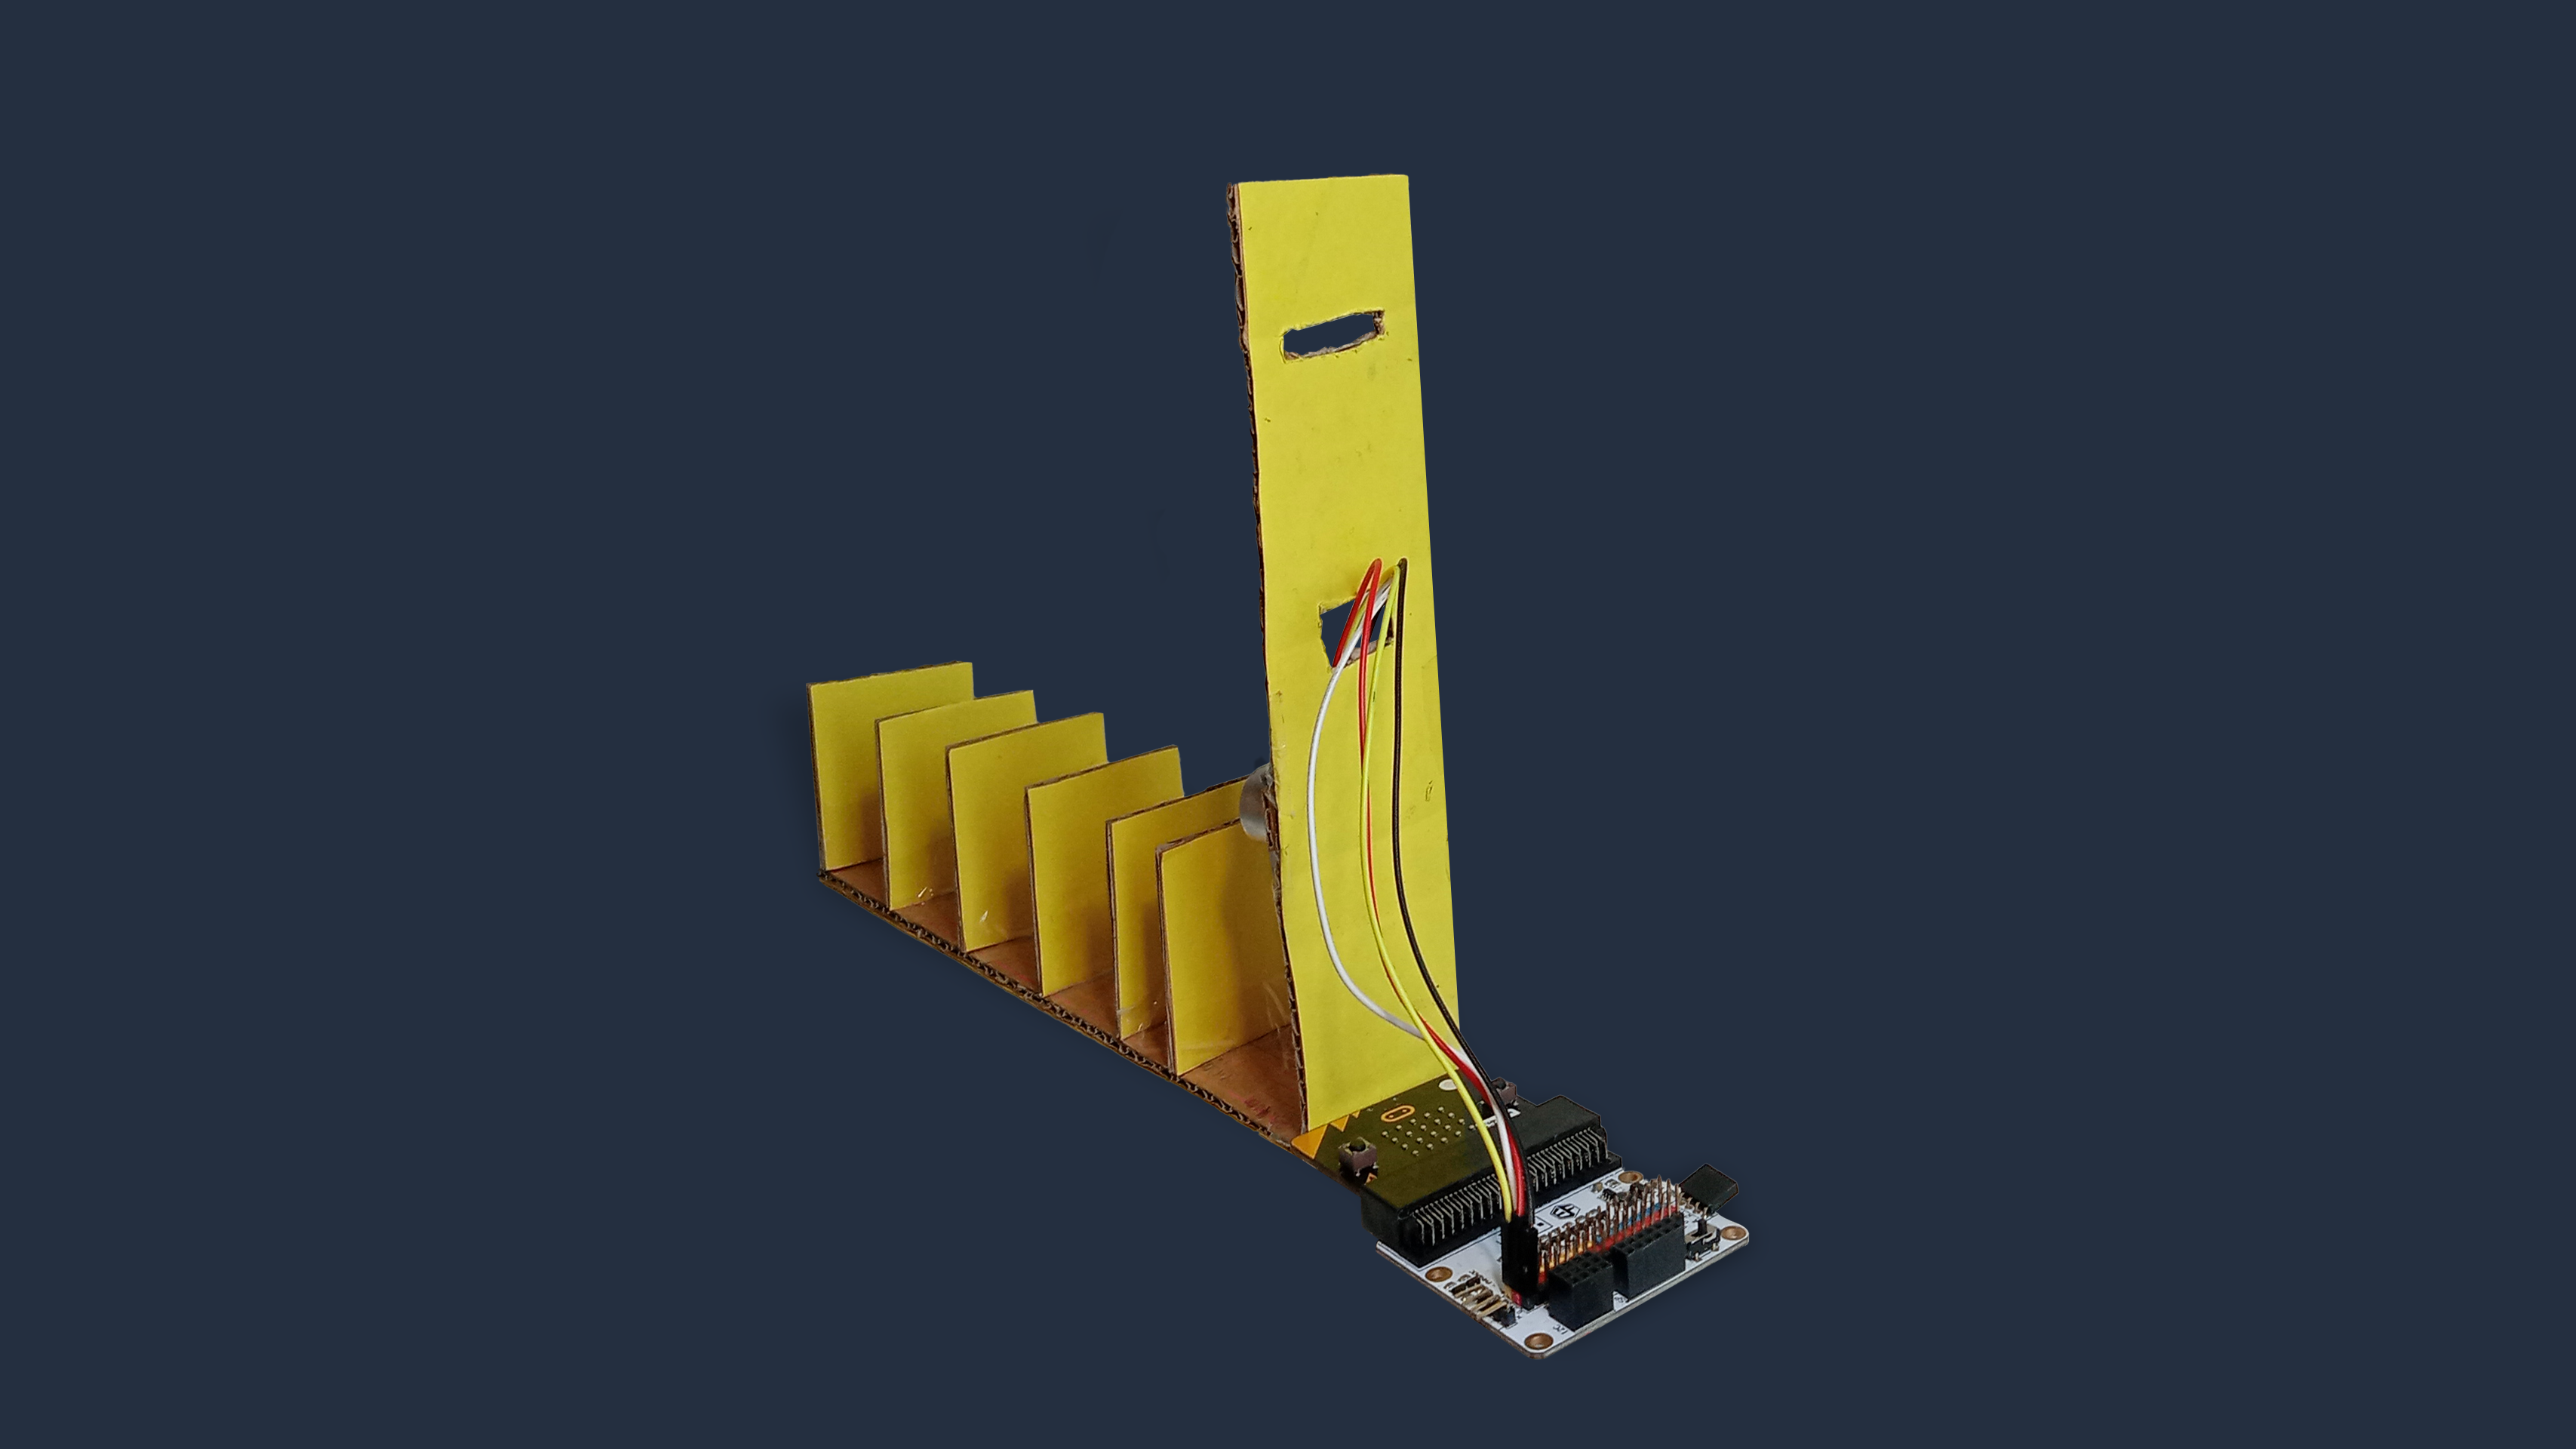
Cardboard D - Side Piece
(a) Take a 5x19cm cardboard (D), and turn it over to the side without colour paper.
(b) Measure 16cm vertically up from the bottom of D, and draw a 0.3cm (height) x 3cm (width) rectangle in the centre. This will be the coin slot later.
(c) Measure 10cm vertically up from the bottom of D, and draw a 1cm (height) x 2cm (width) rectangle in the centre. We will stick the ultrasonic sensor wires out from here later.
(d) Cut out the rectangles drawn in (b) and (c).
Materials
- Cardboard D
- Ruler
- Marker / Pen
- Penknife
STEP 10
Setting Up the electronics
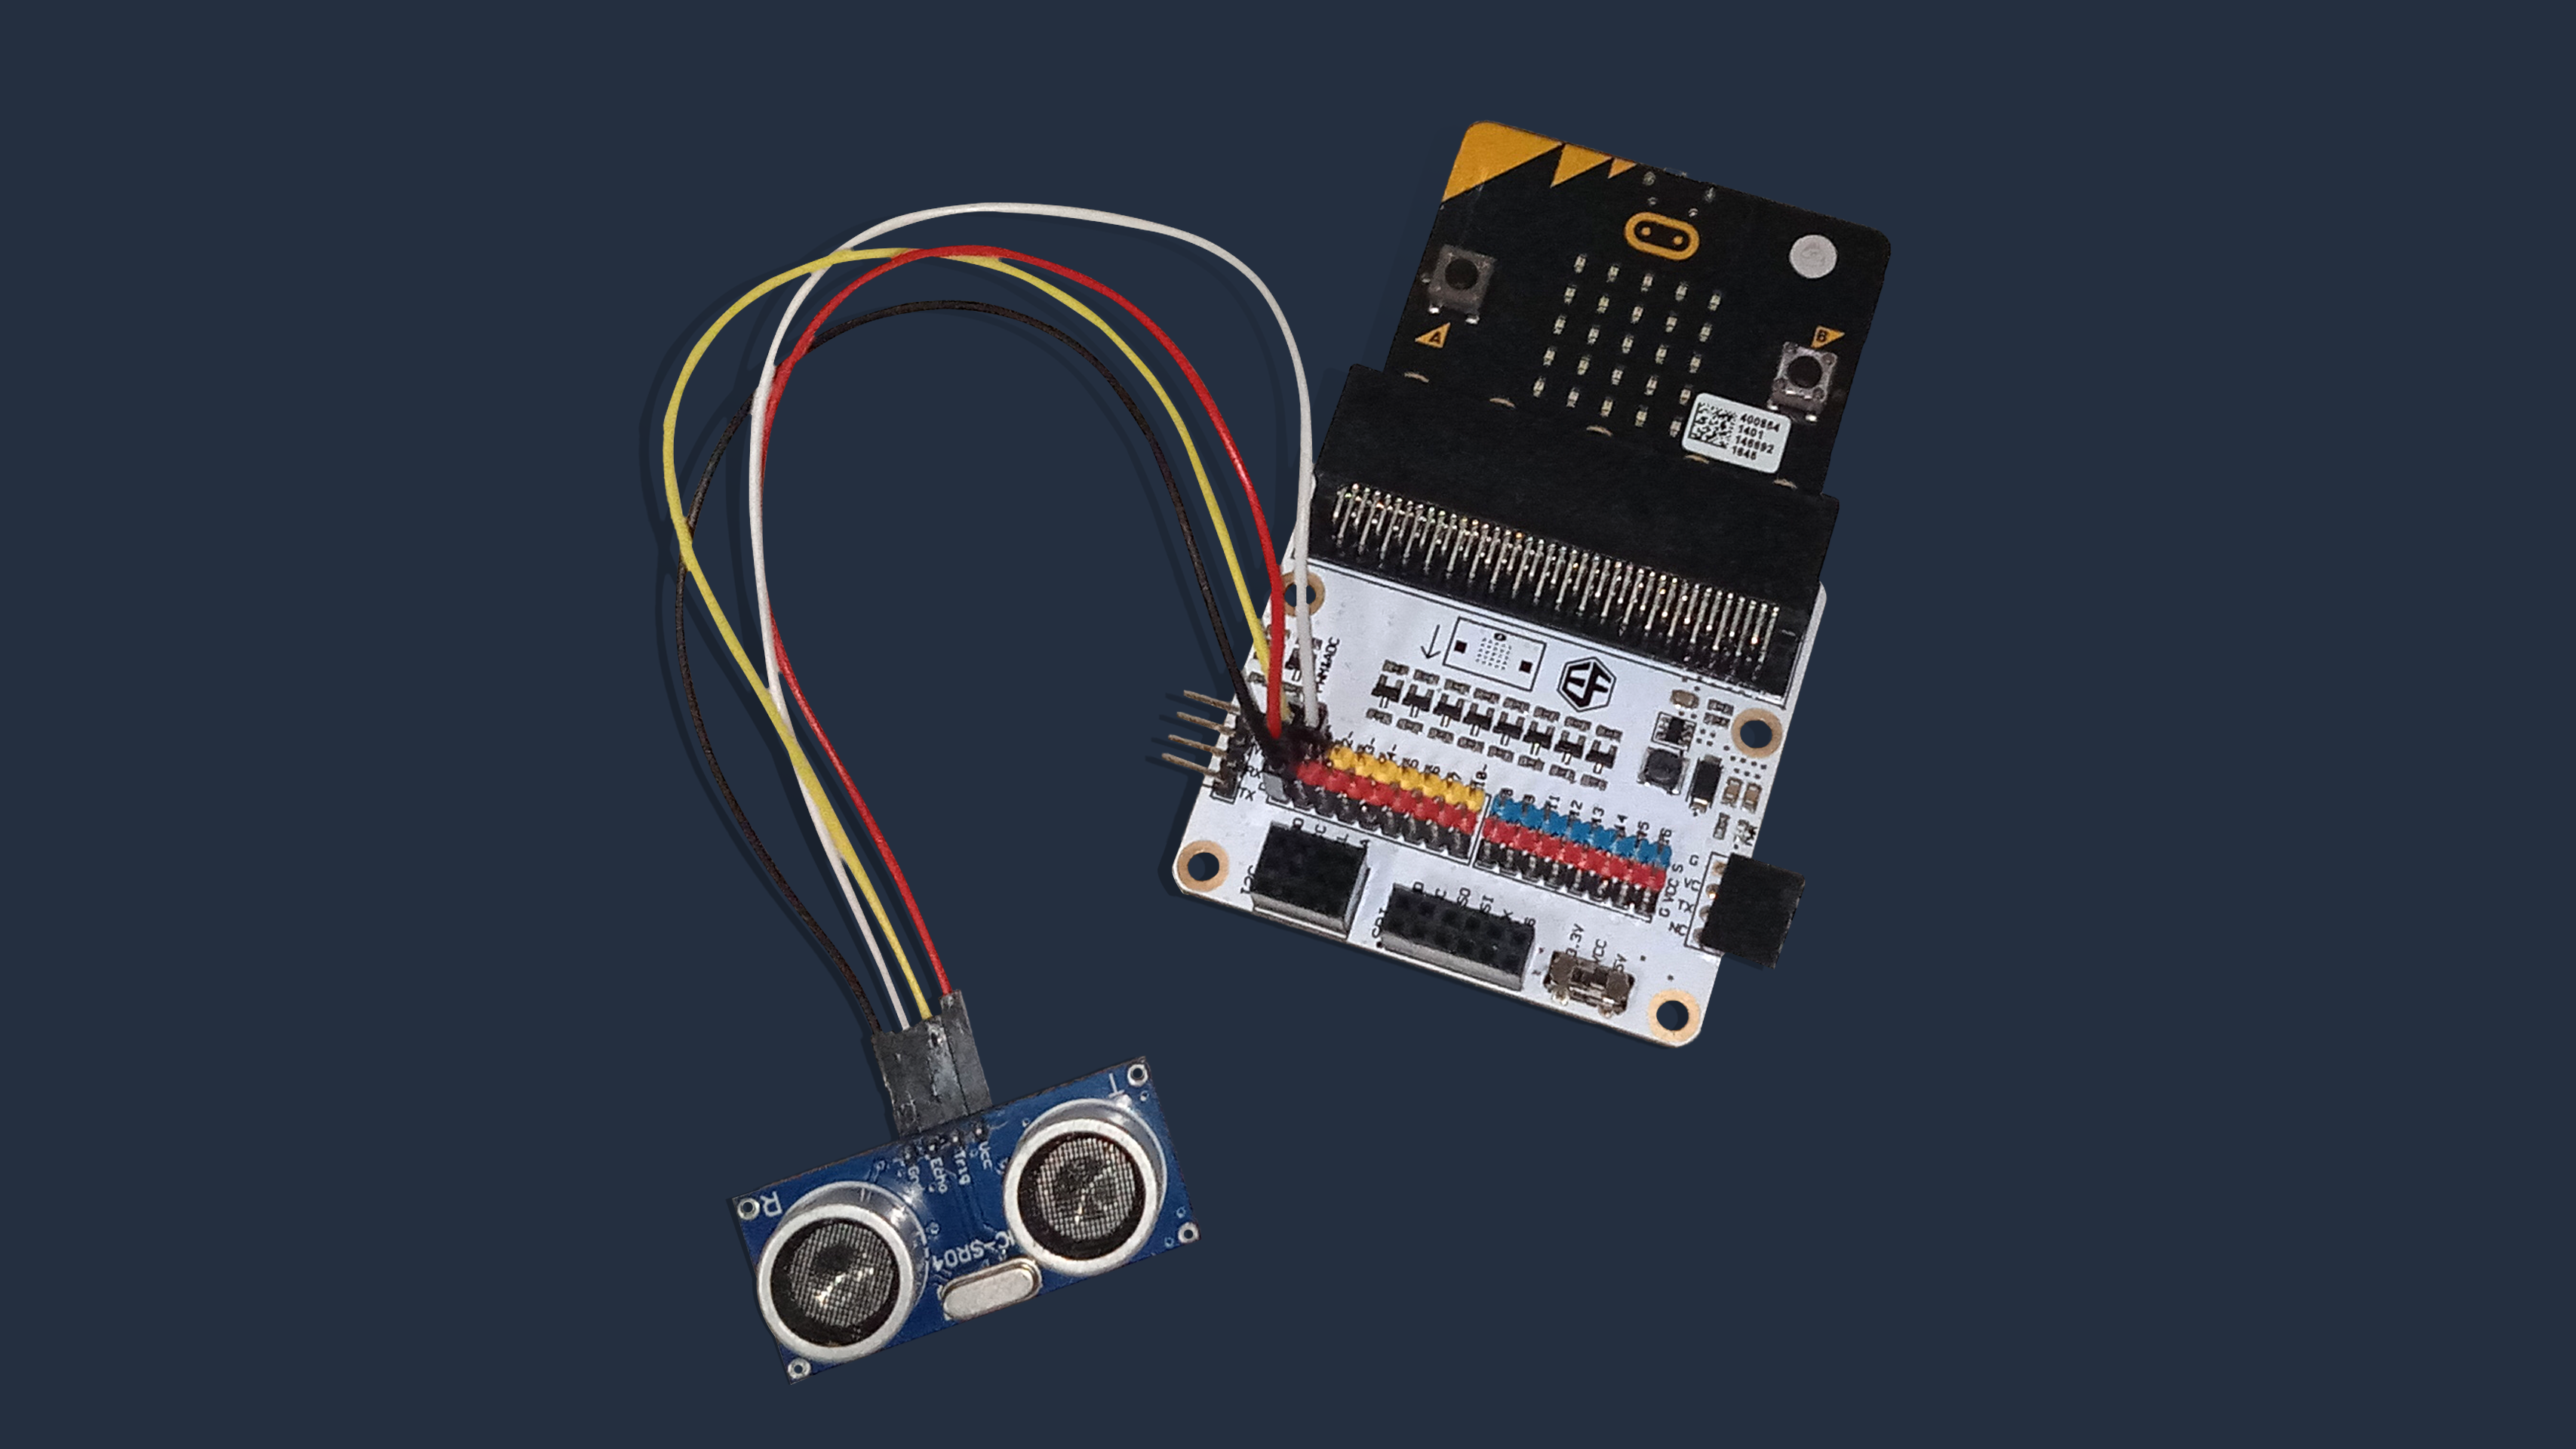
(a) Take the HC-SR04 Ultrasonic Sensor, microbit and the Tinkercademy Breakout Board.
(b) Slot the micro:bit through the top of the Tinkercademy Breakout Board.
(c) Using the F-F jumper wires, connect the ultrasonic sensor to the Tinkercademy Breakout Board.
- TRIG (on ultrasonic sensor) to yellow pin of P0 (on breakout board)
- VCC (on ultrasonic sensor) to red pin of P0 (on breakout board)
- GND (on ultrasonic sensor) to black pin of P0 (on breakout board)
- ECHO (on ultrasonic sensor) to yellow pin of P1 (on breakout board)
(d) Paste the 2x5cm piece of cardboard (E) on the back of the ultrasonic sensor.
Materials
- 1 x Micro:bit
- 1 x Tinkercademy Breakout Board
- 1 x HC-SR04 Ultrasonic Sensor
- 4 x F-F jumper wire
- Cardboard E
STEP 11
Assembling Ultrasonic Sensor
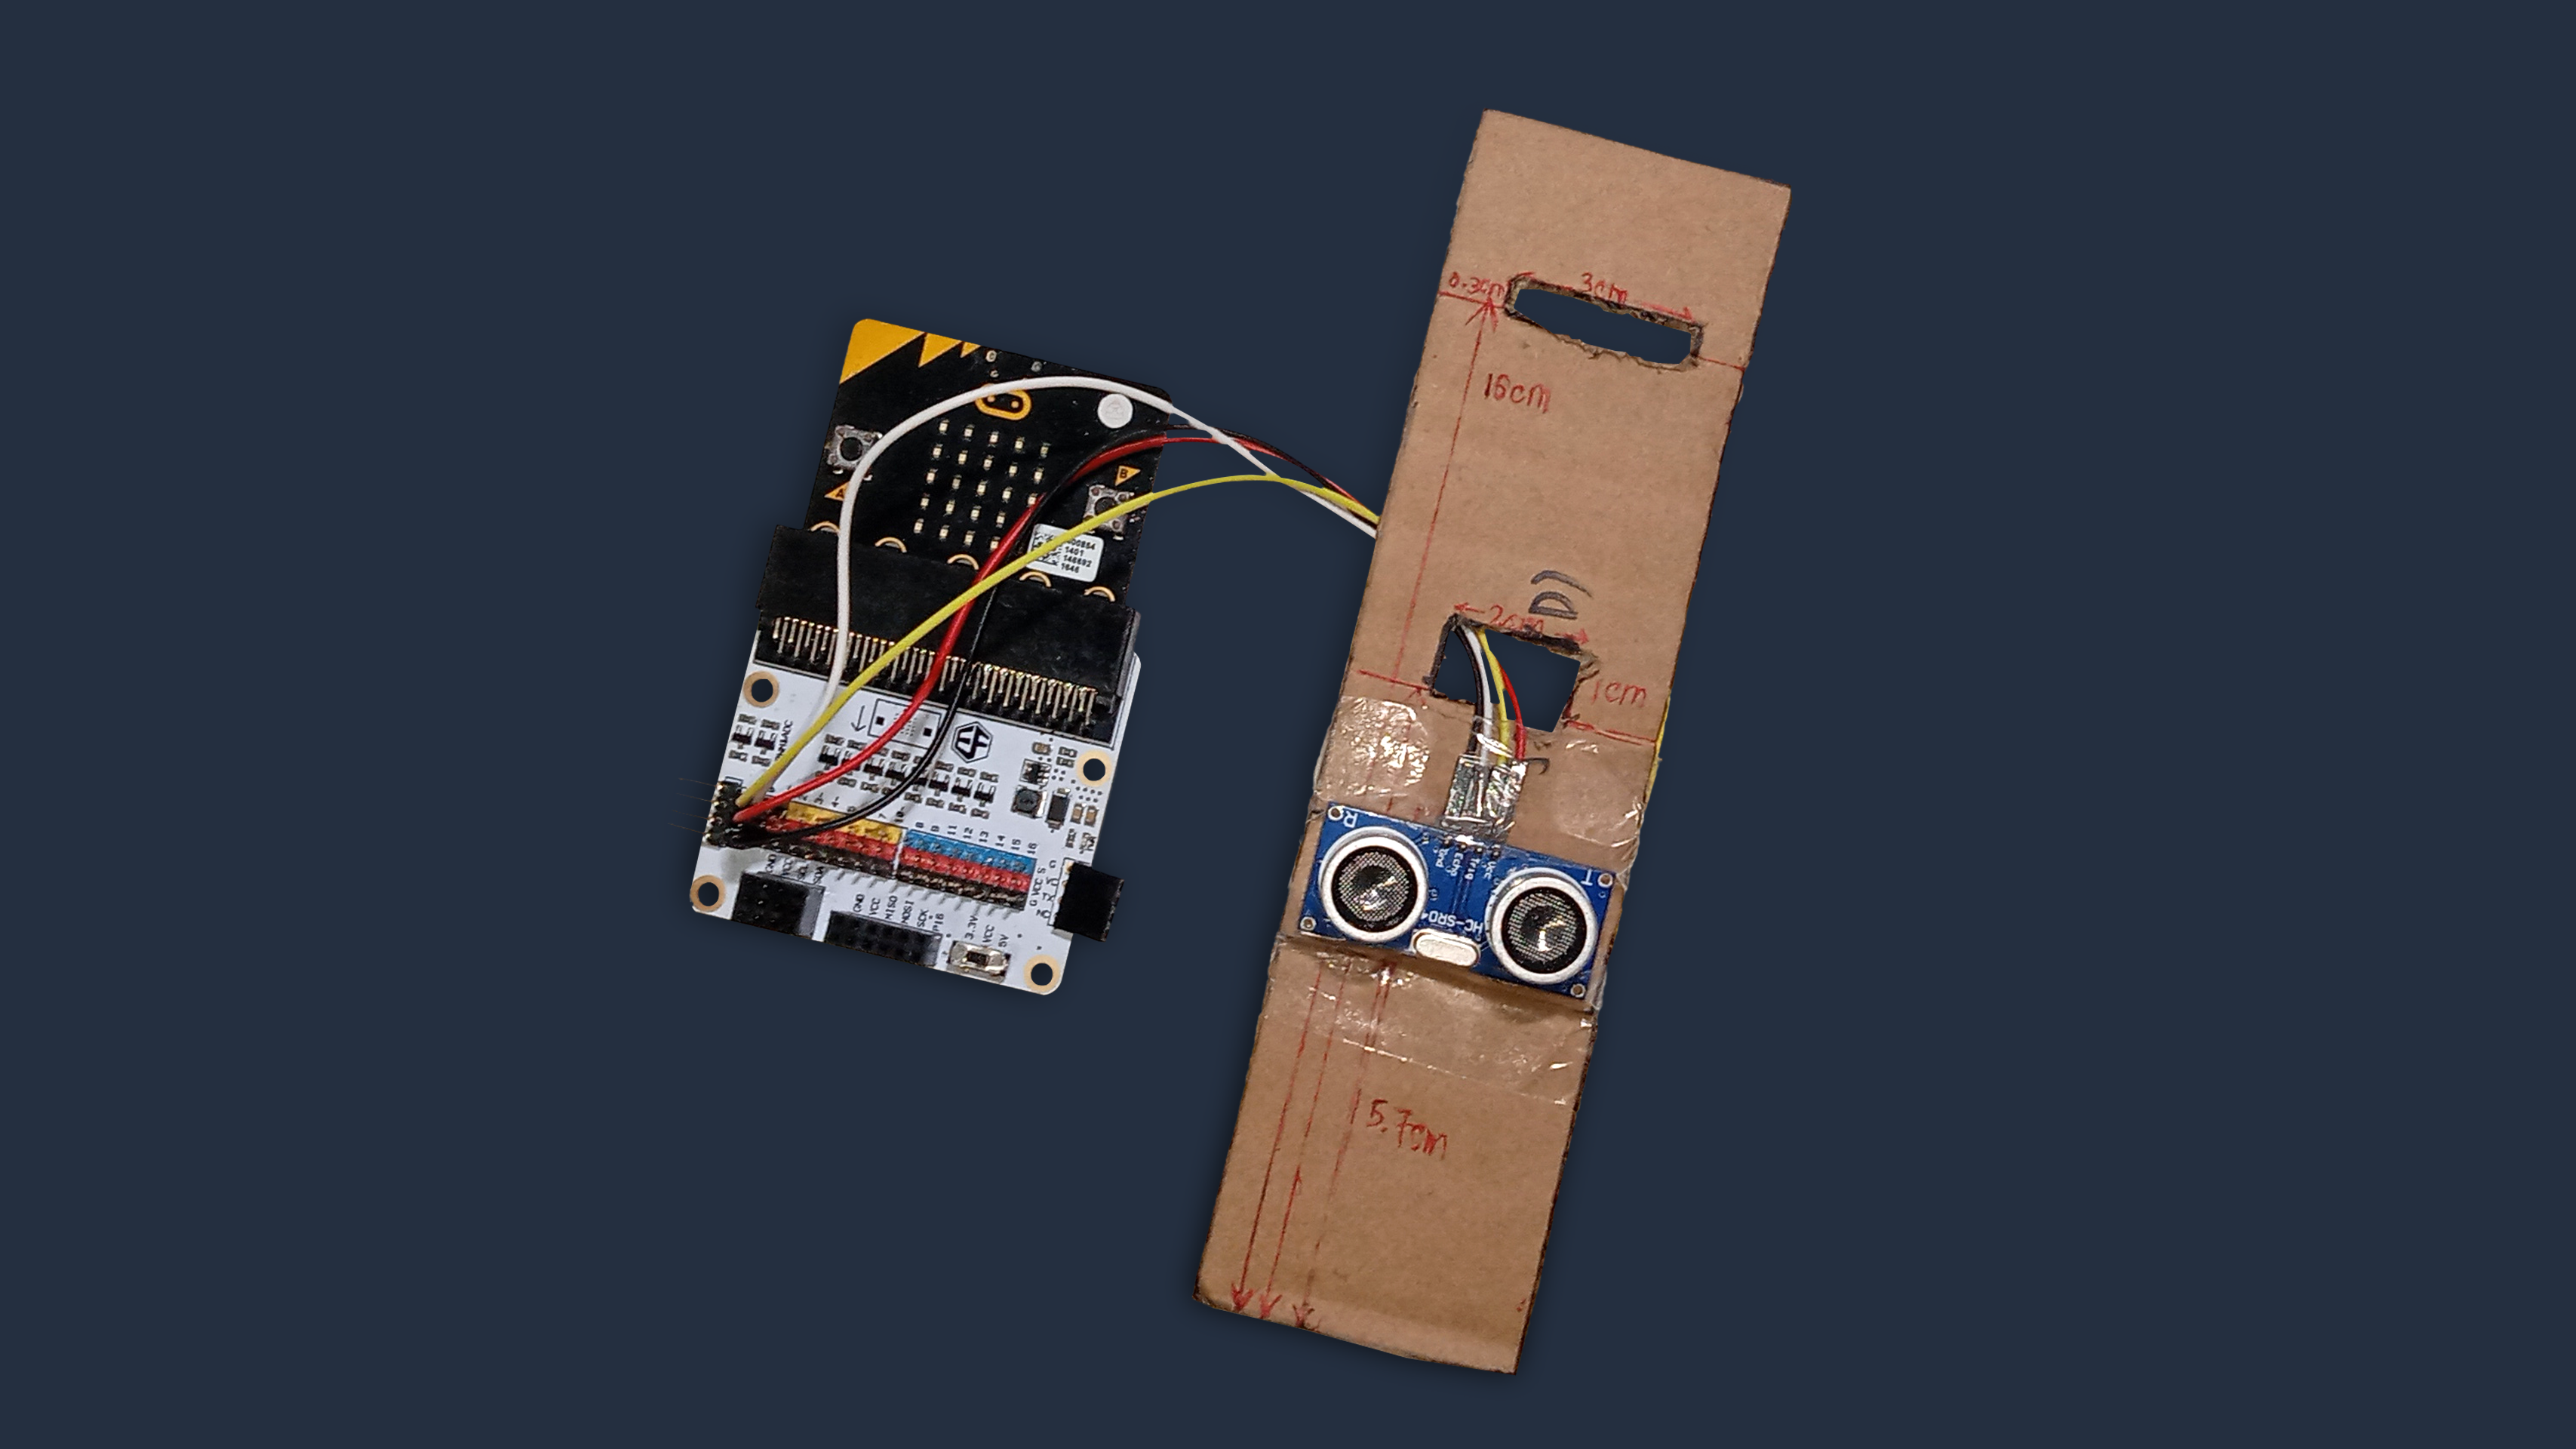
(a) Take the 5x19cm cardboard (D) from step 9.
(b) Thread the F-F jumper wires from the ultrasonic sensor through the 1x2cm opening. The ultrasonic sensor should be on the side of D without colour paper, while the microbit and breakout board should be on the side of D with colour paper.
(c) On the side of D without colour paper, measure 5.7cm vertically up from the bottom. Paste the ultrasonic sensor there.
Materials
- Cardboard D (from Step 9)
STEP 12
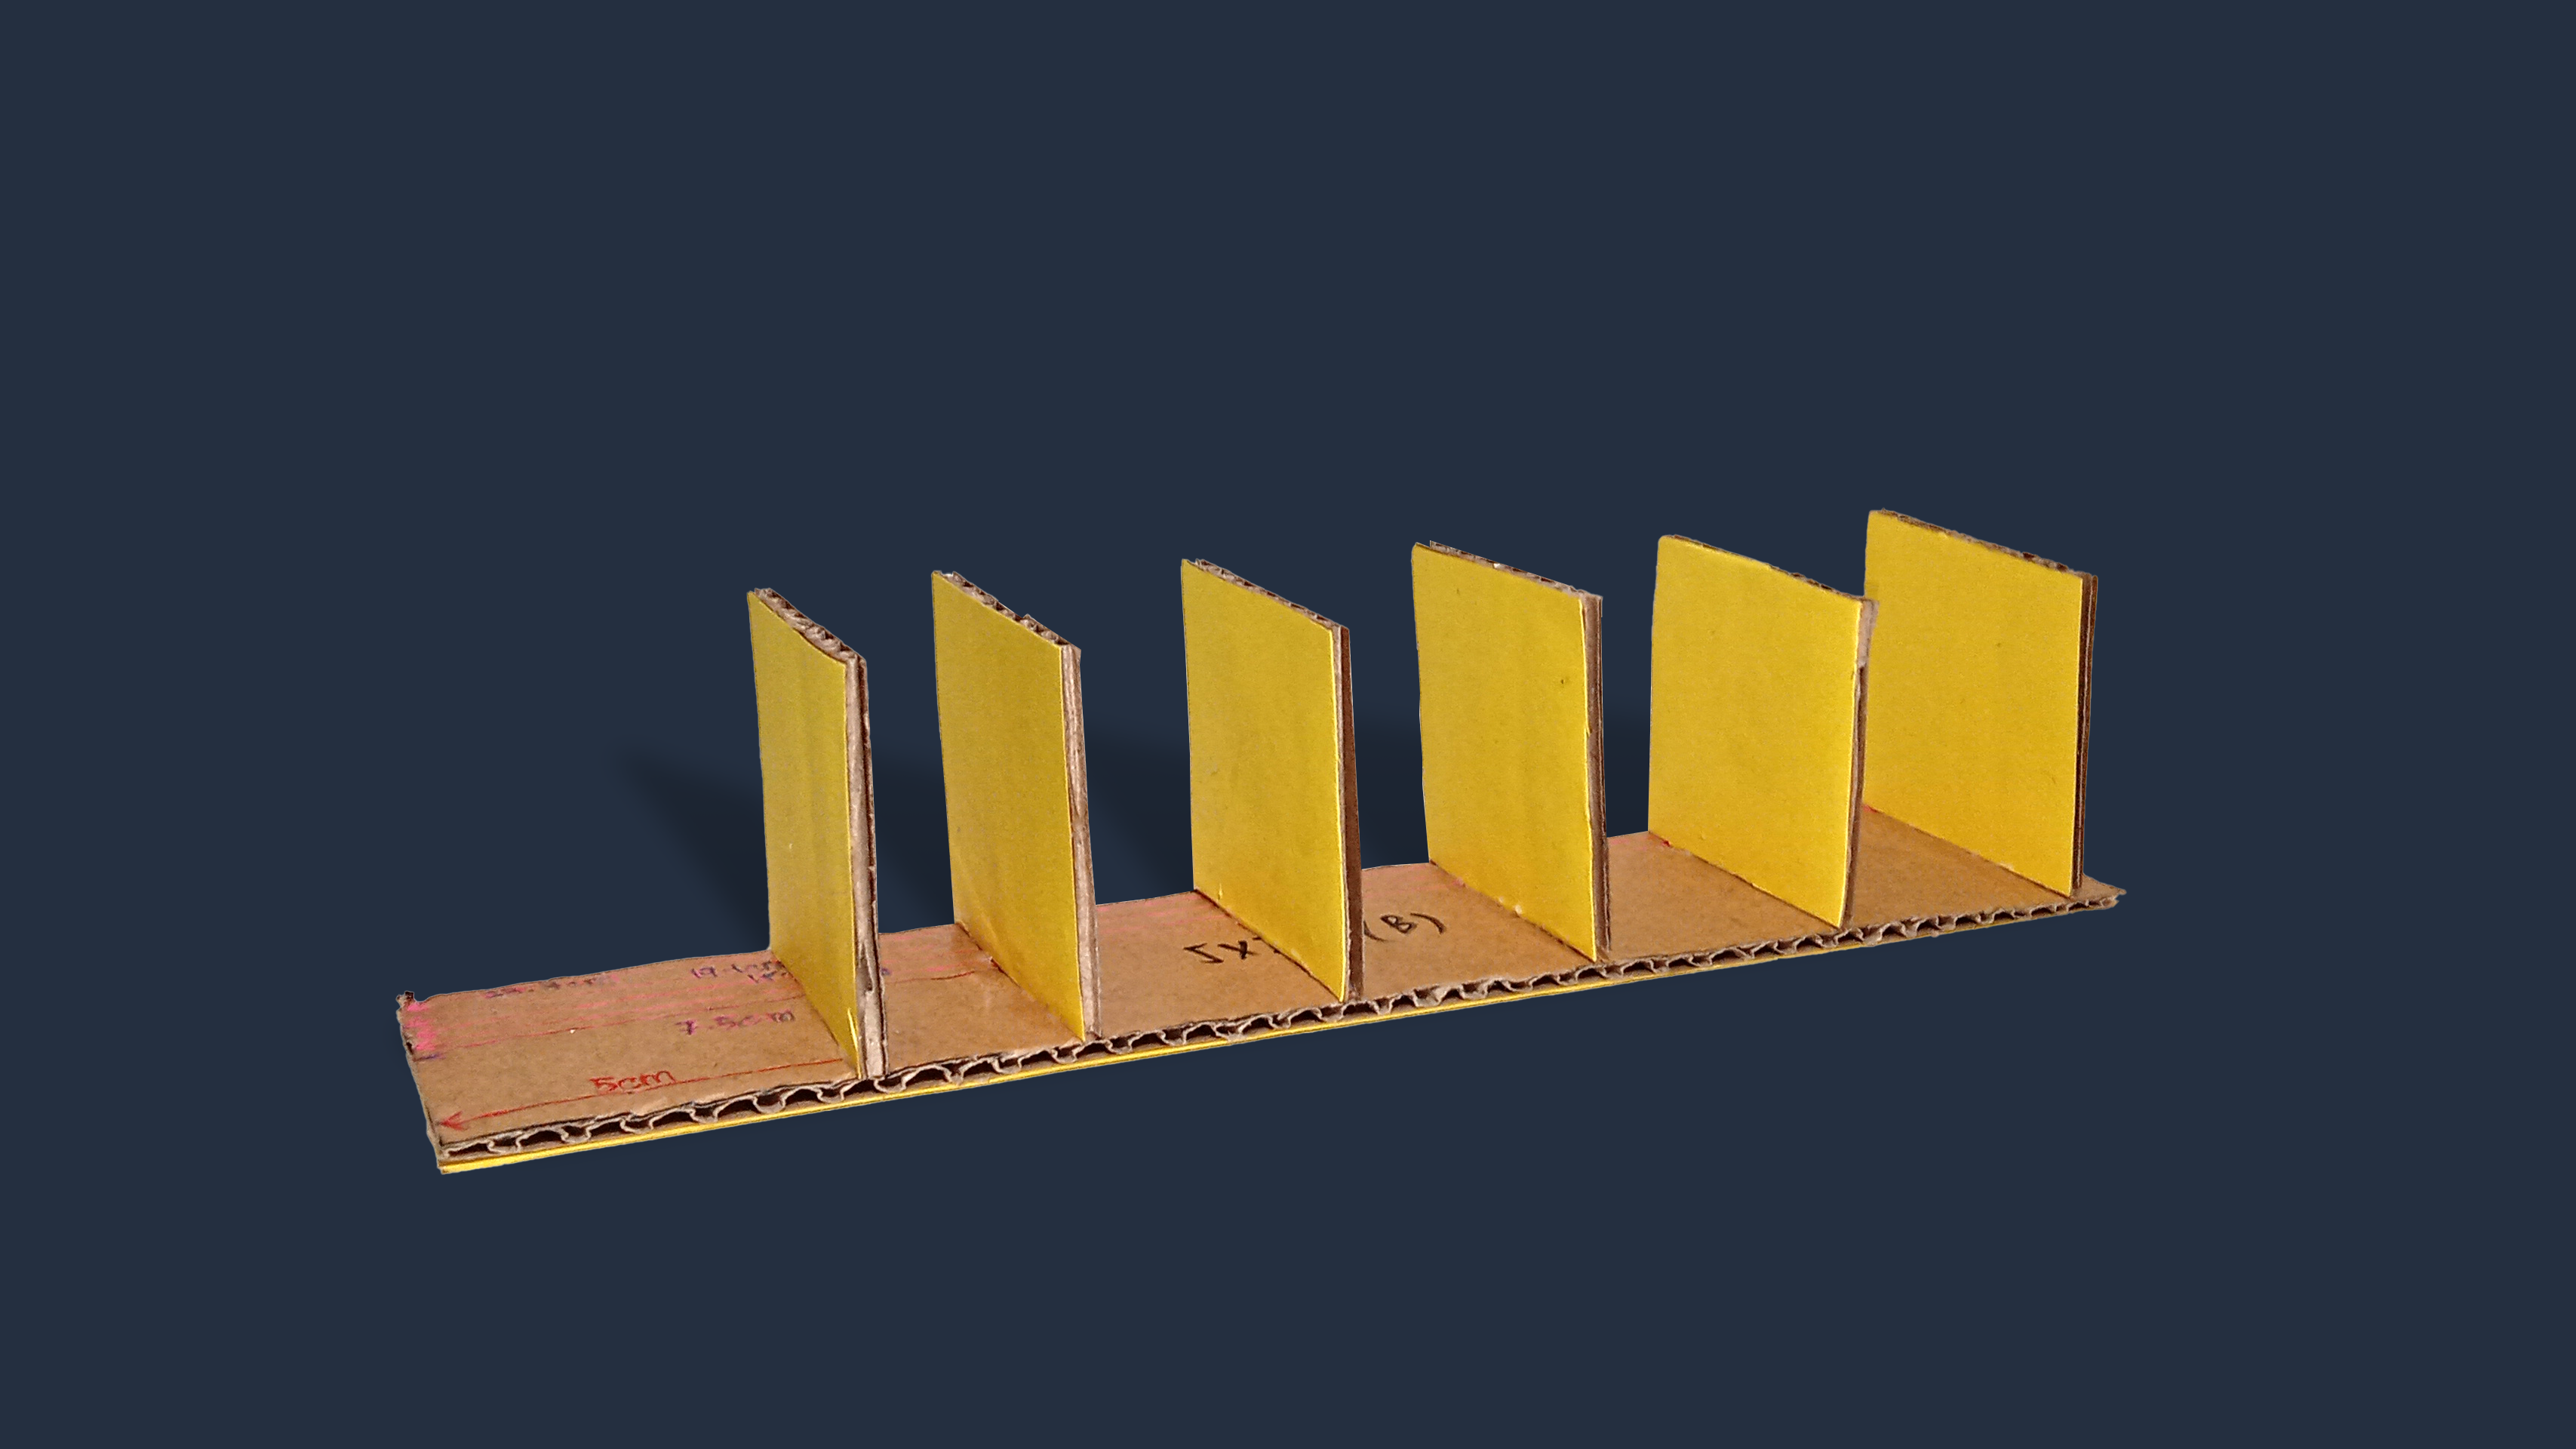
Assembling Cardboard B
(a) Take cardboard B and turn it over to the side without the colour paper.
(b) Paste the 6 5x5cm pieces of cardboard vertically on top of the reference lines on B .
(c) You can also use scotch tape to secure.
Materials
- Cardboard B
STEP 13
Assembling Cardboard B, D
(a) Orientate B such that the 5¢ slot is on the right.
(b) Paste cardboard D on the right side of B. The ultrasonic sensor should face inwards.
(c) Paste a 19x26cm board (G) at the back of B, to the left of D.
(d) You can also use scotch tape to secure.
STEP 14
Assembling Cardboard A, B, C
(a) On cardboard G, measure 9.2cm vertically up from the bottom left. Mark it out.
(b) Orientate A such that the 5¢ slot is on the right. Paste the back of A onto G, such that the base of A on the left touches the 9.2cm mark, and the base of A on the right right is just below the coin slot on D.
(c) Take cardboard C and turn it over to the side without the colour paper. Measure 8.7cm vertically up from the bottom right. Mark it out.
(d) Paste C onto the front of A, such that the base of A on the left touches the 8.7cm mark, and the tip of A on the right is just below the top of C.
STEP 15
Finishing Touches
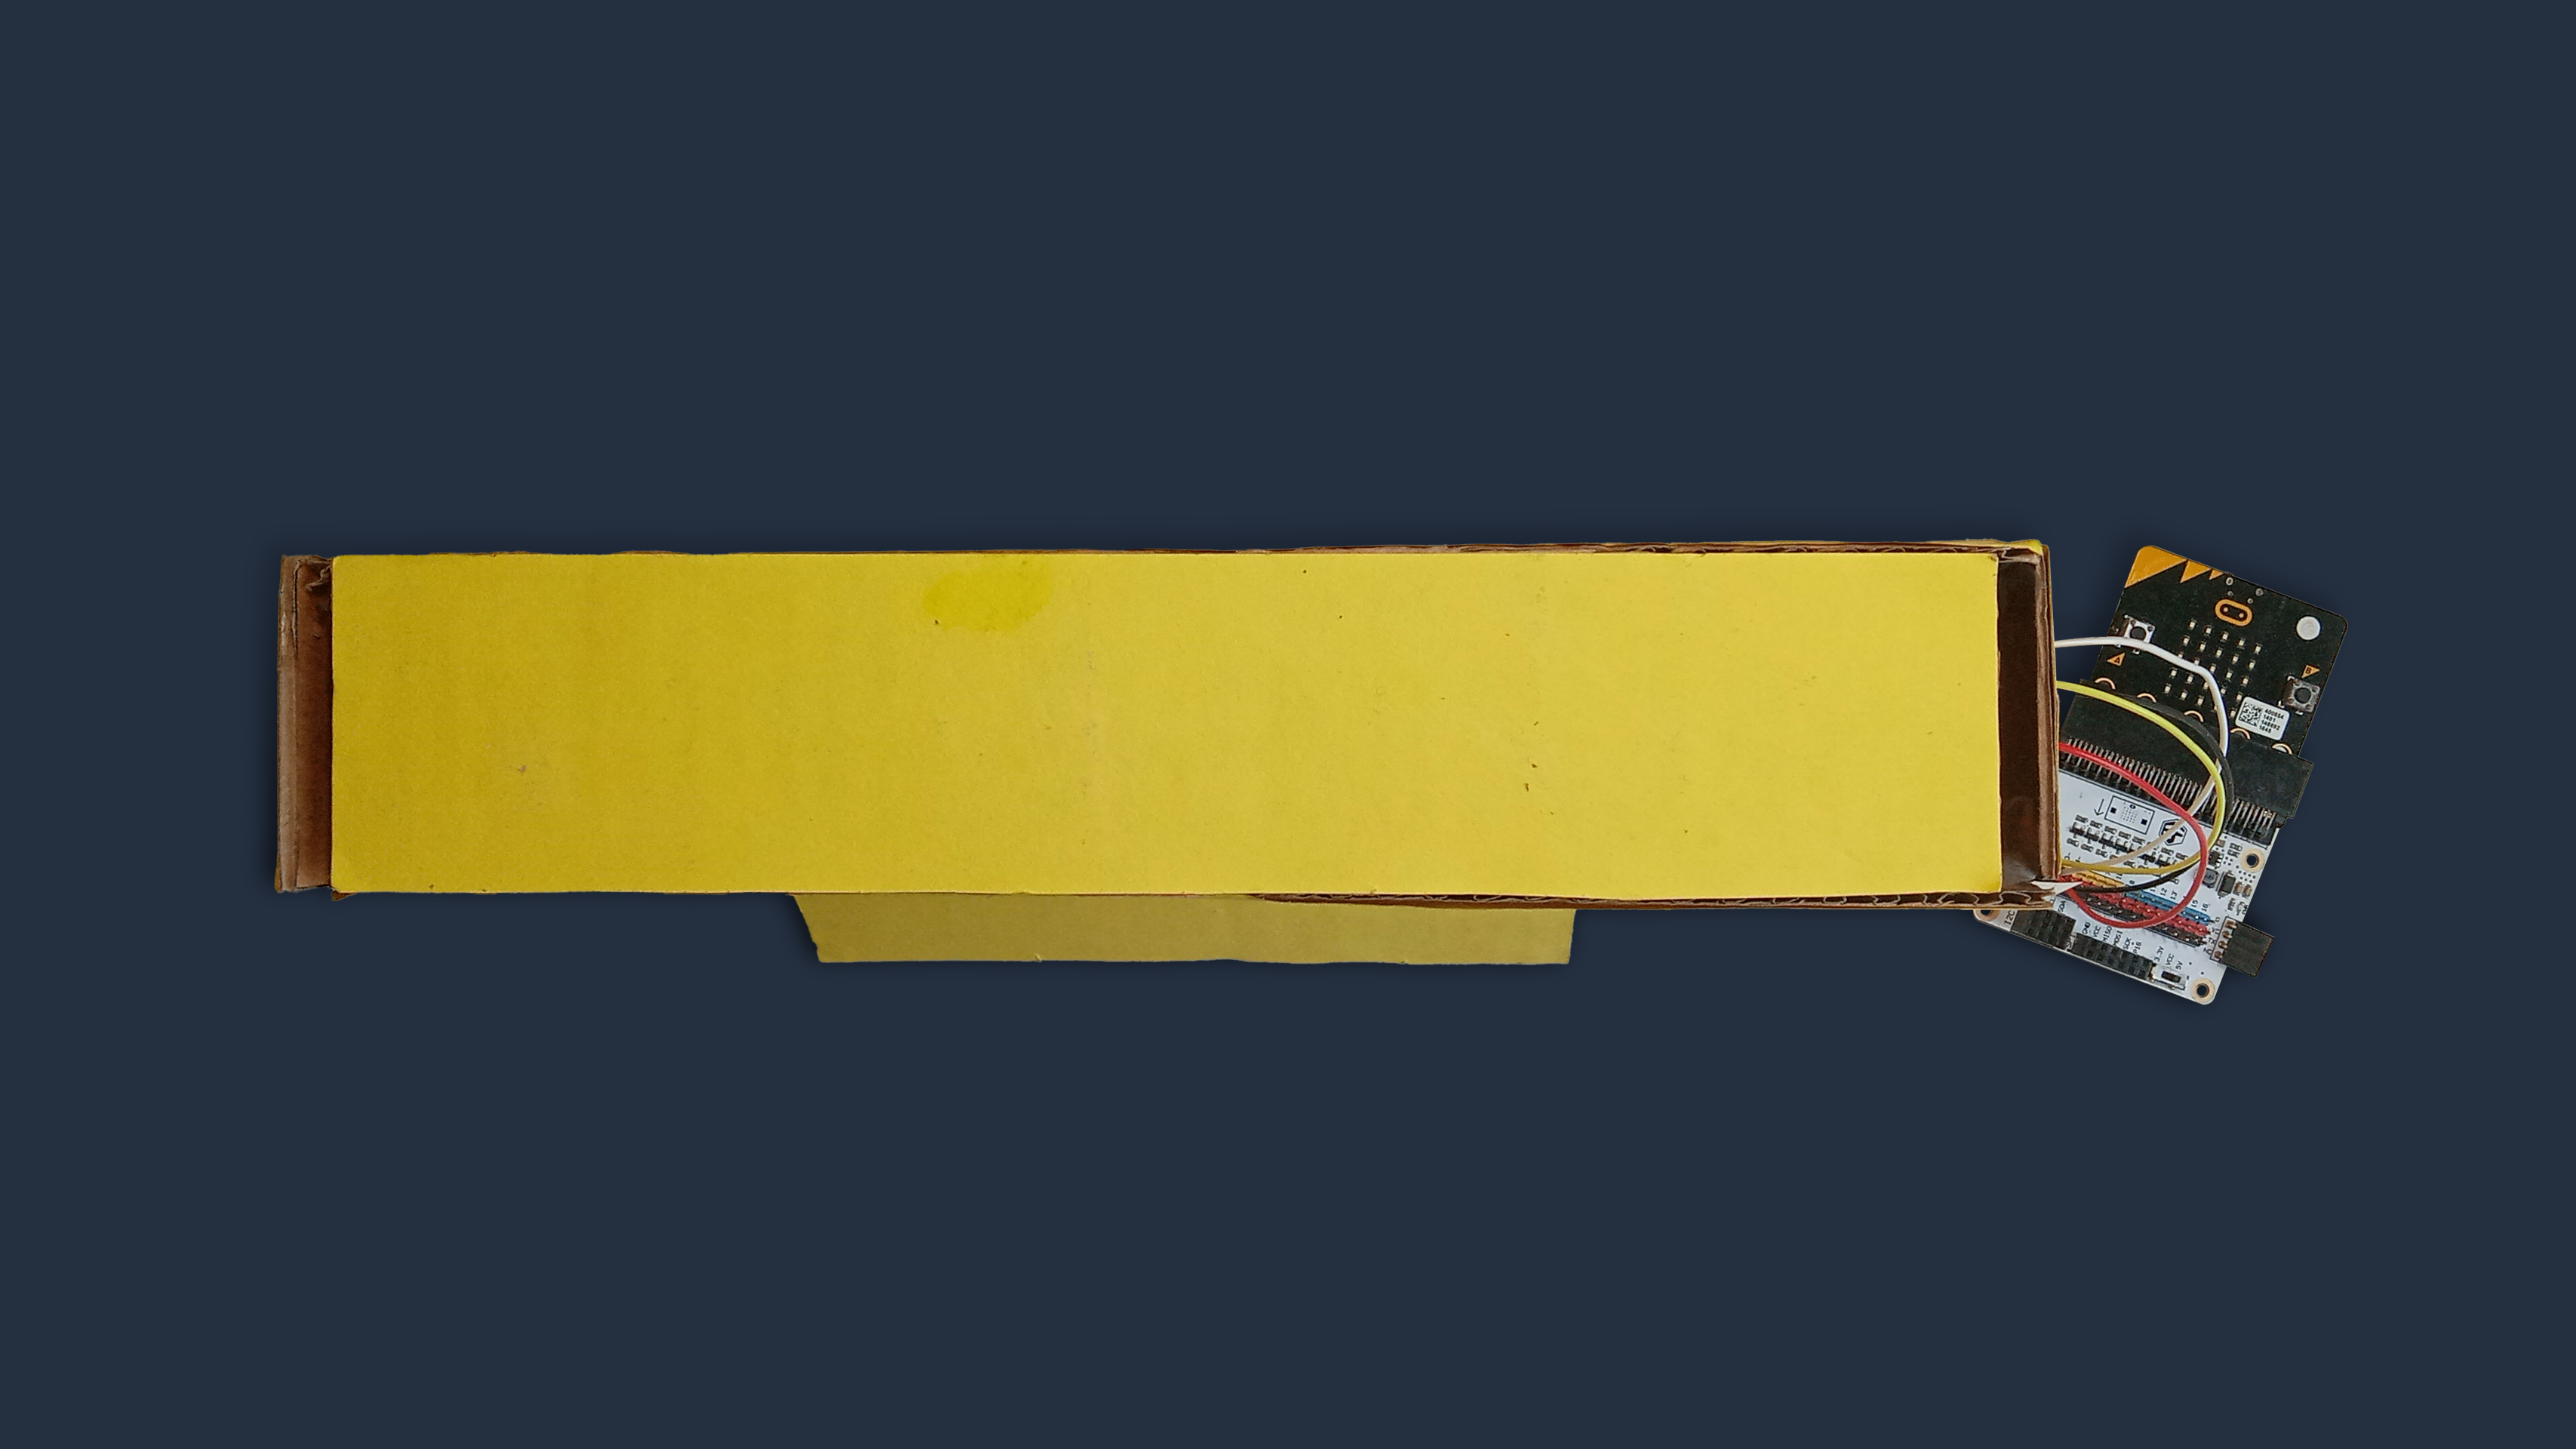
(a) Paste the other 5x19cm piece (F) to the left side of the coin sorter.
(b) Paste the last 5x25cm board onto the top of the sorter, to close the setup.
(c) Don’t forget to decorate your coin sorter too!
STEP 16

Powering up
Finally, connect the microUSB cable from your laptop to the top of the micro:bit.
We’re now ready to move to software to code the micro:bit!
STEP 17
Calibrating Ultrasonic Sensor
First, let’s calibrate the ultrasonic sensor, to determine values to be used with our ultrasonic sensor, in the specific coin sorter setup we created.
(a) Go to https://makecode.microbit.org/ and click on ‘New Project’.
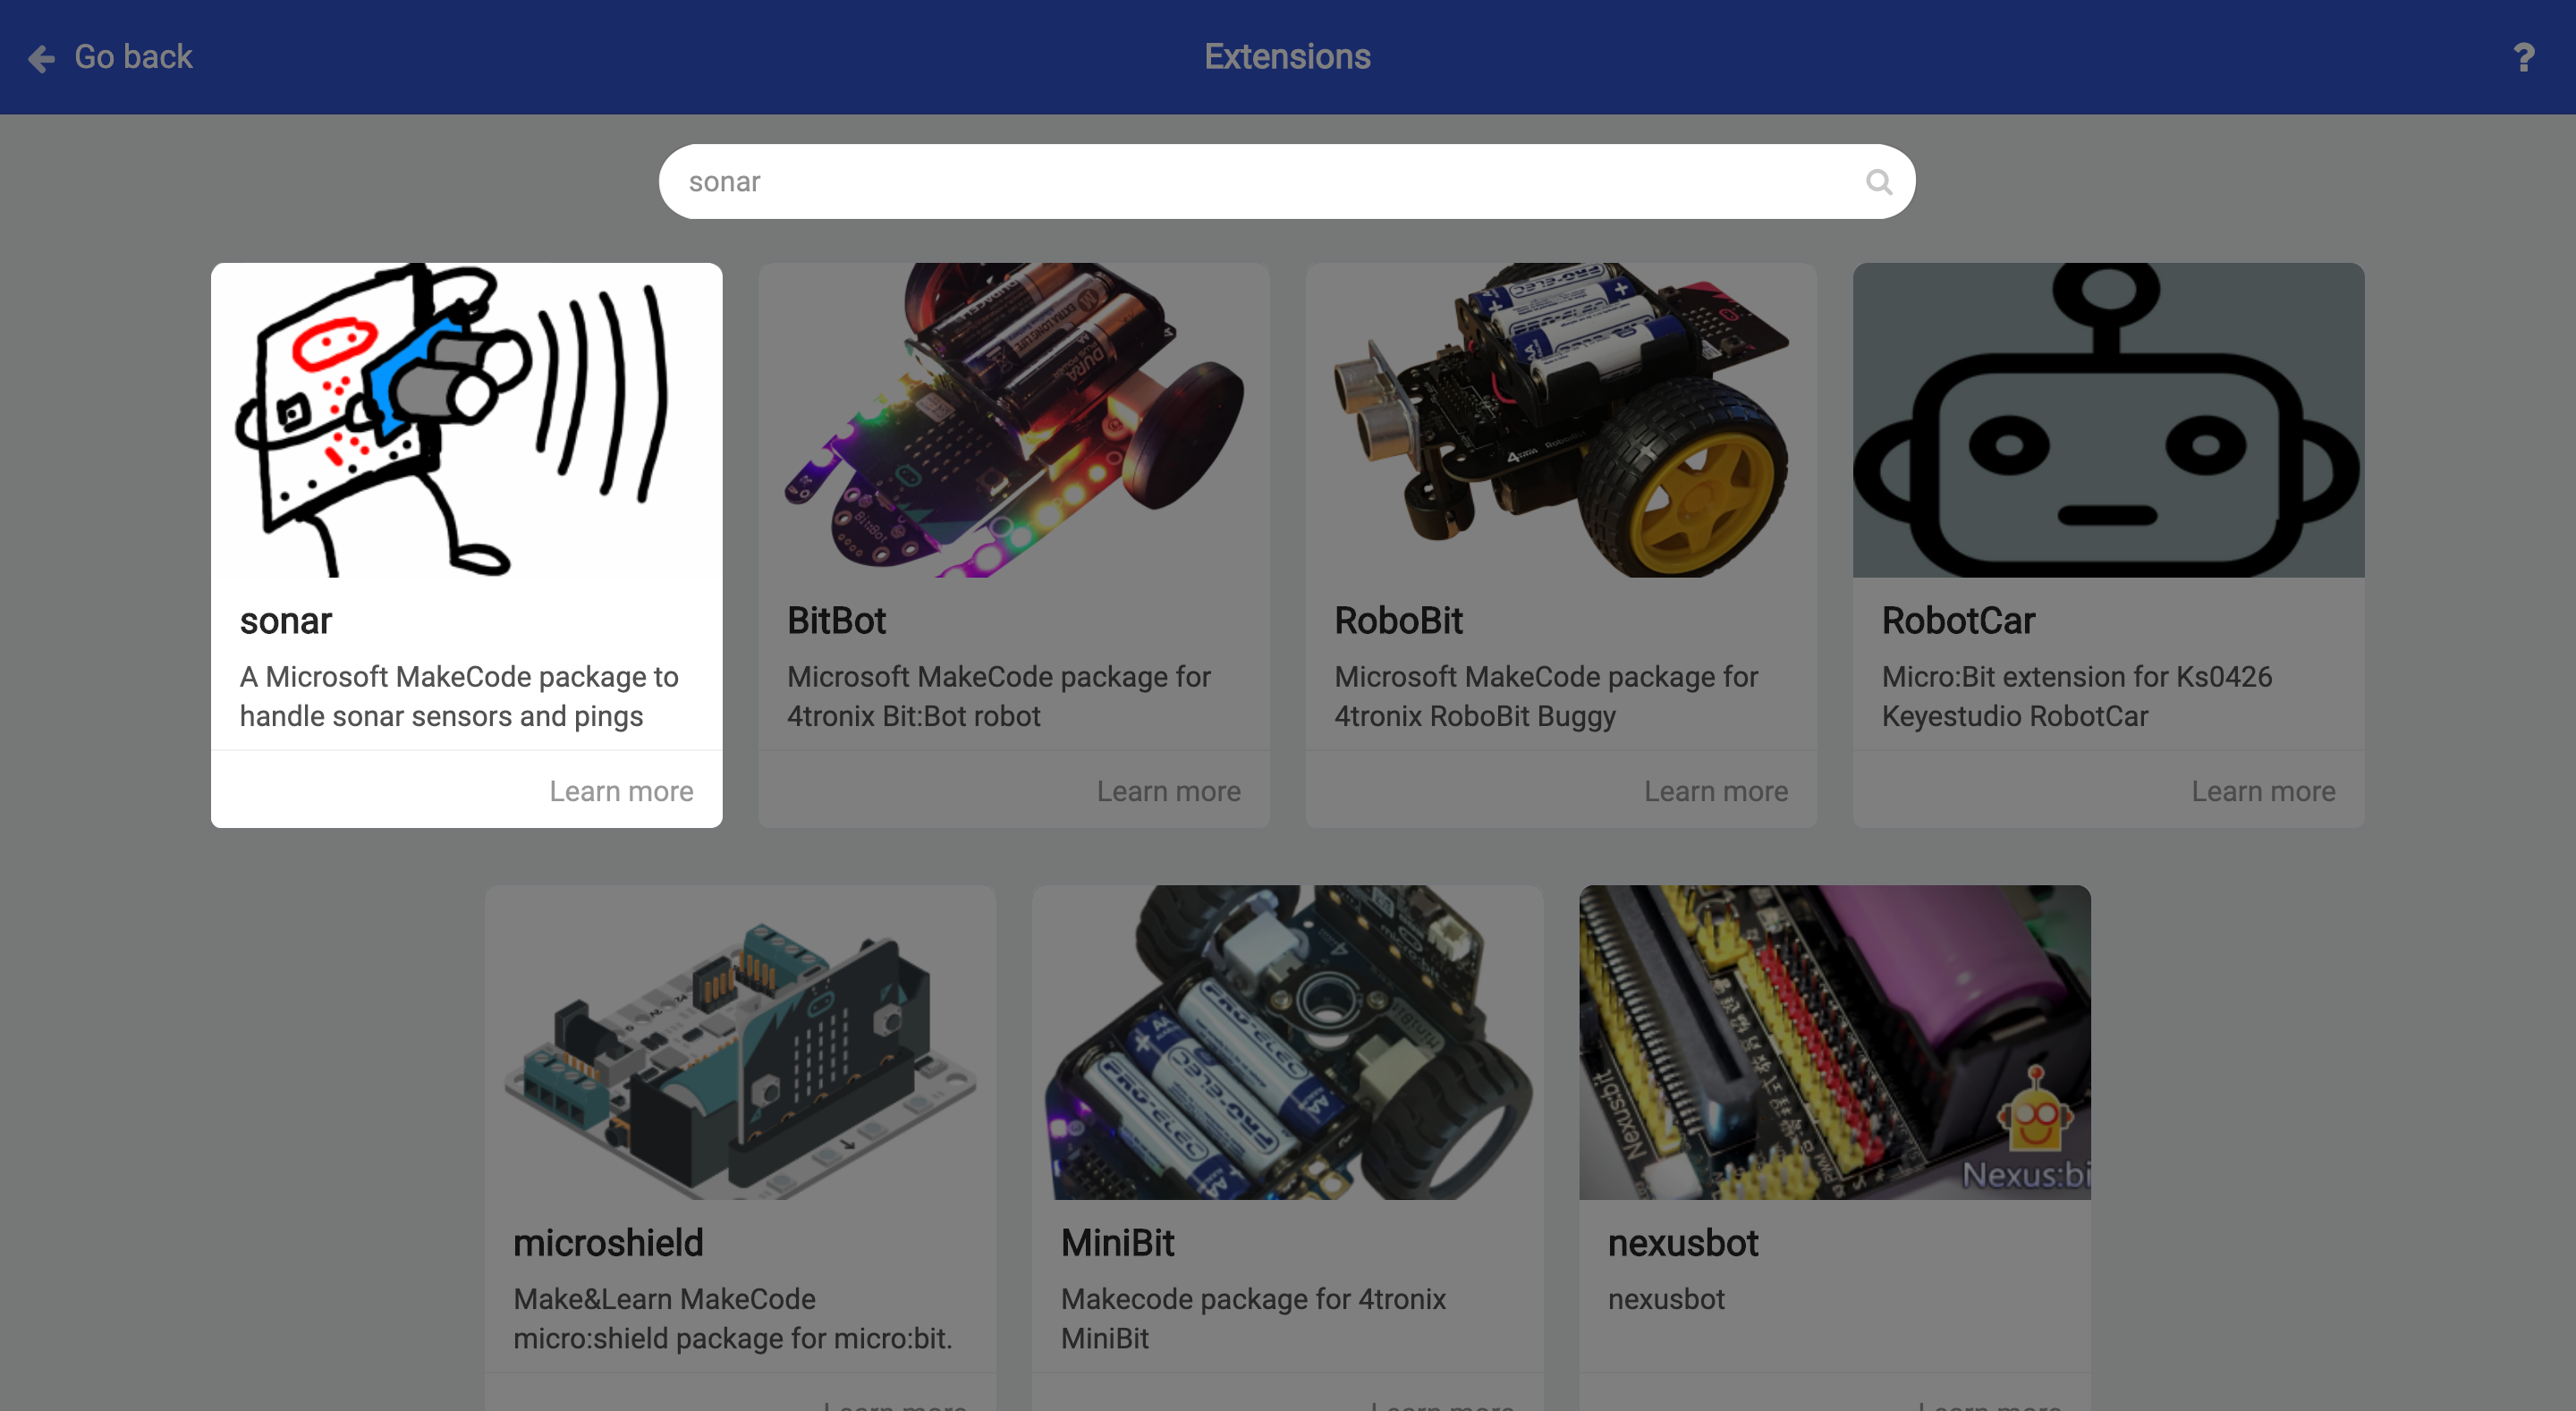
(b) Download the ‘sonar’ package from Advanced > Extensions.
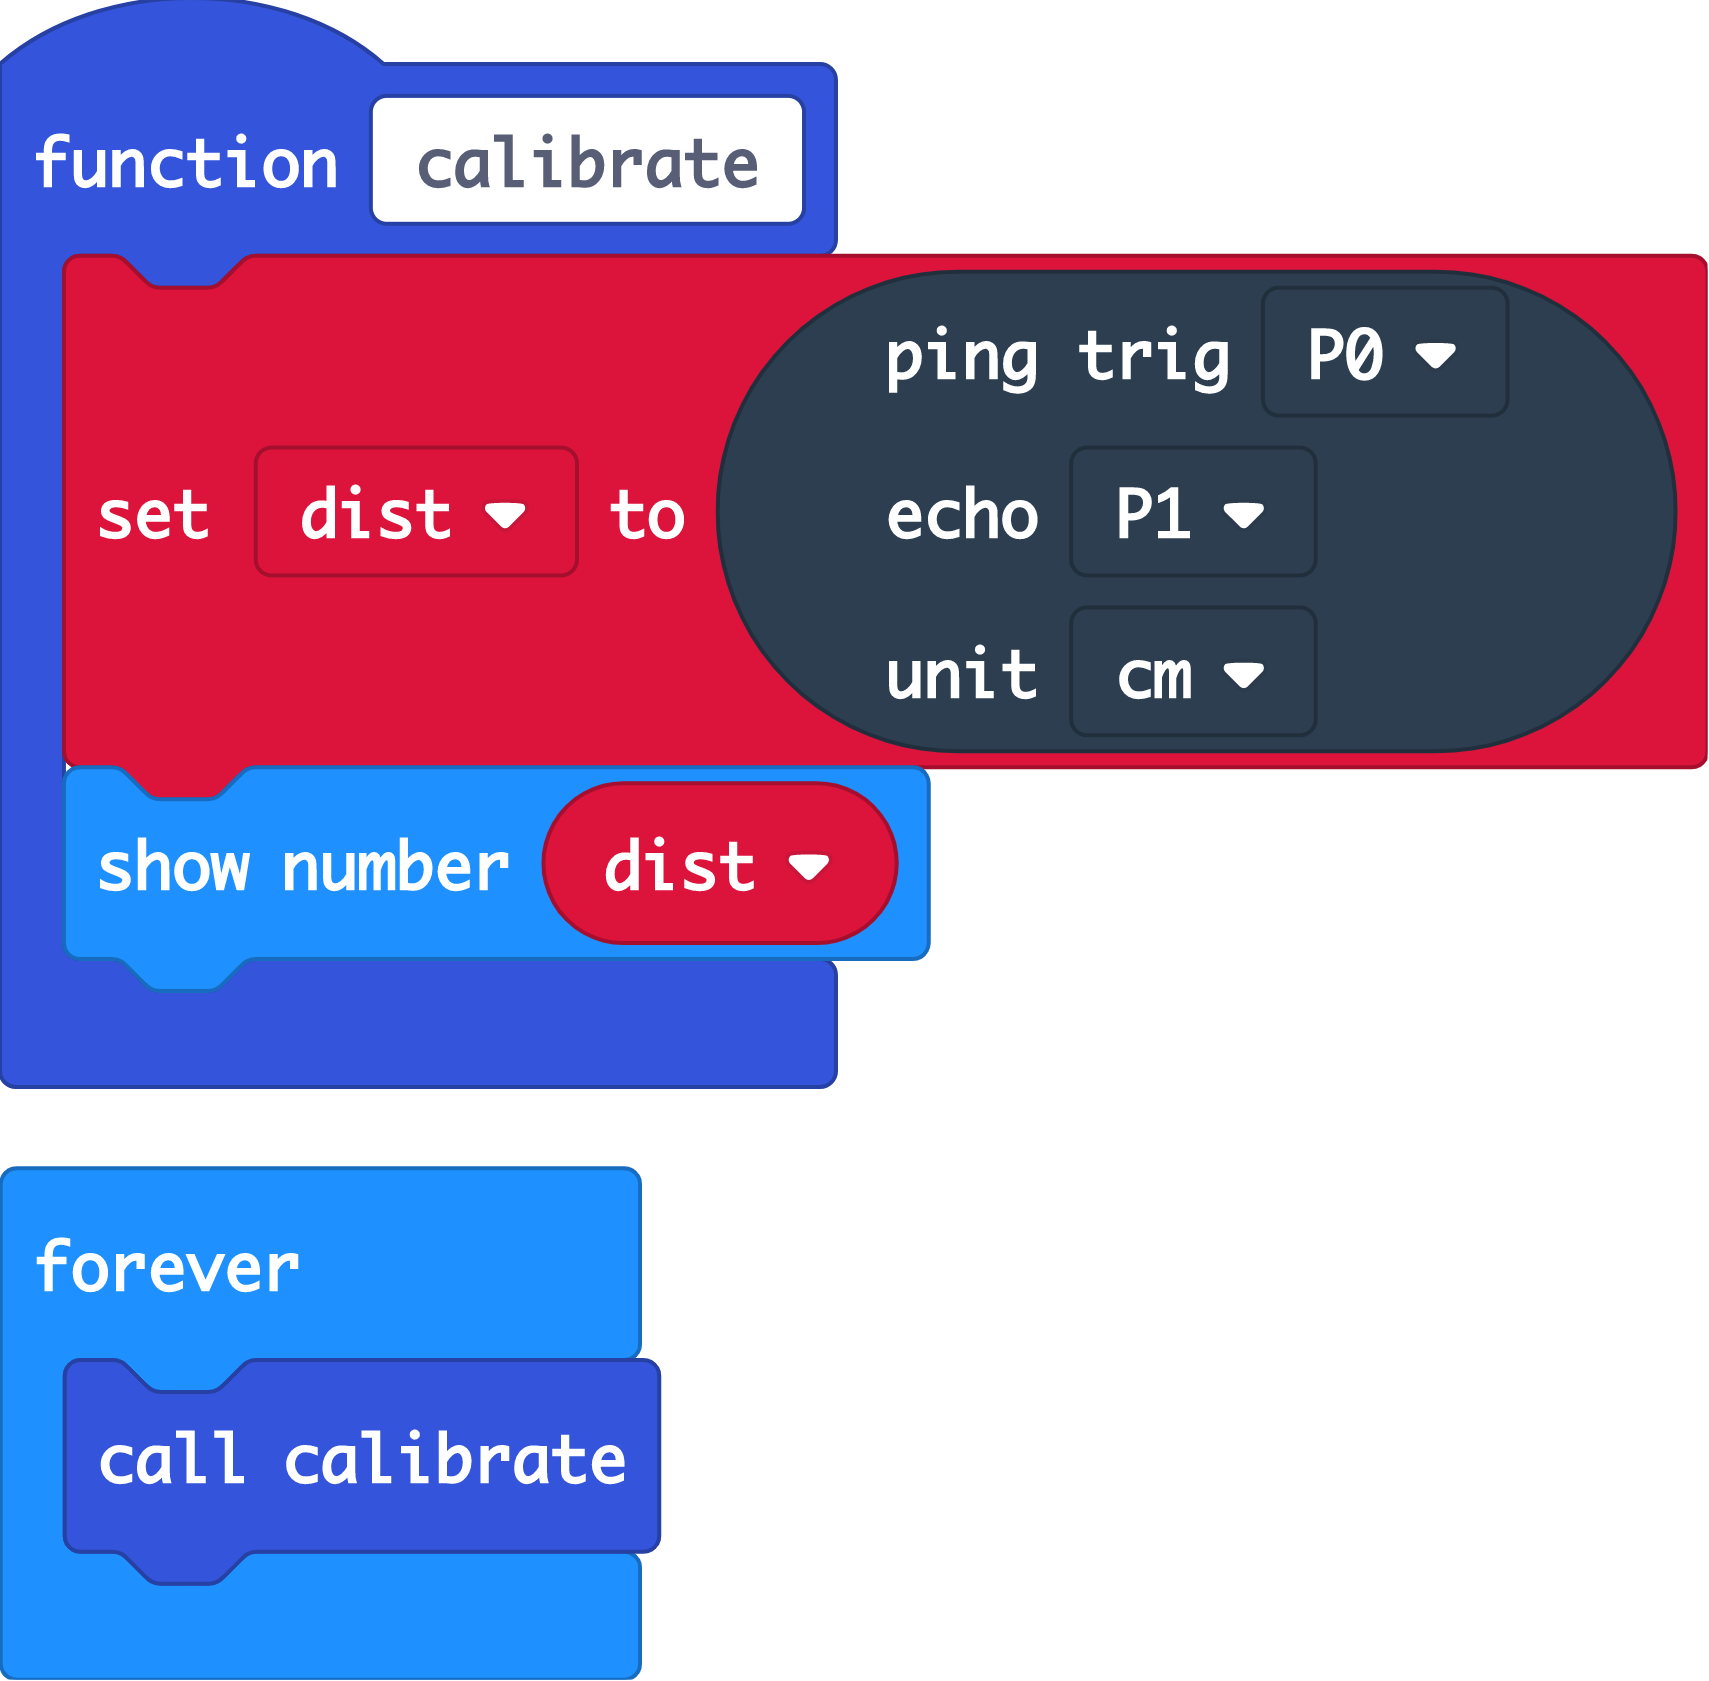
(c) Create a function calibrate.
(d) Under this function, get and display the distance detected by the ultrasonic sensor.
(e) Continuously call this calibrate function, to continously perform (d).
(f) Download this code to your micro:bit, and drop different coins into the coin sorting machine. Note down the min and max distances for each type of coin, as reflected on the micro:bit LEDs.
(e)Troubleshooting: Make sure the ultrasound is placed vertically and not obstructed.
STEP 18
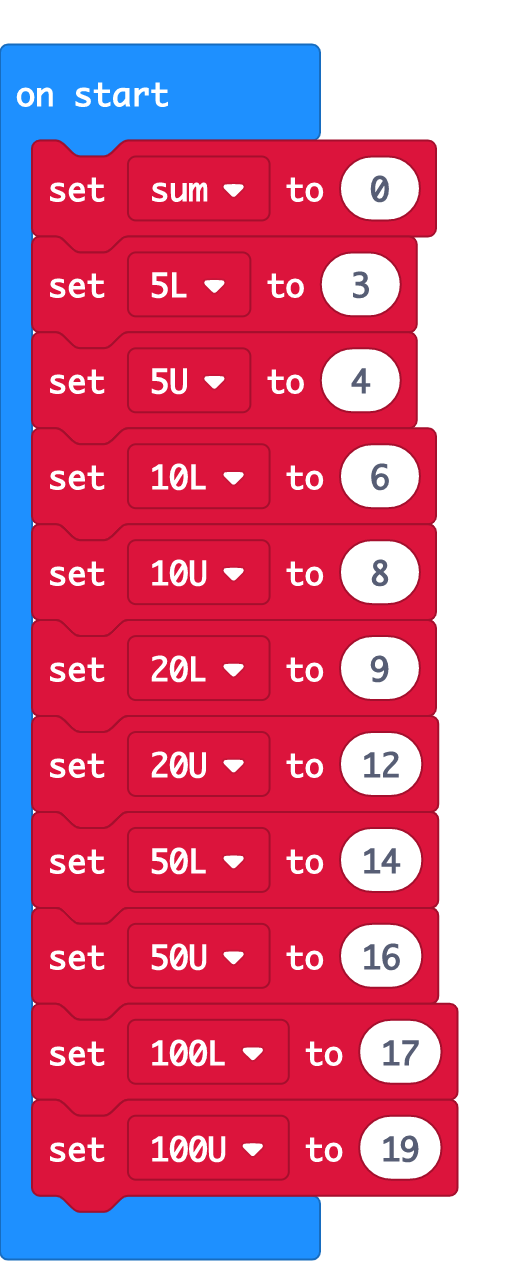
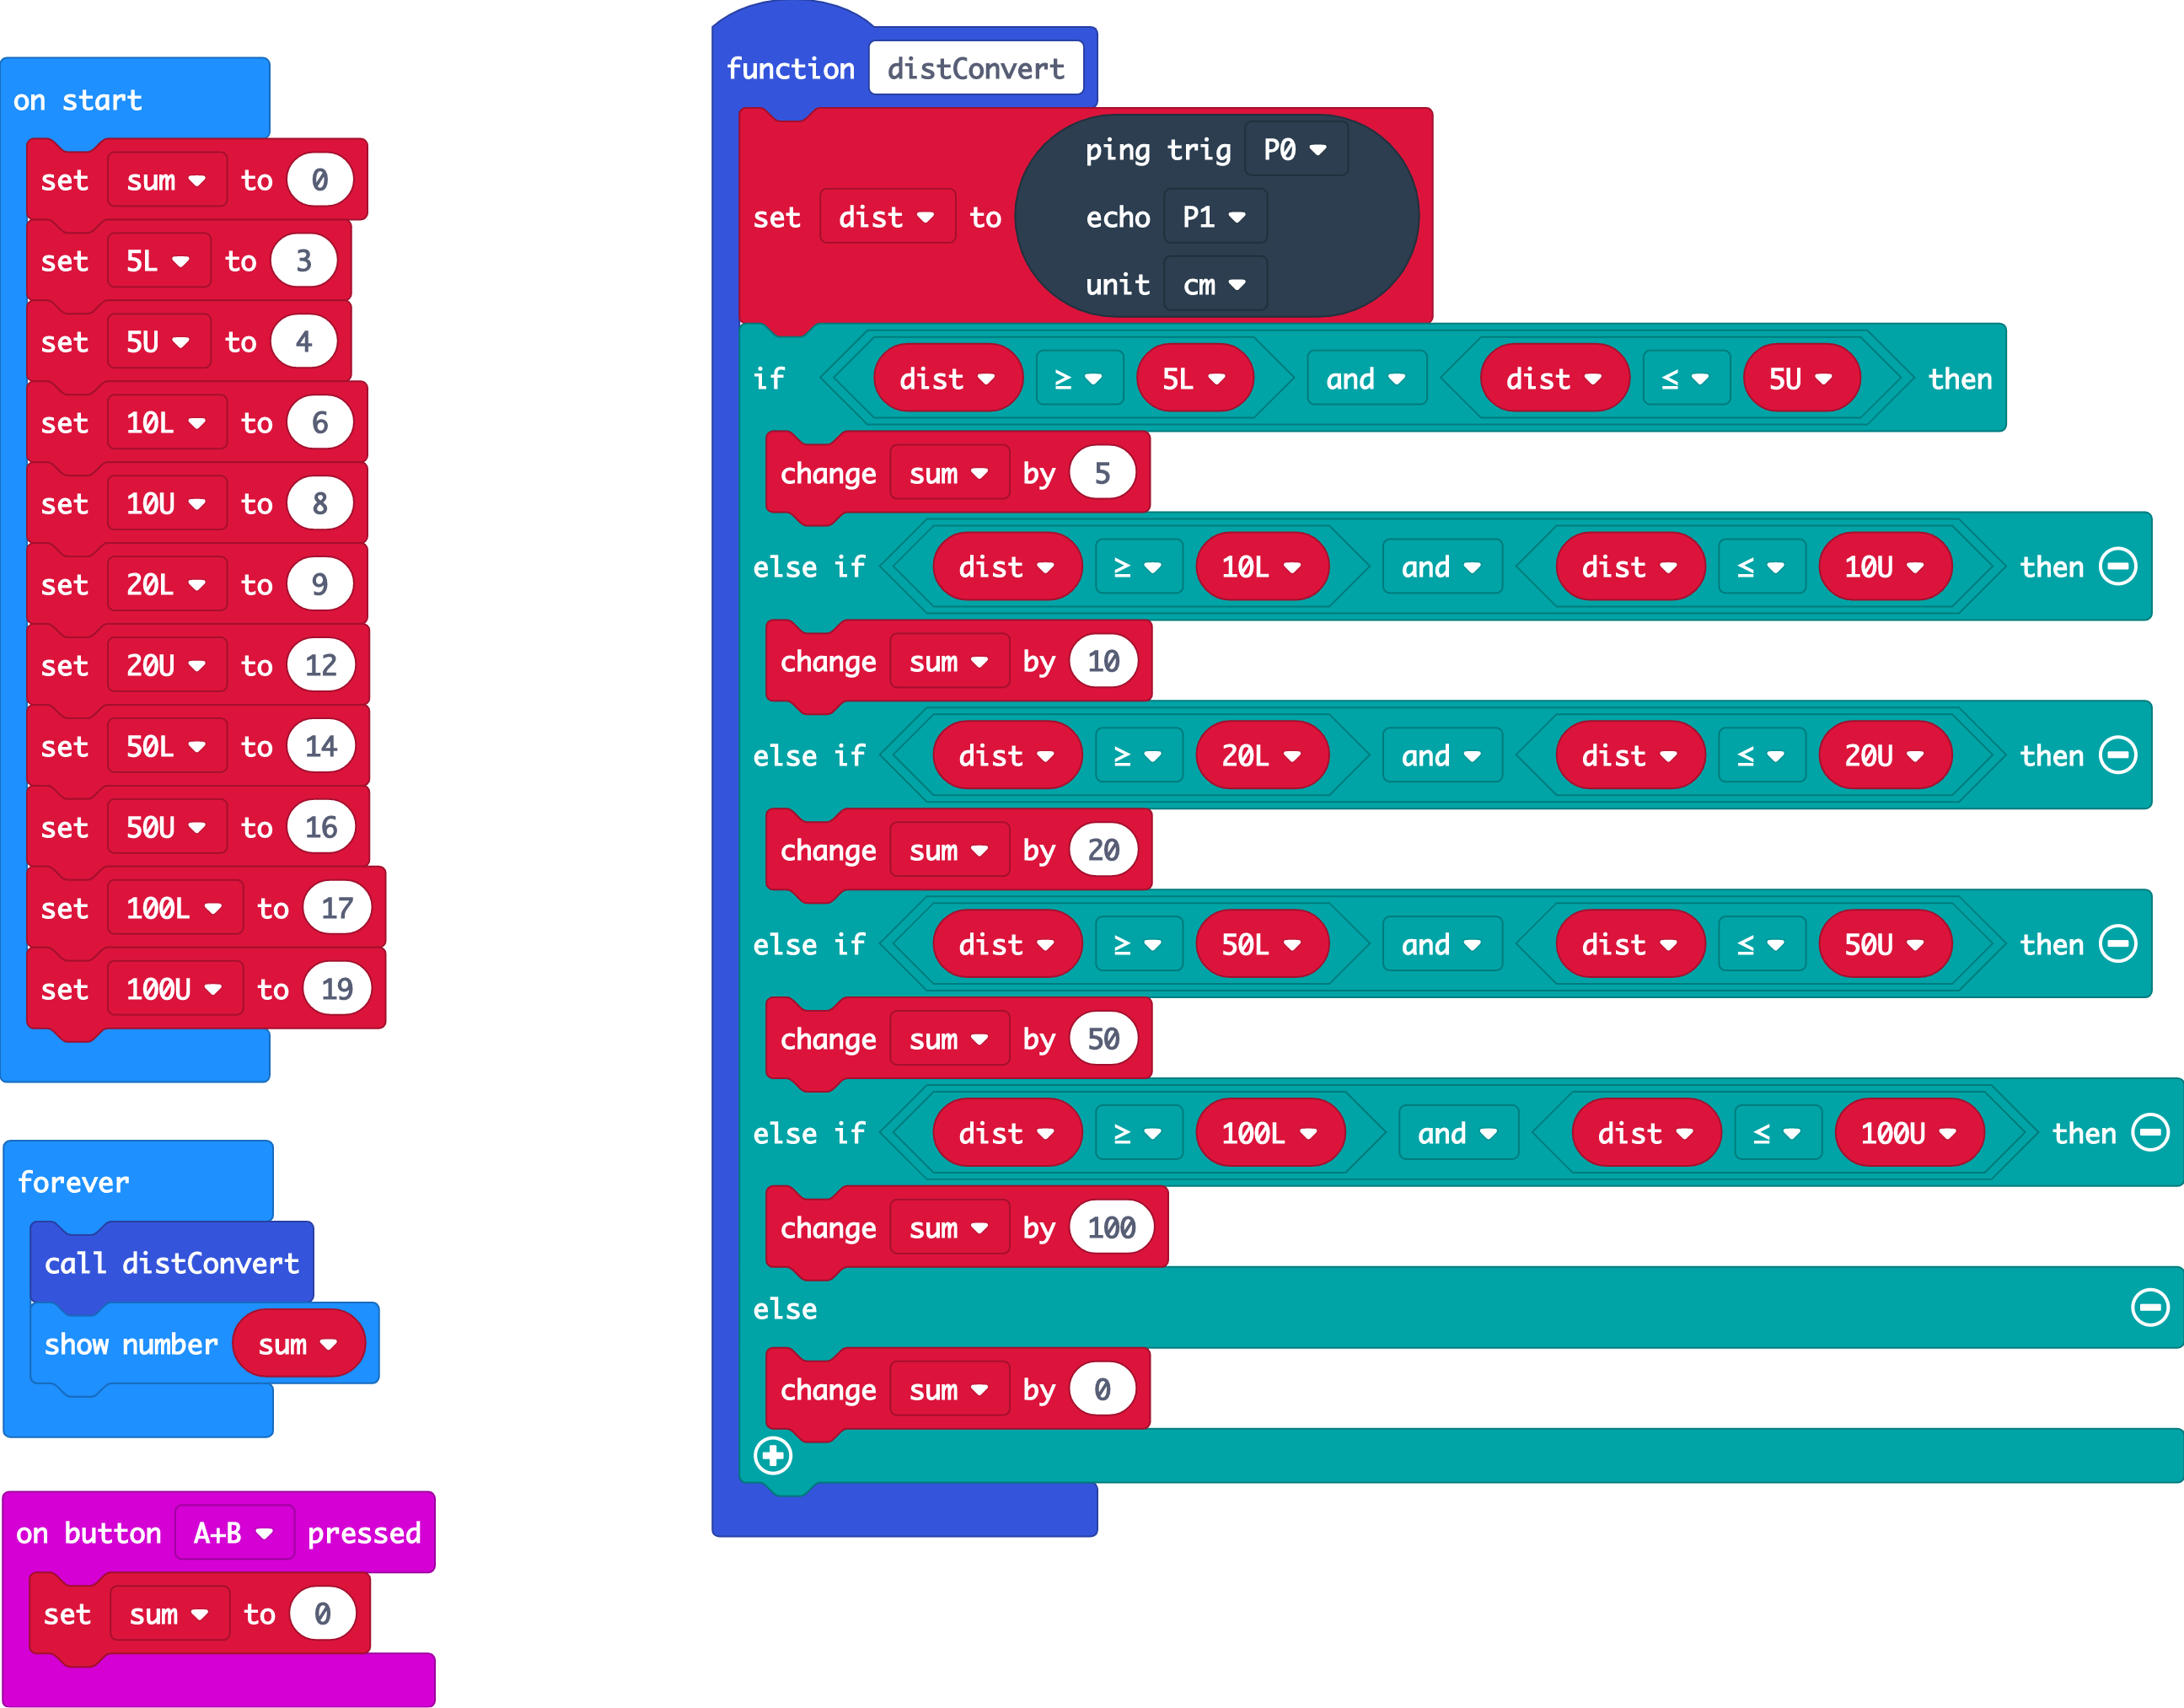
On Start
(a) Go back to https://makecode.microbit.org/ and click on ‘New Project’ to create the main code on a new project.
(b) Under the on start event handler, record the min and max values (cm) from step 17 as variables. Your values may differ slightly from ours, depending on your individual set up / how you dropped the coins in.
- 5L and 5U are the min and max values respectively, from dropping the 5¢
- 10L and 10U are the min and max values respectively, from dropping 10¢
etc.
(c) Create a variable sum to represent the sum of coins in the coin sorter, and initialise it to 0 at the start. The coin sorter should not have any coins at the start.
STEP 19
Summing Coin Values
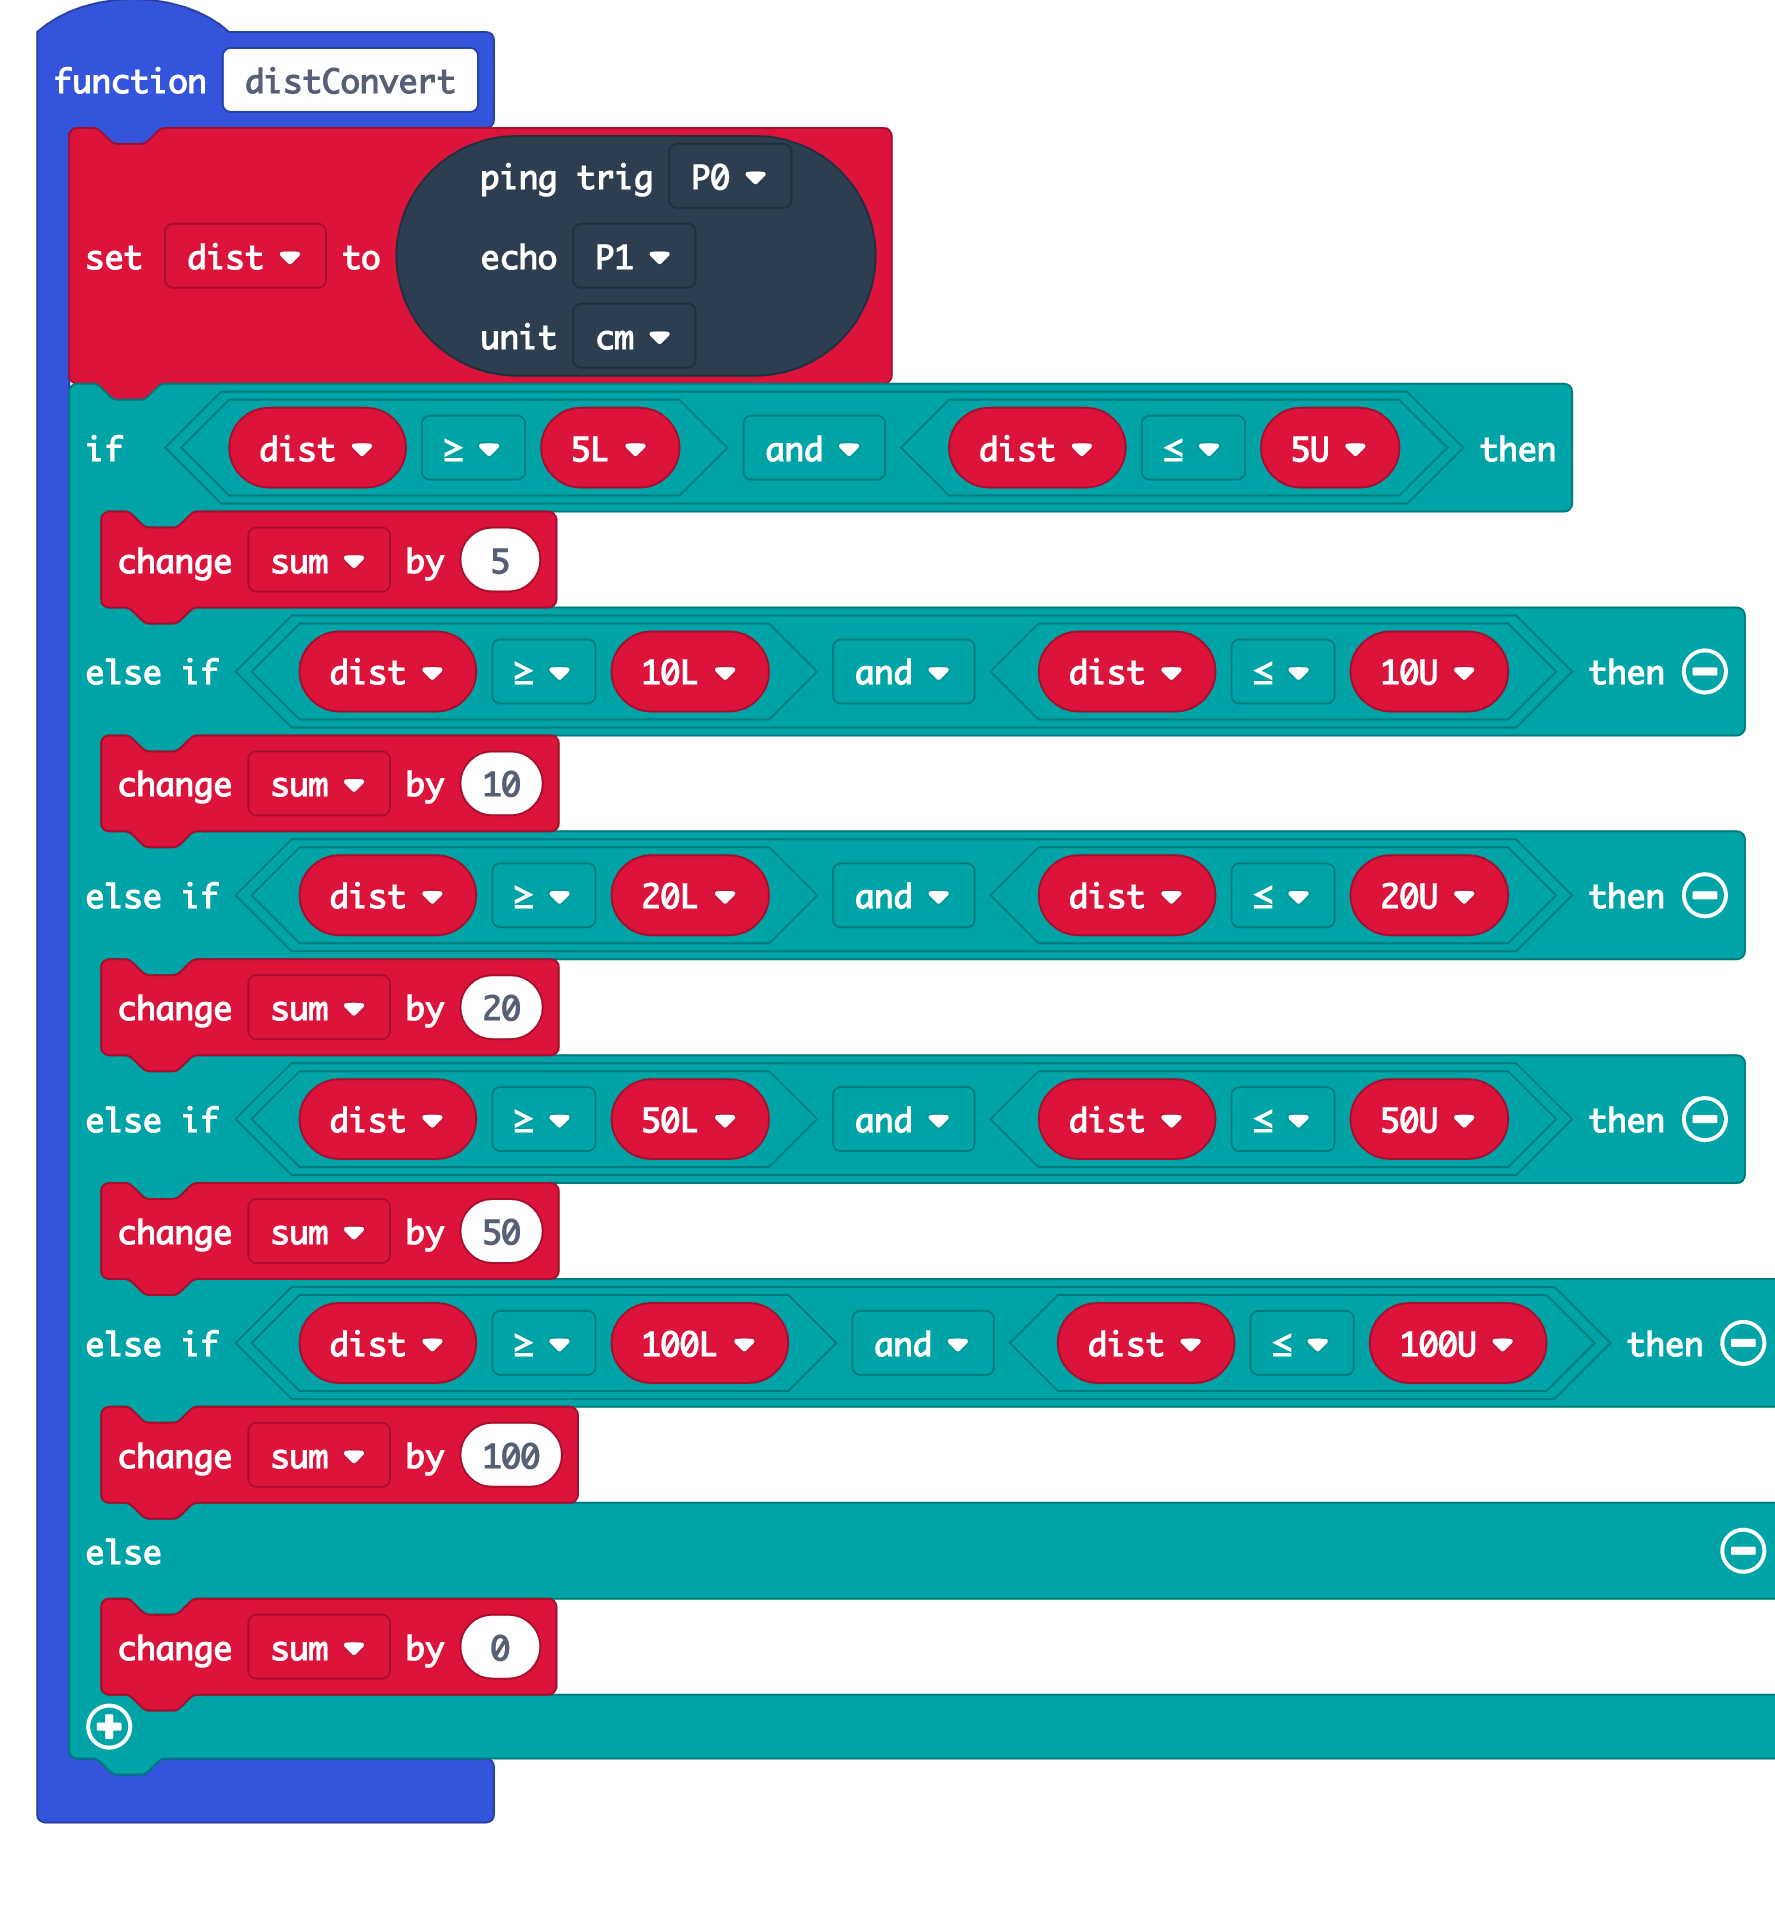
(a) Create a new function distConvert, and drag all the blocks for the following steps under it.
(b) Create a variable dist and drag out the block from the ‘sonar’ drawer to initialise and set up the ultrasonic sensor.
(c) If the ultrasonic sensor reads a value between the min and max values of a coin, the coin sorted must be of that particular value.
(d) Add to sum by this value.
STEP 20
Increasing and Restarting Sum
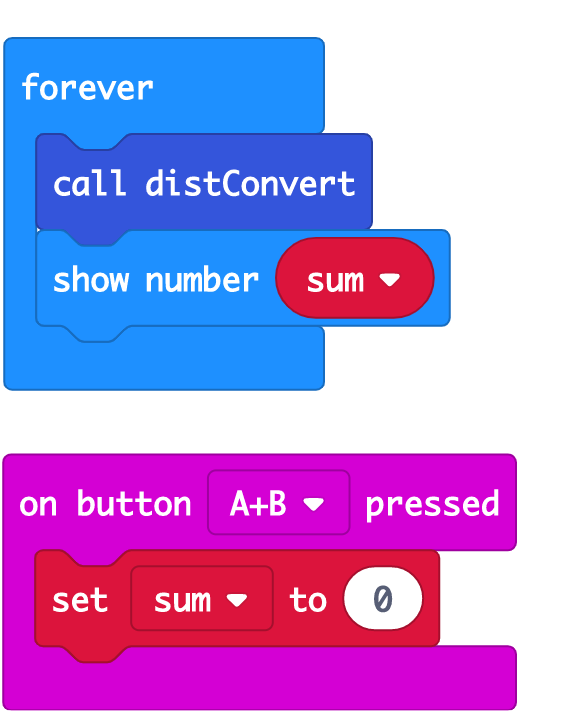
(a) Continuously call the distConvert function under the forever block. This will continuously run what we programmed in step 19, ie. detect the coins being dropped into the coin sorter, and add to sum accordingly.
(b) Add a ‘show number (sum)’ block, to show the sum of the coins in the coin sorter (in cents) on the micro:bit LEDs.
(c) To reset the sum to 0 when we take out our coins, set sum to 0 when both buttons A&B are pressed.
STEP 21
Great Job!
(a) And we’re done building our coin sorter! Don’t forget to click the ‘Download’ button on Makecode to download this to the connected microbit!
(b) Now you can drop different coins into the coin sorter, and the sum of these coins will be displayed on the micro:bit LEDs.
(c) Going further, perhaps you can add another function to check if the coin sorter is full?
Hope you had fun building this coin sorting machine. Enjoy!
Code and References
Made this activity? Good Job! Now spread the word. Share a photo of your creation on social media with #letsgethacking #Coinsorterwithmicro:bit