Finger Dexterity Game
Test the speed and coordination of your fingers!

YOU WILL NEED
1 x BBC micro:bit
1 x Tinkercademy breakout board
1 x Micro USB cable
1 x ADKeypad
STEP 1
We are going to create a finger dexterity game test. The player must press a key on the ADKeypad corresponding to the column that the random LED lights up at (A corresponds to 1st column, B to 2nd column and so on).
The speed at which the LED lights up increases as the game continues.
You’ll learn how to:
(a) use an ADKeypad with the micro:bit
(b) use functions recursively, to ease lighting up LEDs randomly
(c) use while loops
(d) improve your finger dexterity
STEP 2
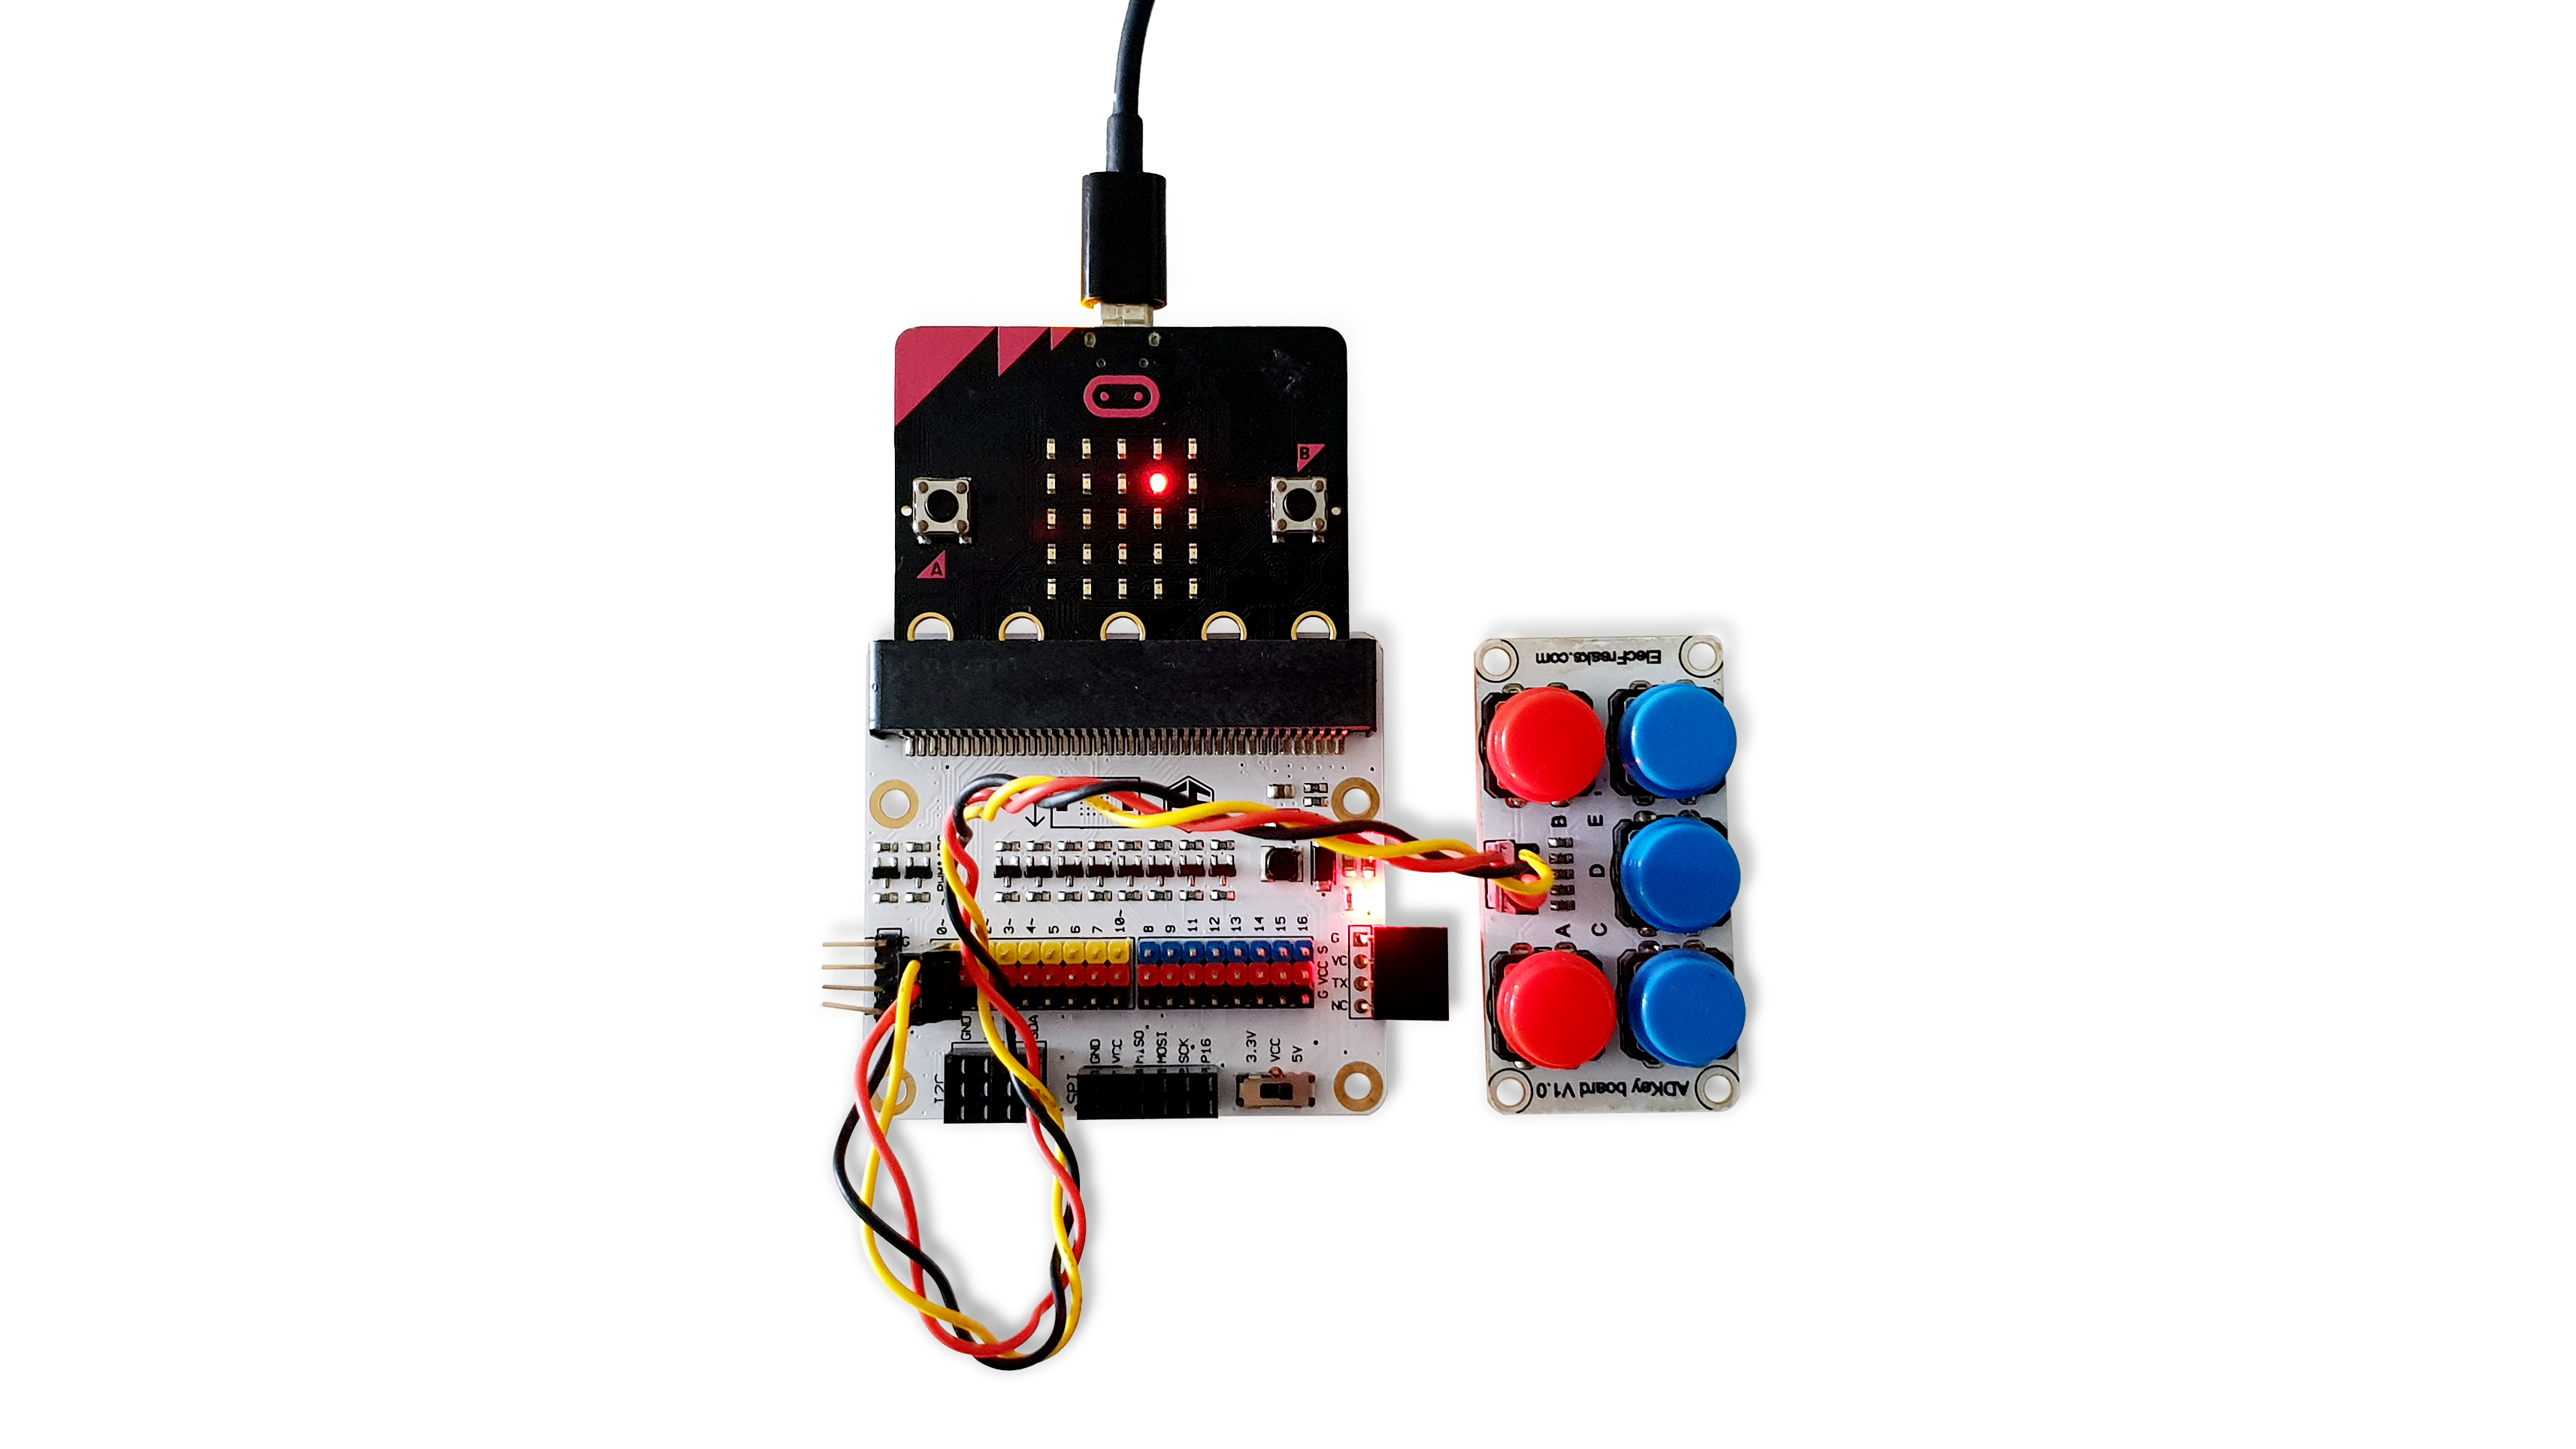
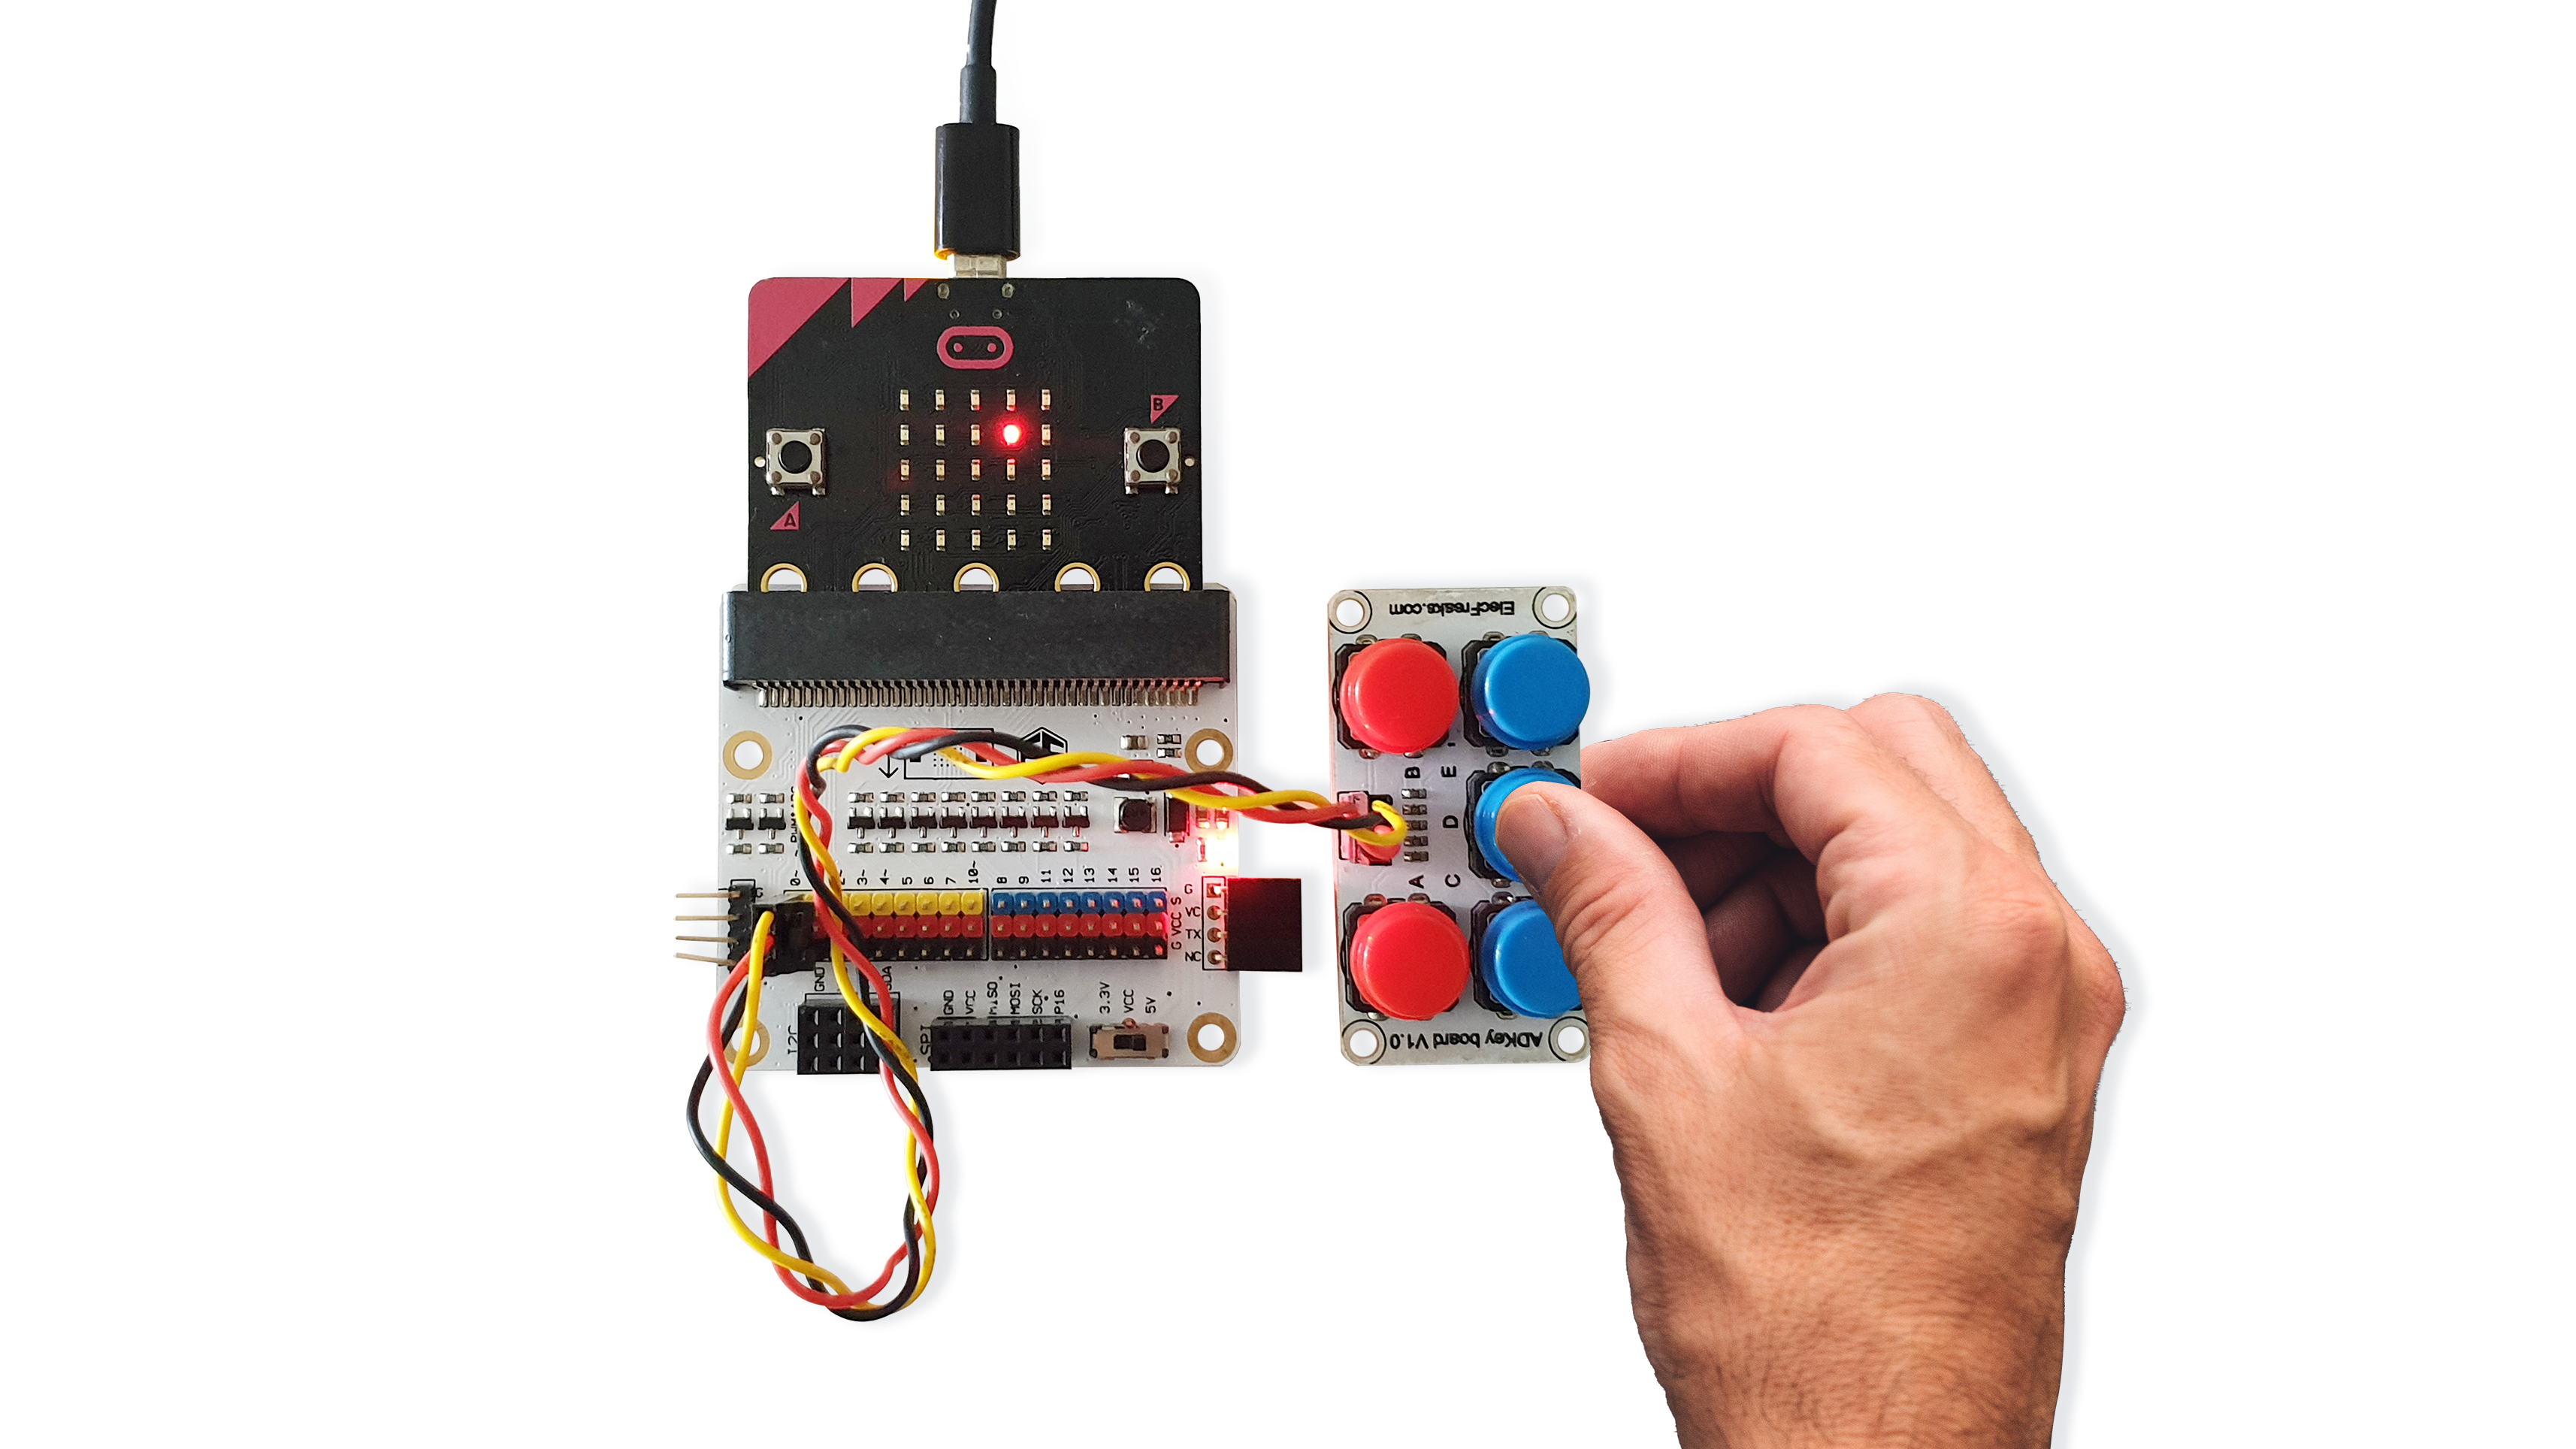
Connect the Components
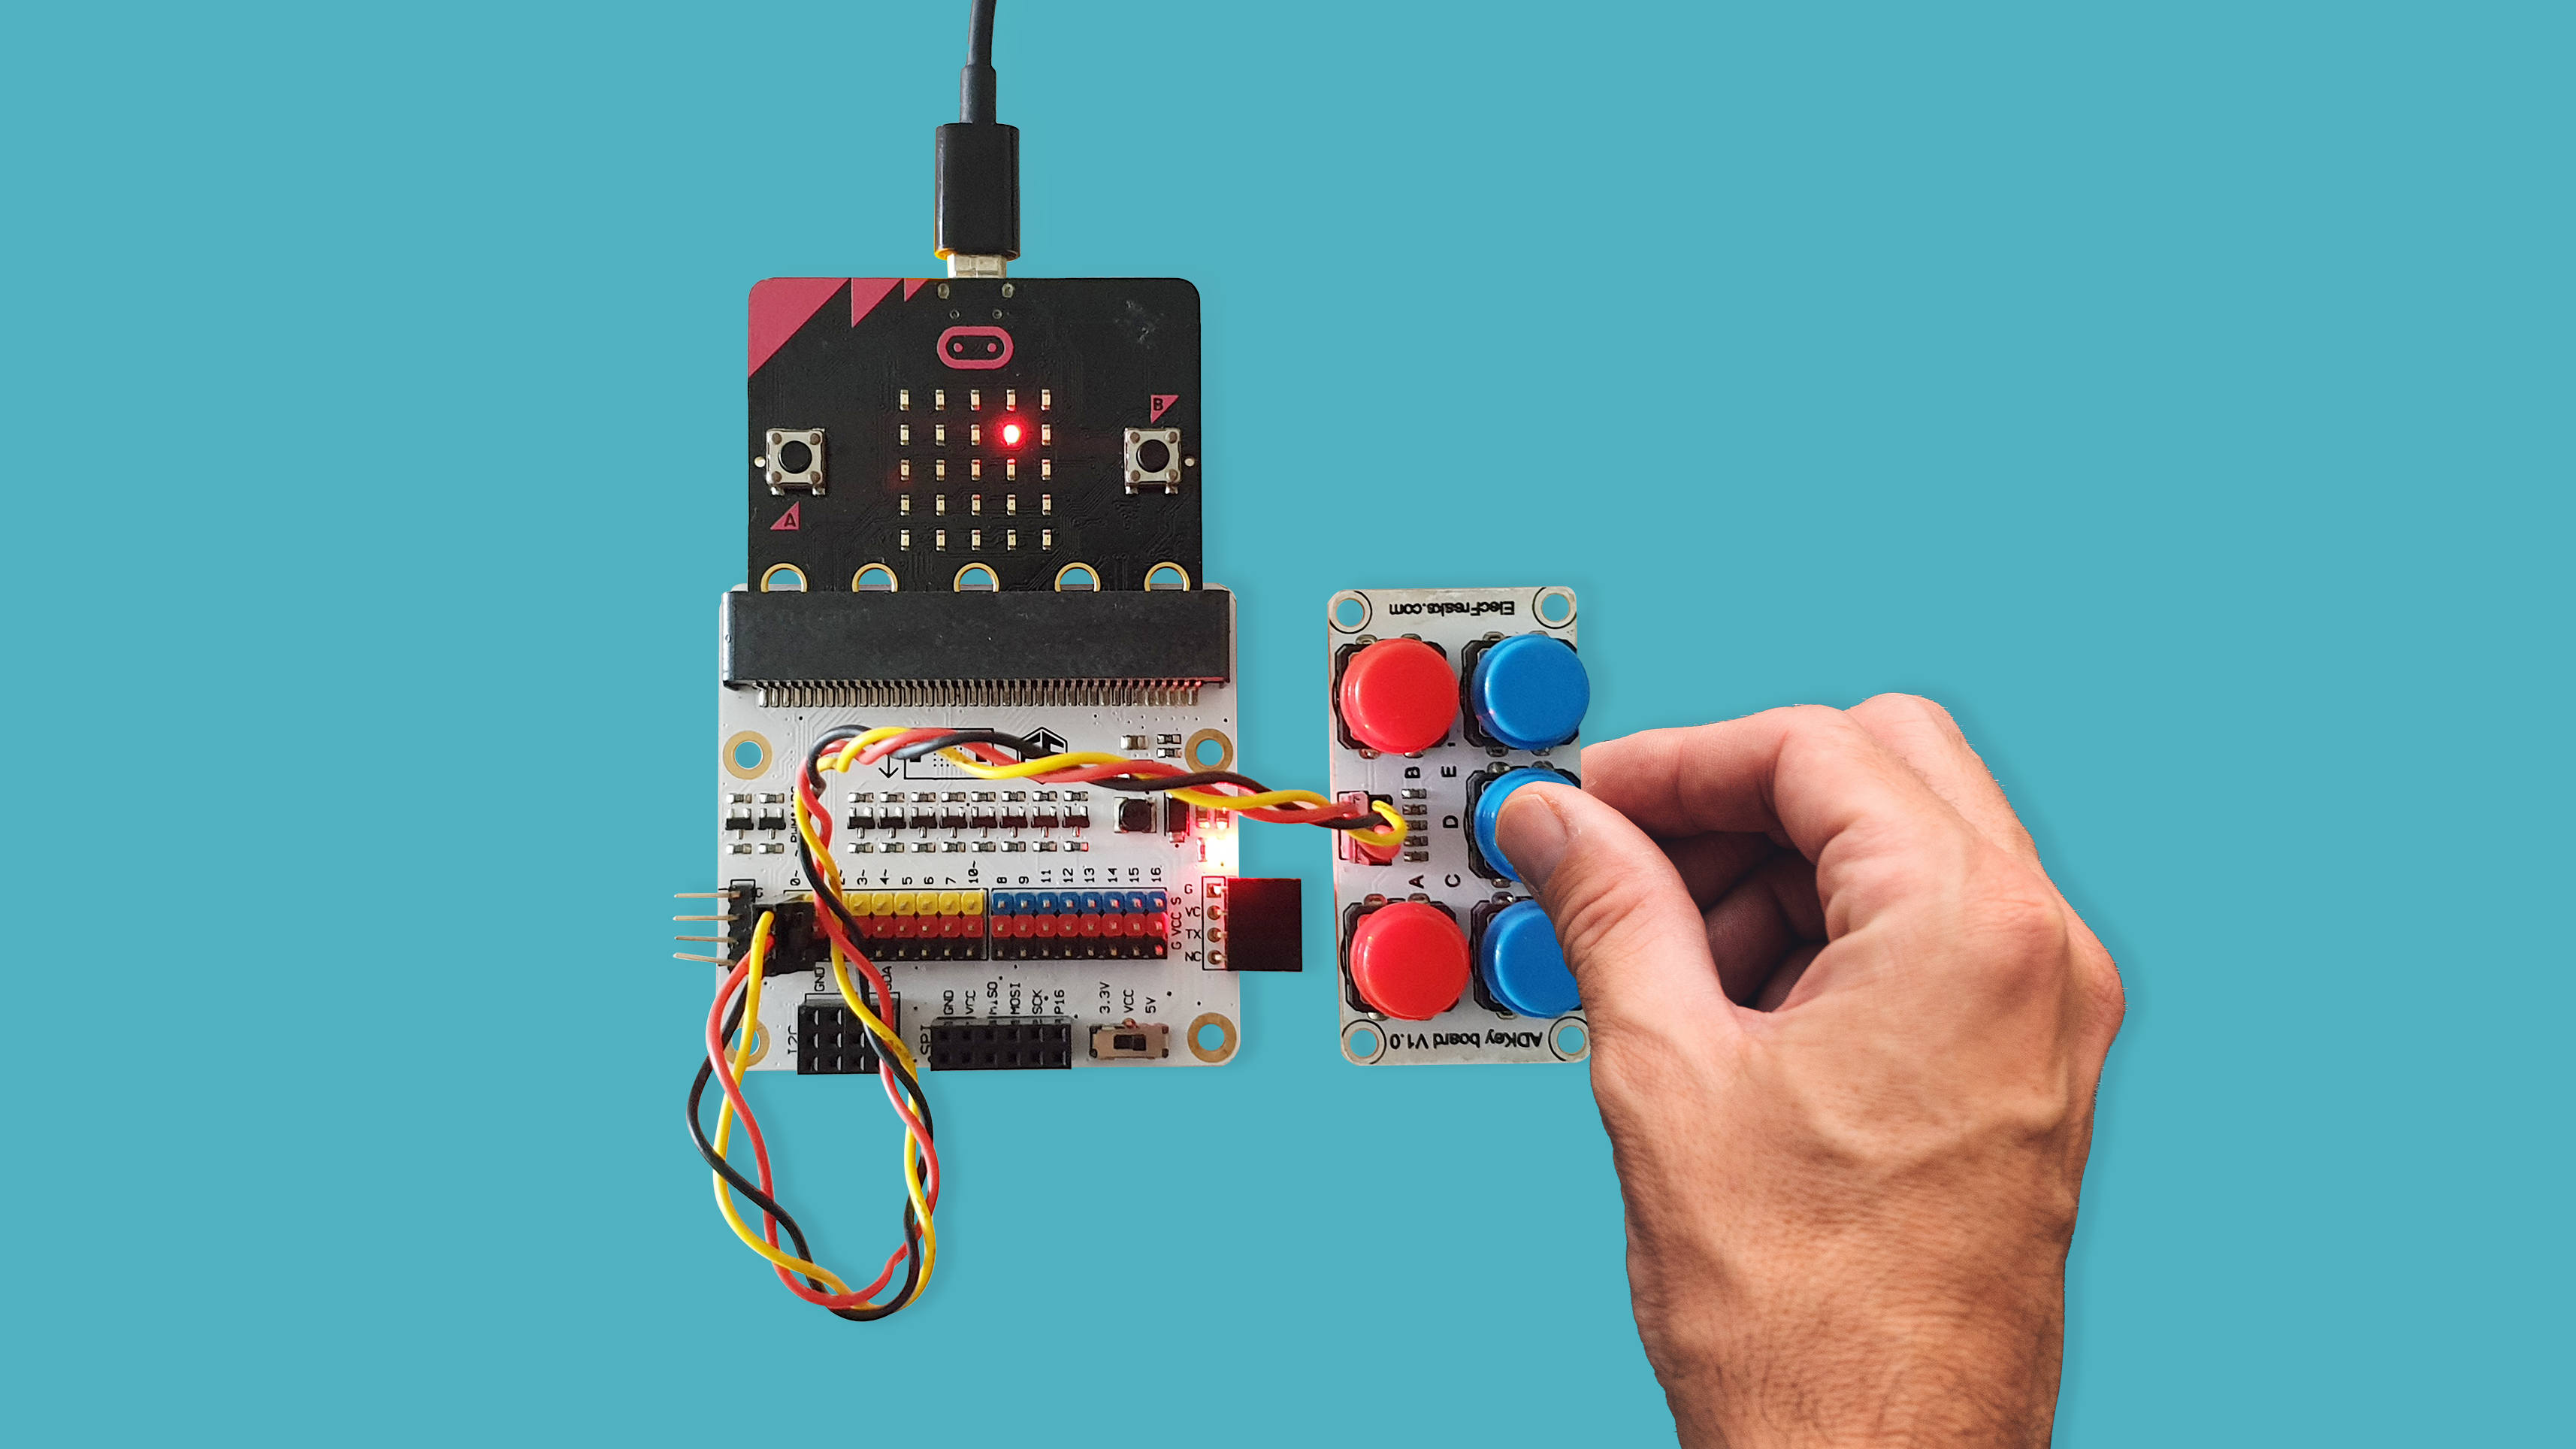
(a) Slot the micro:bit into the top of the Tinkercademy breakout board.
(b) Connect the ADKeypad to pin0 of the Tinkercademy breakout board. Match the colours of the wires to that on the breakout board pin.
Materials
- 1 x BBC micro:bit
- 1 x Tinkercademy breakout board
- 1 x Micro USB cable
- 1 x ADKeypad
STEP 3
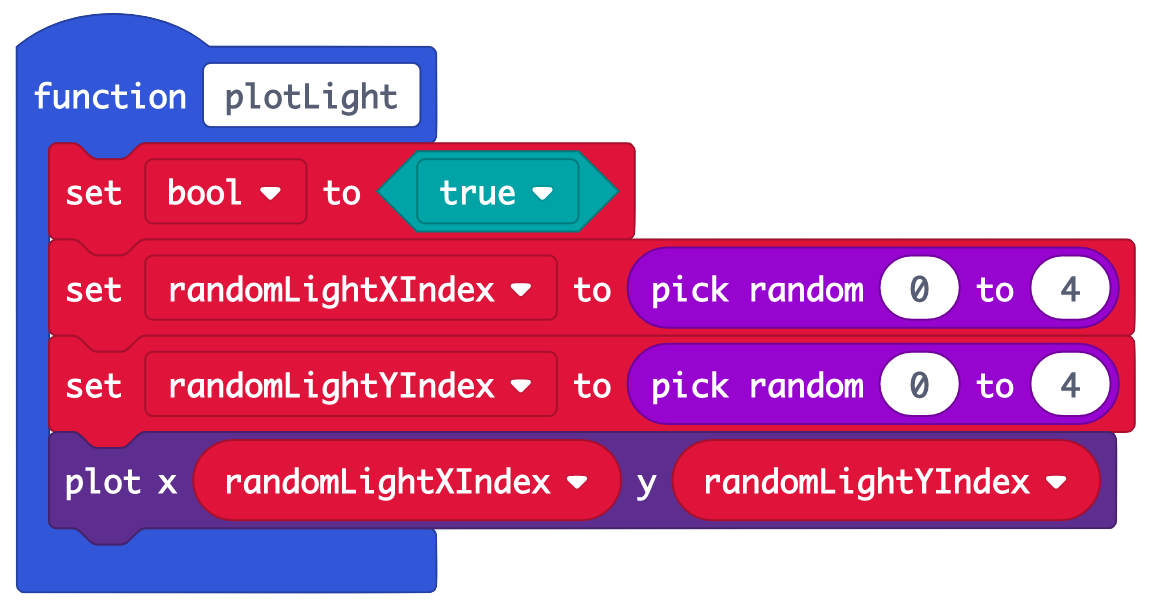
Initialize plotLight
(a) Create a function 'plotLight'. It will be a recursive function which calls itself.
(b) Within this function,
• Set 'bool' to true - later, we will run a loop when 'bool' is true, and terminate it easily by setting it to false
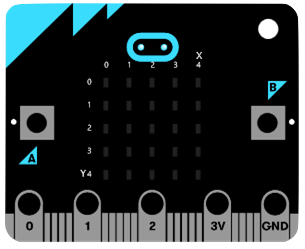
• Create variables 'randomLightXIndex' and 'randomLightYIndex'. Plot these random x and y coordinates on the micro:bit LED screen, to light up a random LED. We chose a random integer from 0 to 4 as the LEDs are numbered from 0 to 4 (see picture).
STEP 4
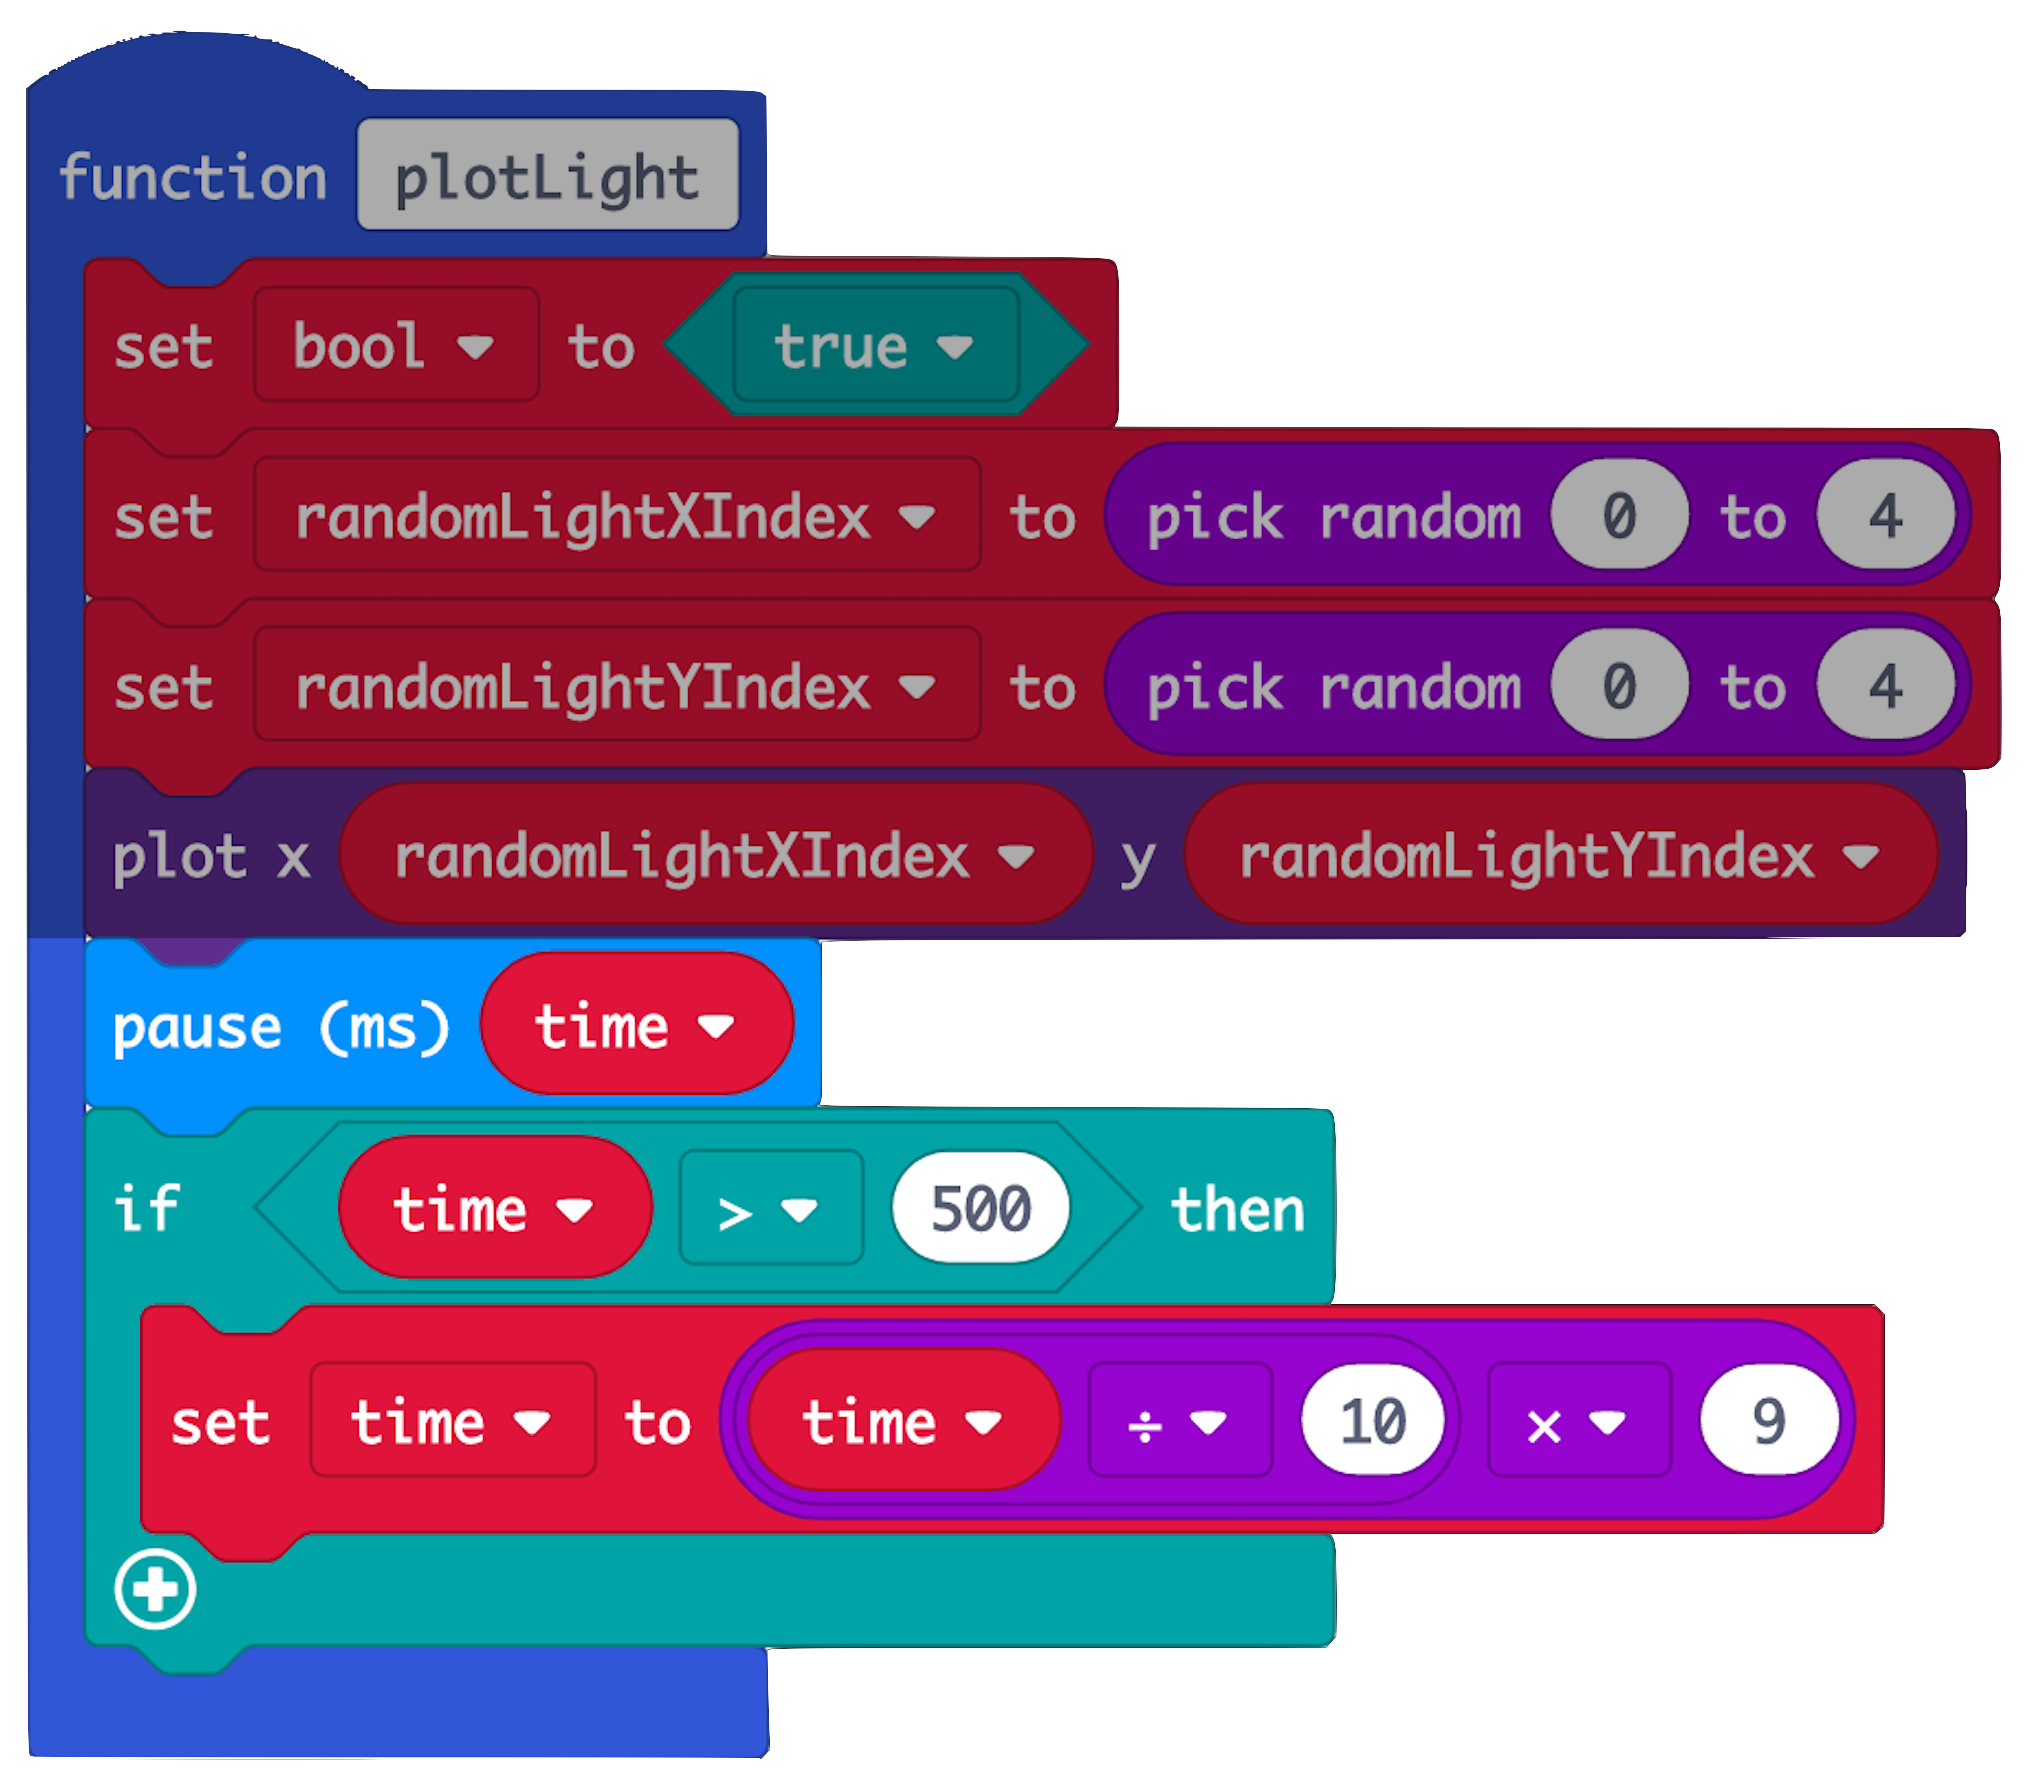
Time Variable
(a) To increase difficulty, create a 'time' variable.
(b) 'time' stores the time (in ms) the game pauses between one LED lighting up and the next.
(c) The arithmetic operation for 'time' decreases the value of 'time'.
(d) When the function is called recursively, pause 'time' between one LED lighting up and the next decreases. The game thus gets faster every time.
(e) As (c) only runs when 'time' > 500ms (0.5s), pause time can never decrease below 0.5s, so the game doesn't become impossible.
STEP 5
Import Tinkercademy Extension
(a) We need to check if the ADKeypad buttons are pressed correctly according to the column (x-coordinate) of the LED that lights up.
(b) But to detect button presses on the ADKeypad, we need to import the Tinkercademy extension first.
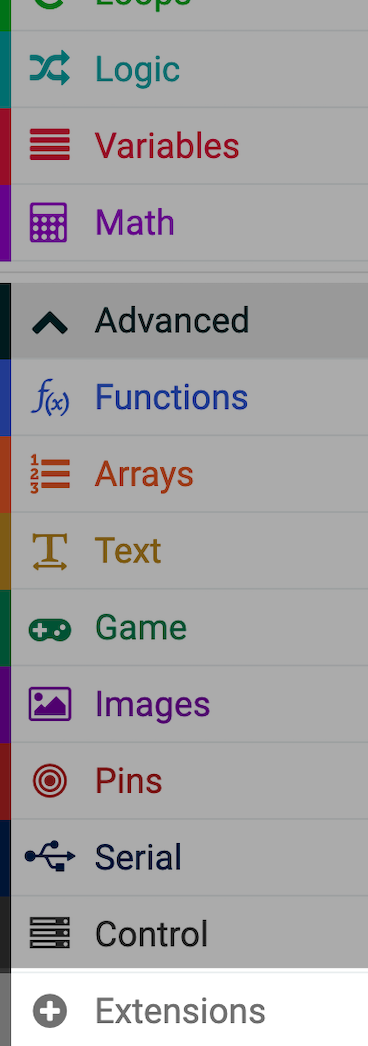
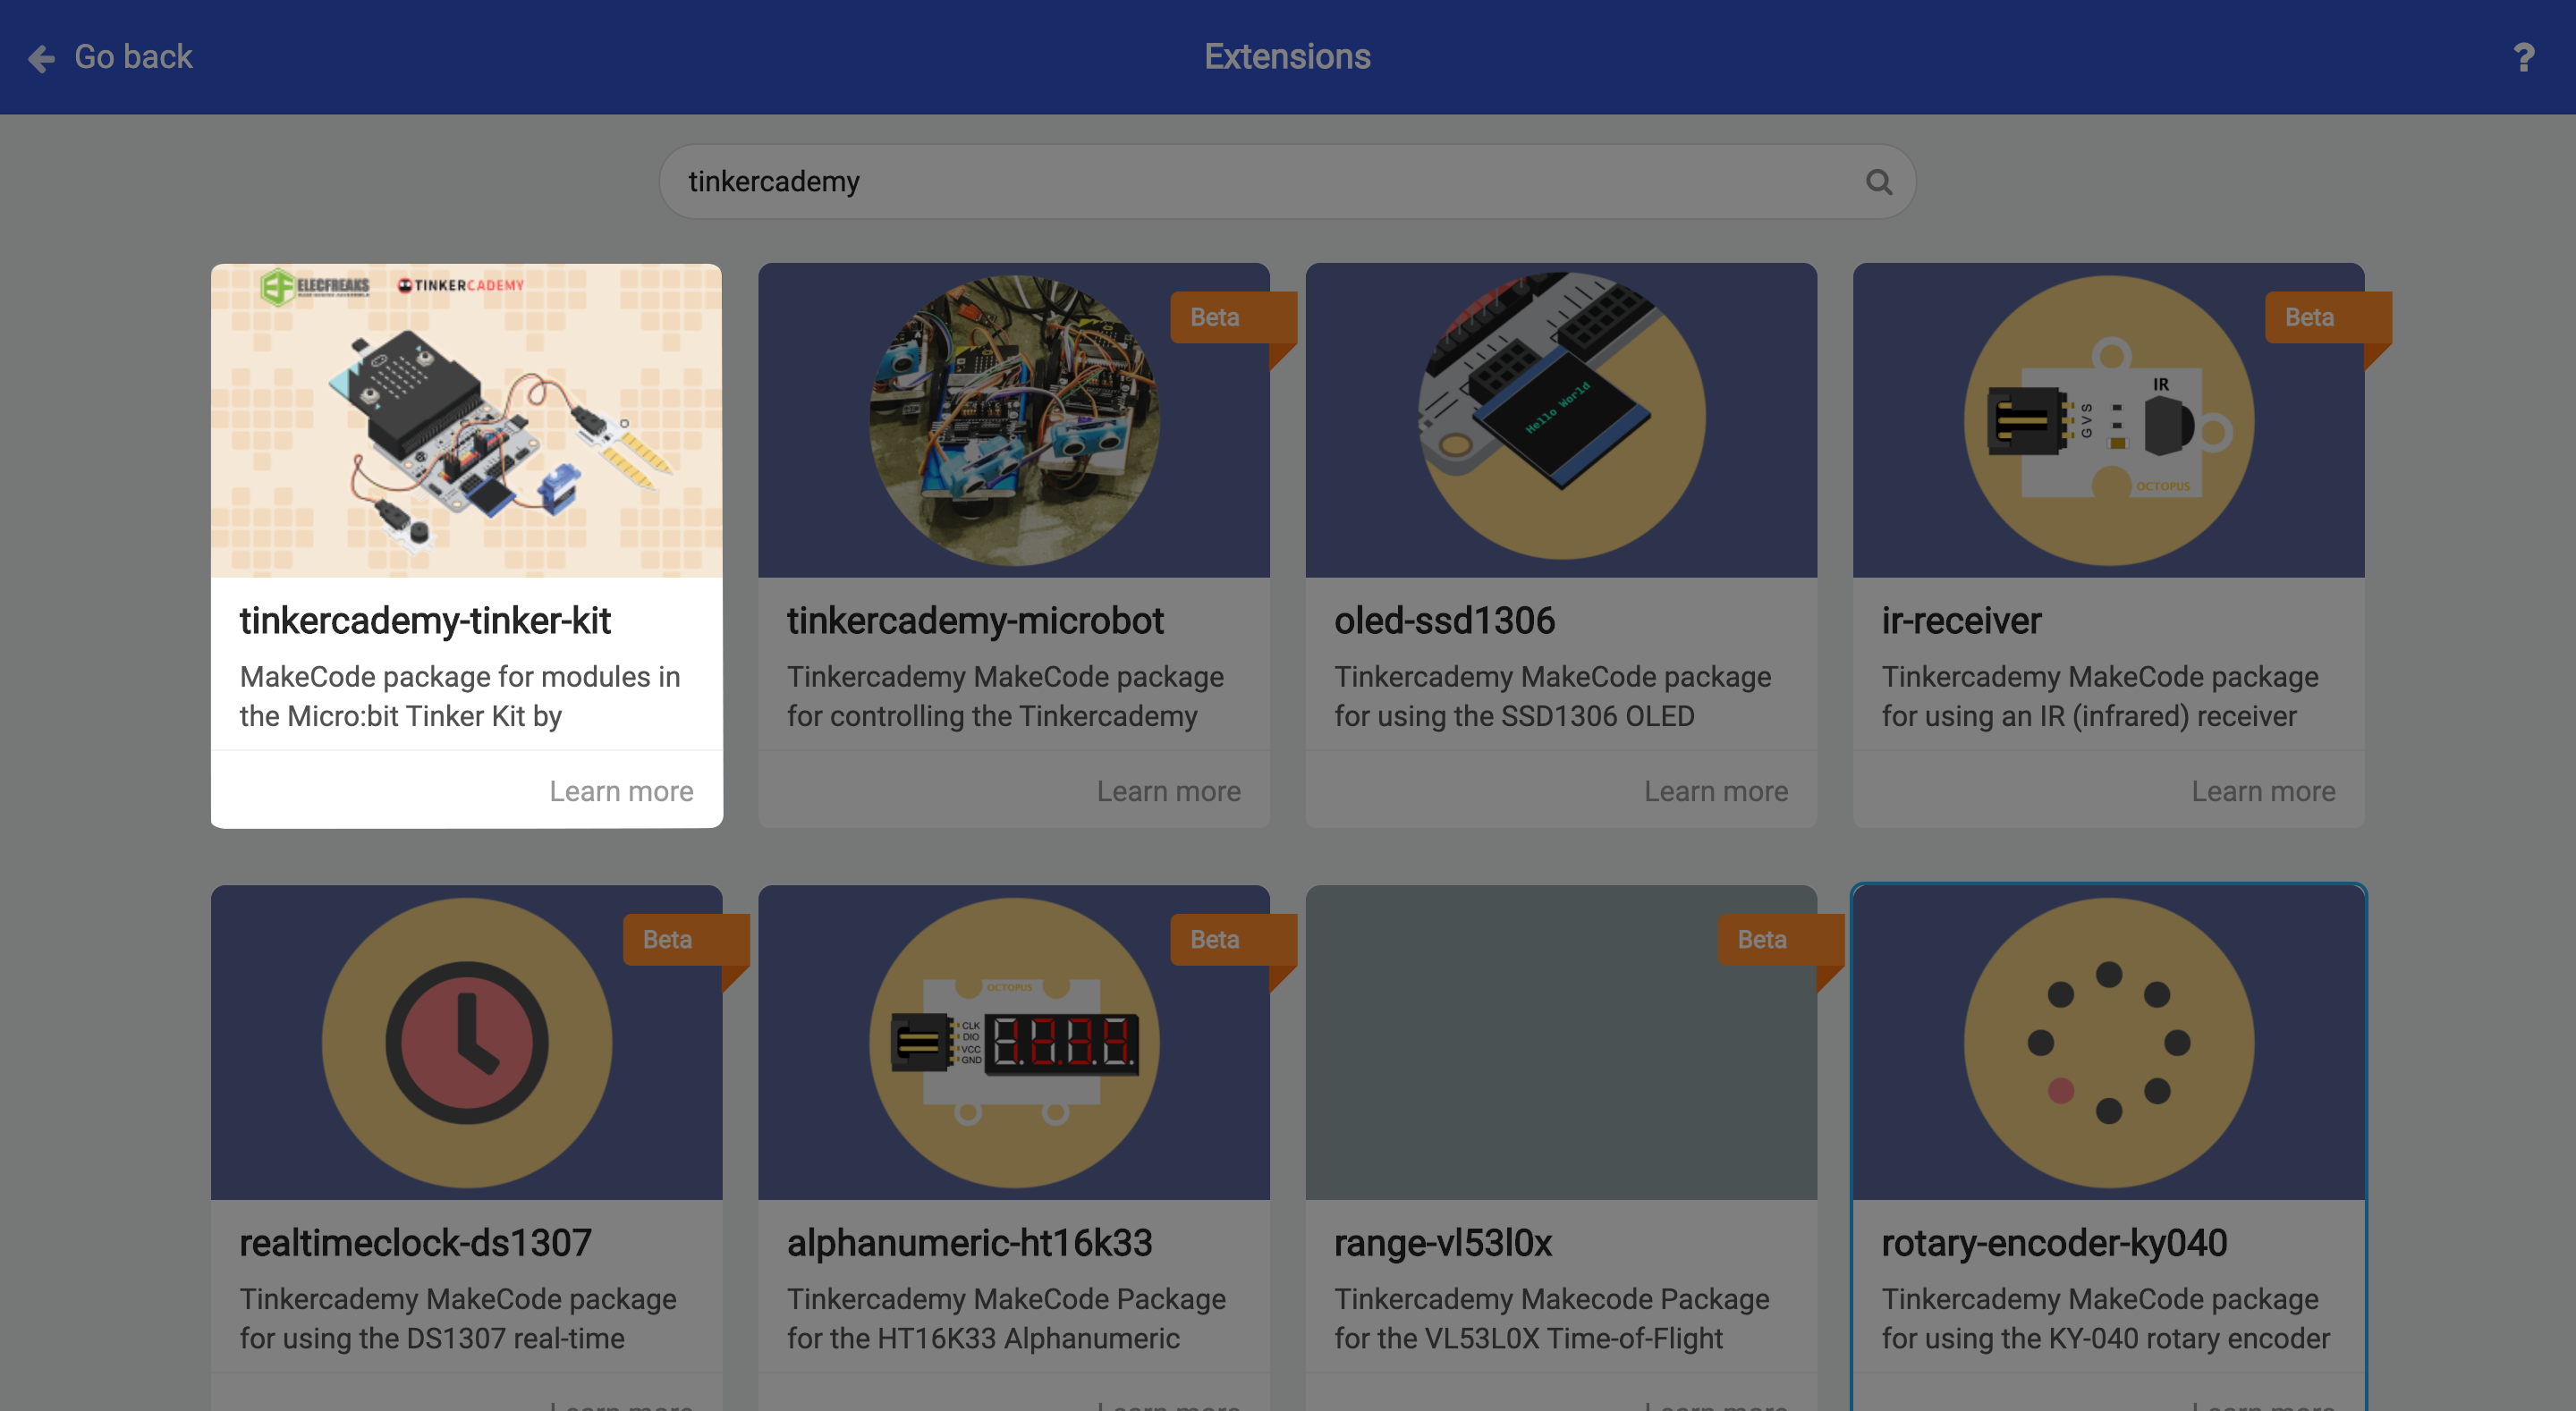
(c) Click the ‘Advanced’ drawer, select 'Extensions'.
(d) Search ‘tinkercademy’ and click 'tinkercademy-tinker-kit'. You will see 2 new drawers - ‘OLED’ and ‘Tinkercademy’ back on MakeCode.
(e) You can find the ADKeypad block for step 5 in ‘Tinkercademy’.
STEP 6
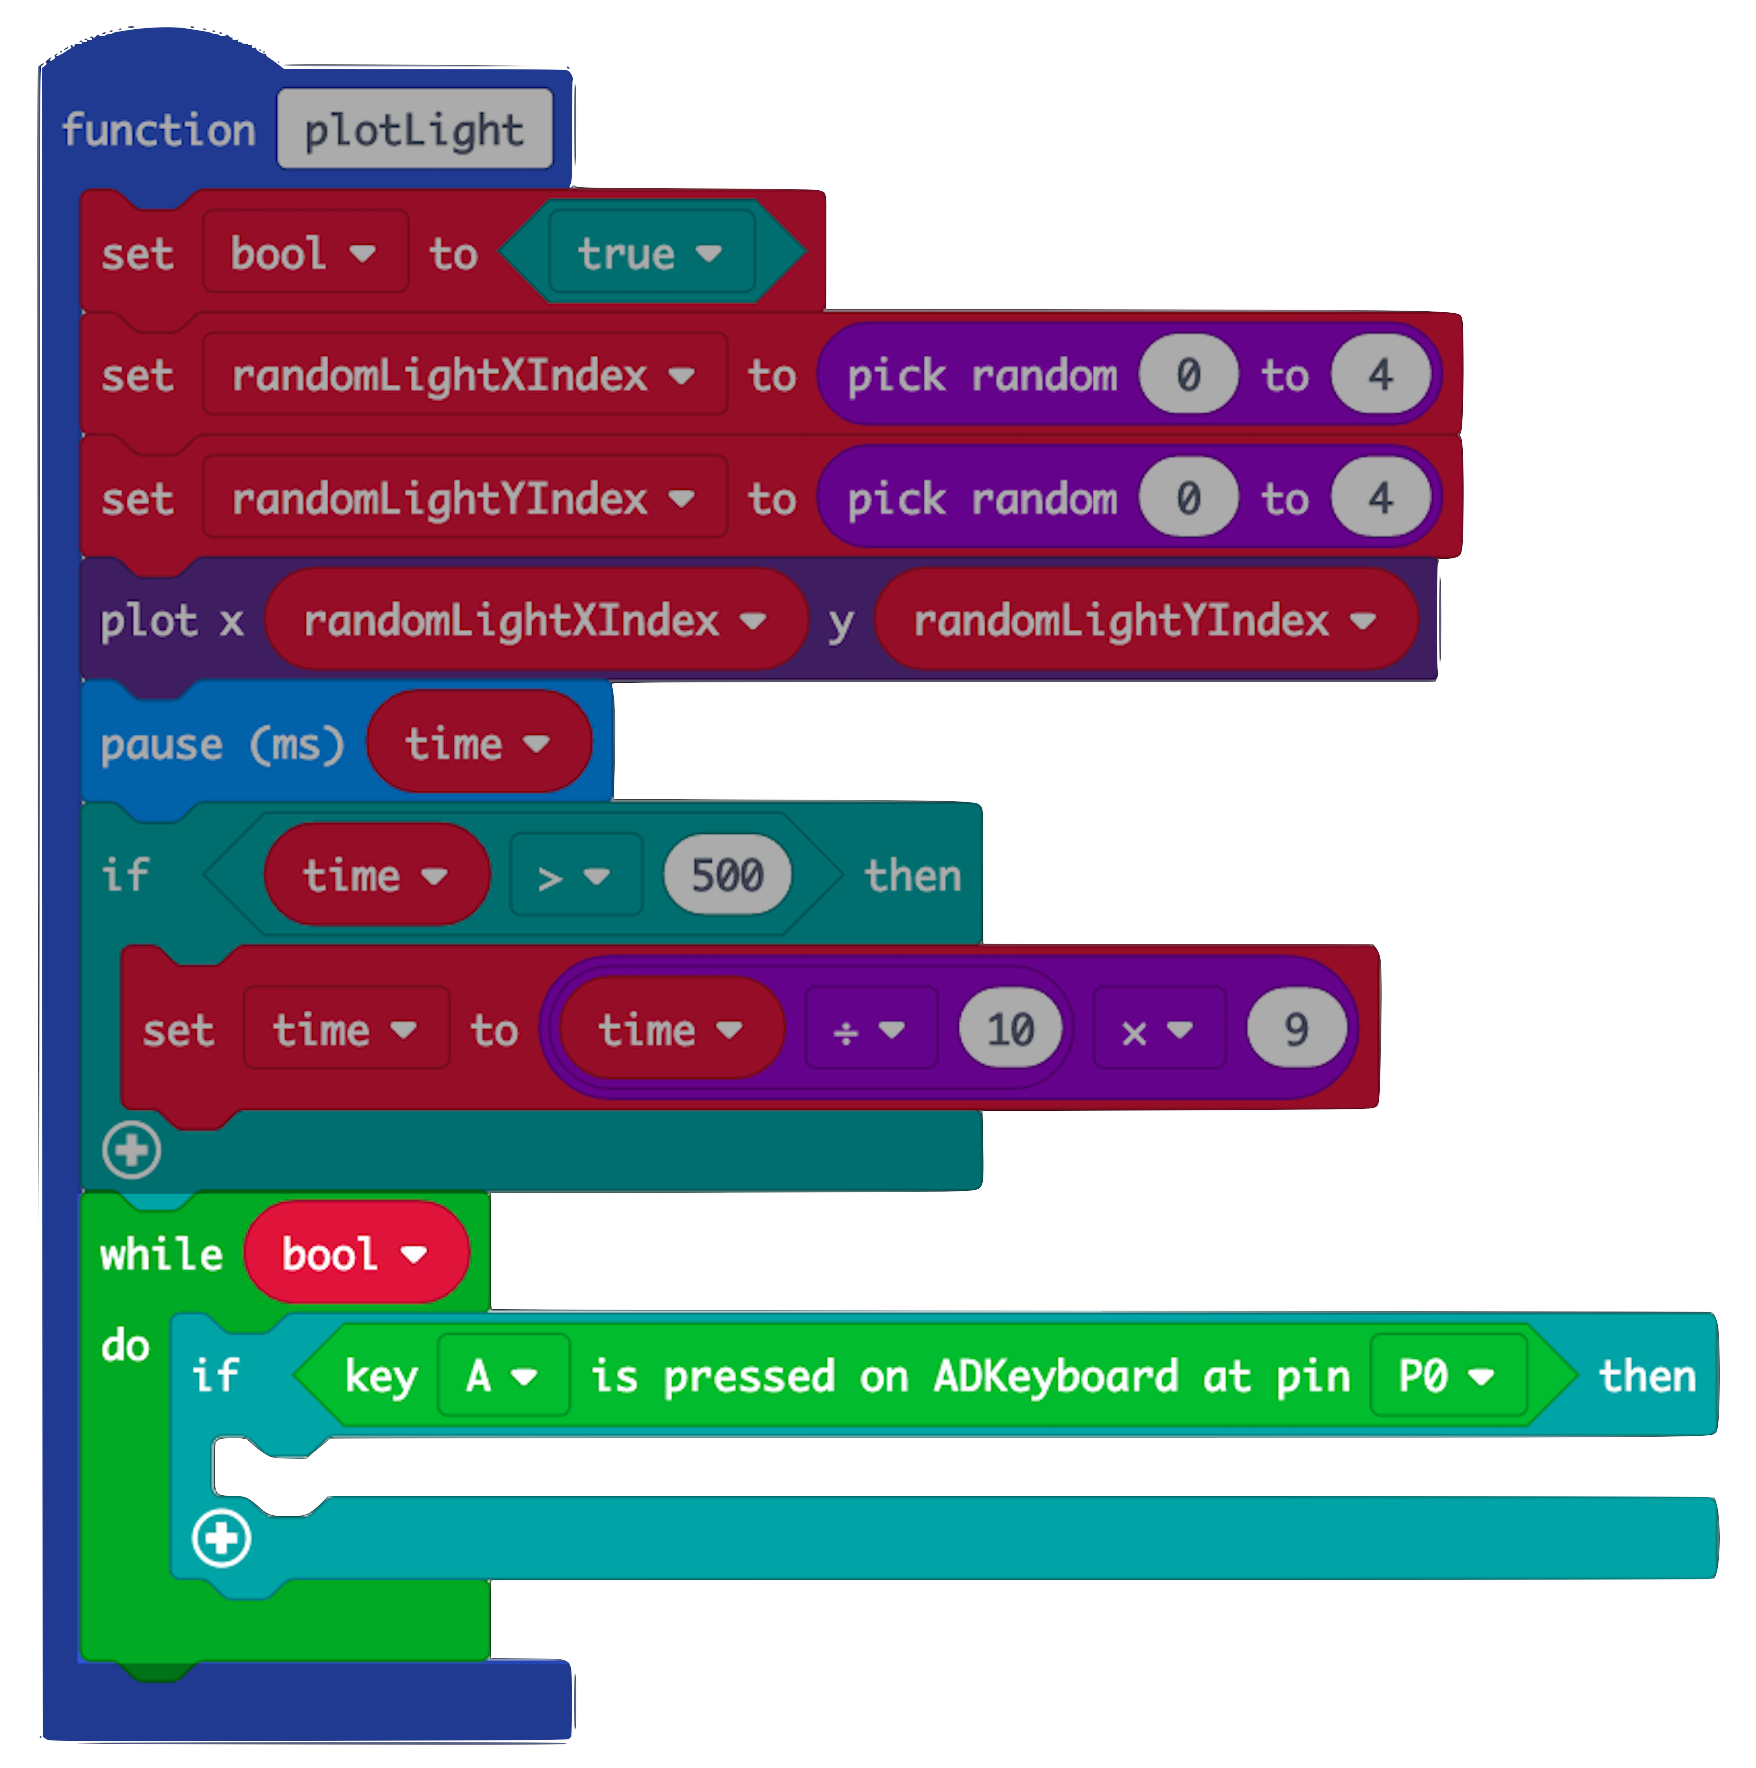
While Loop
(a) Create a 'while' loop that executes only when 'bool' is true.
(b) As 'bool' is set true at the start of 'plotLight', everything under this 'while' loop runs unless 'bool' is set false later.
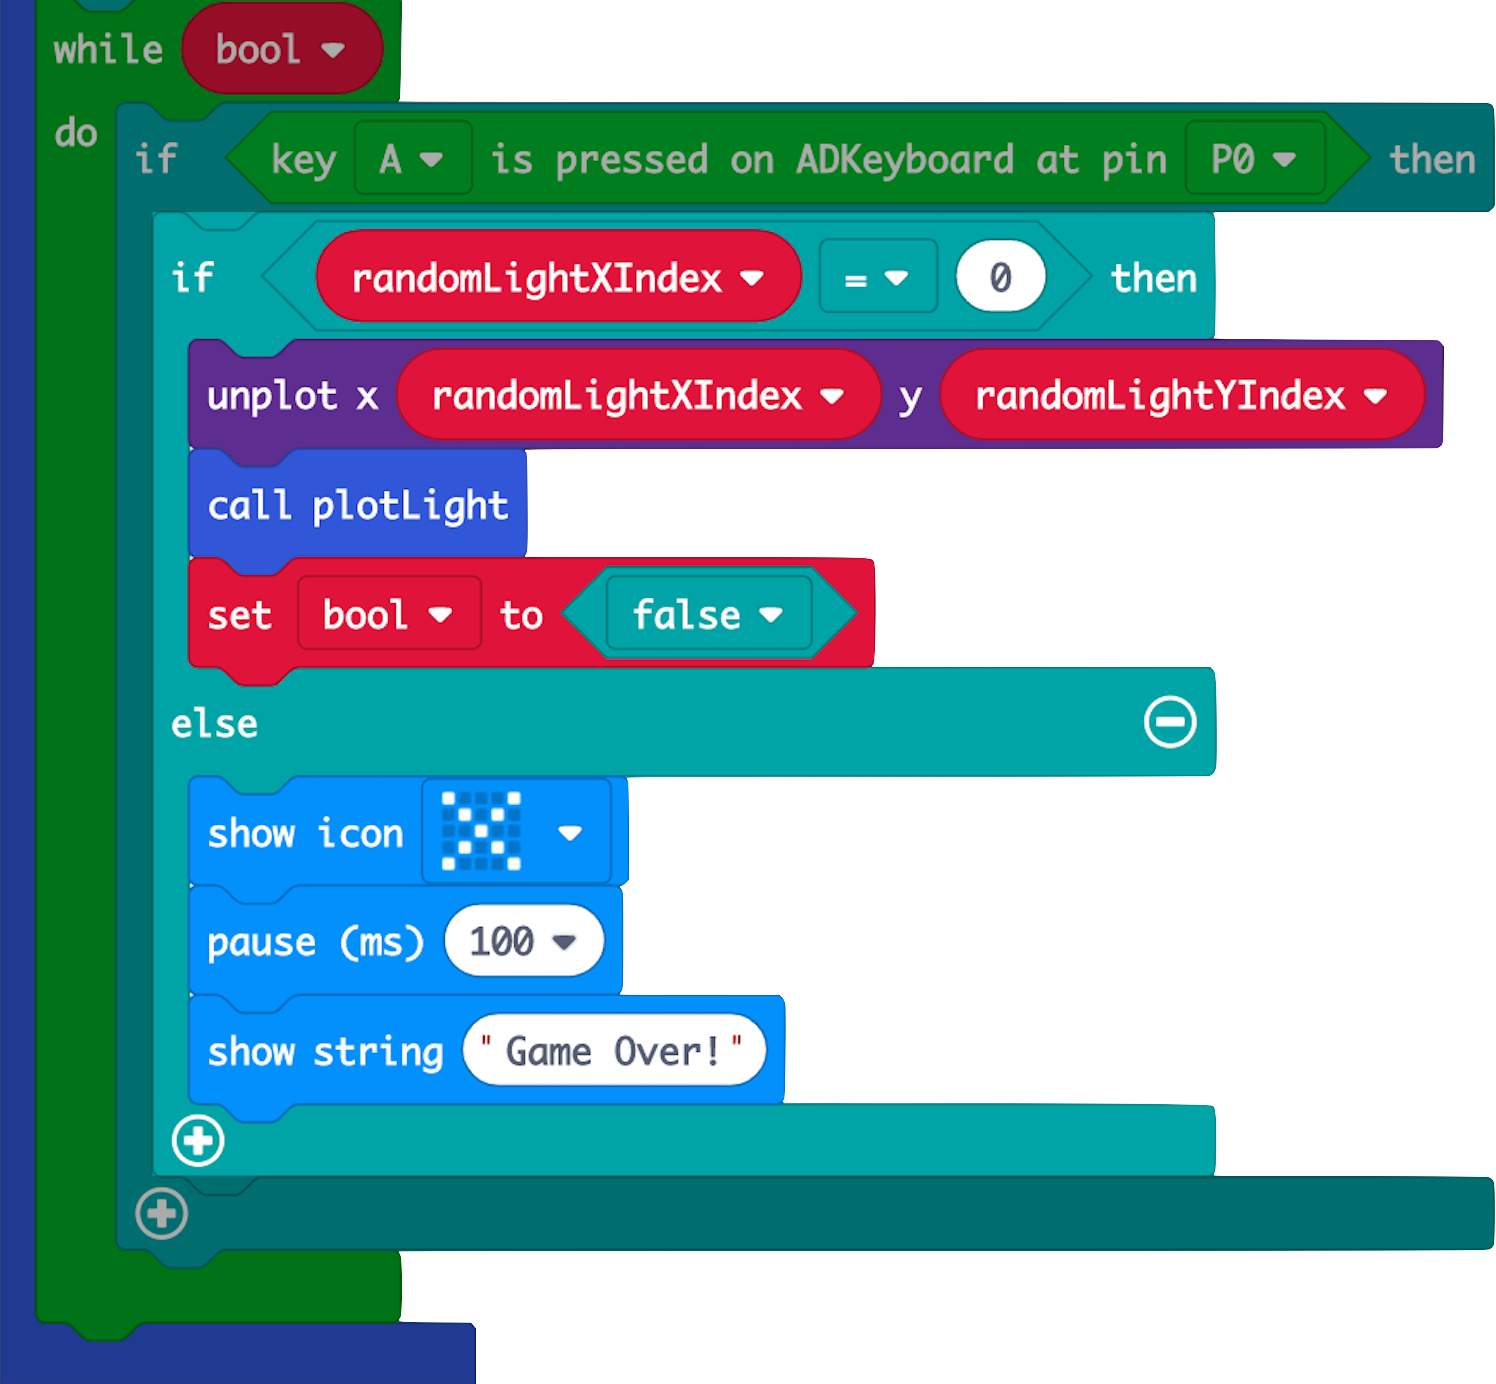
(c) In the loop, first continually check case 1 - if button A on the ADKeypad (connected at P0) is pressed.
• Drag out the ADKeypad block from the 'Tinkercademy' drawer.
STEP 7
Check if Button is Pressed Correctly
(a) If button A is pressed, check if it corresponds to the column of the lit up LED (ie x-coordinate stored in 'randomLightXIndex').
• For button A, it is correct if randomLightXIndex = 0 (ie LED is from 1st column).
(b) If it corresponds,
• remove the current LED
• light up the next random LED by calling 'plotLight', within 'plotLight' - this is recursive programming
• set 'bool' to false to terminate the 'while' loop, greatly improving program efficiency
(c) Otherwise, it's game over!
STEP 8
More Functions!
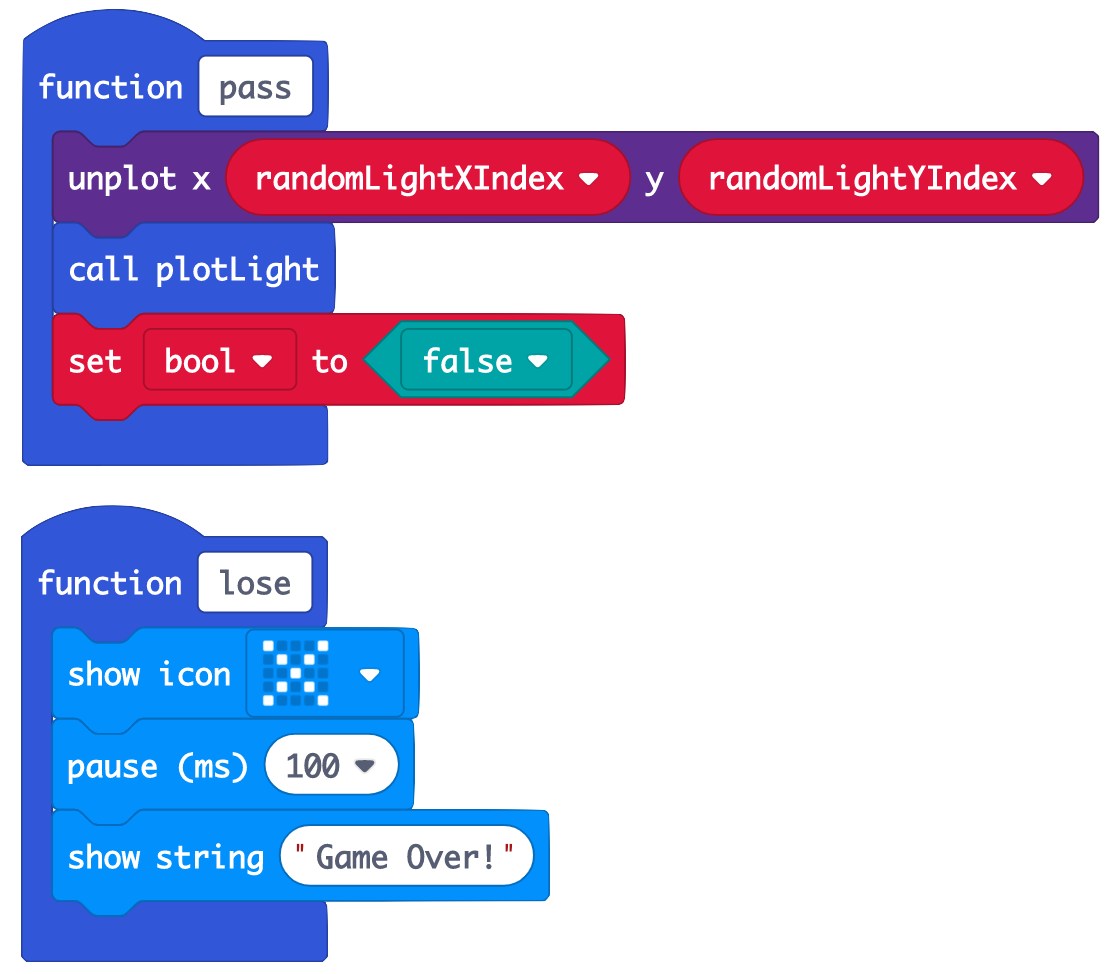
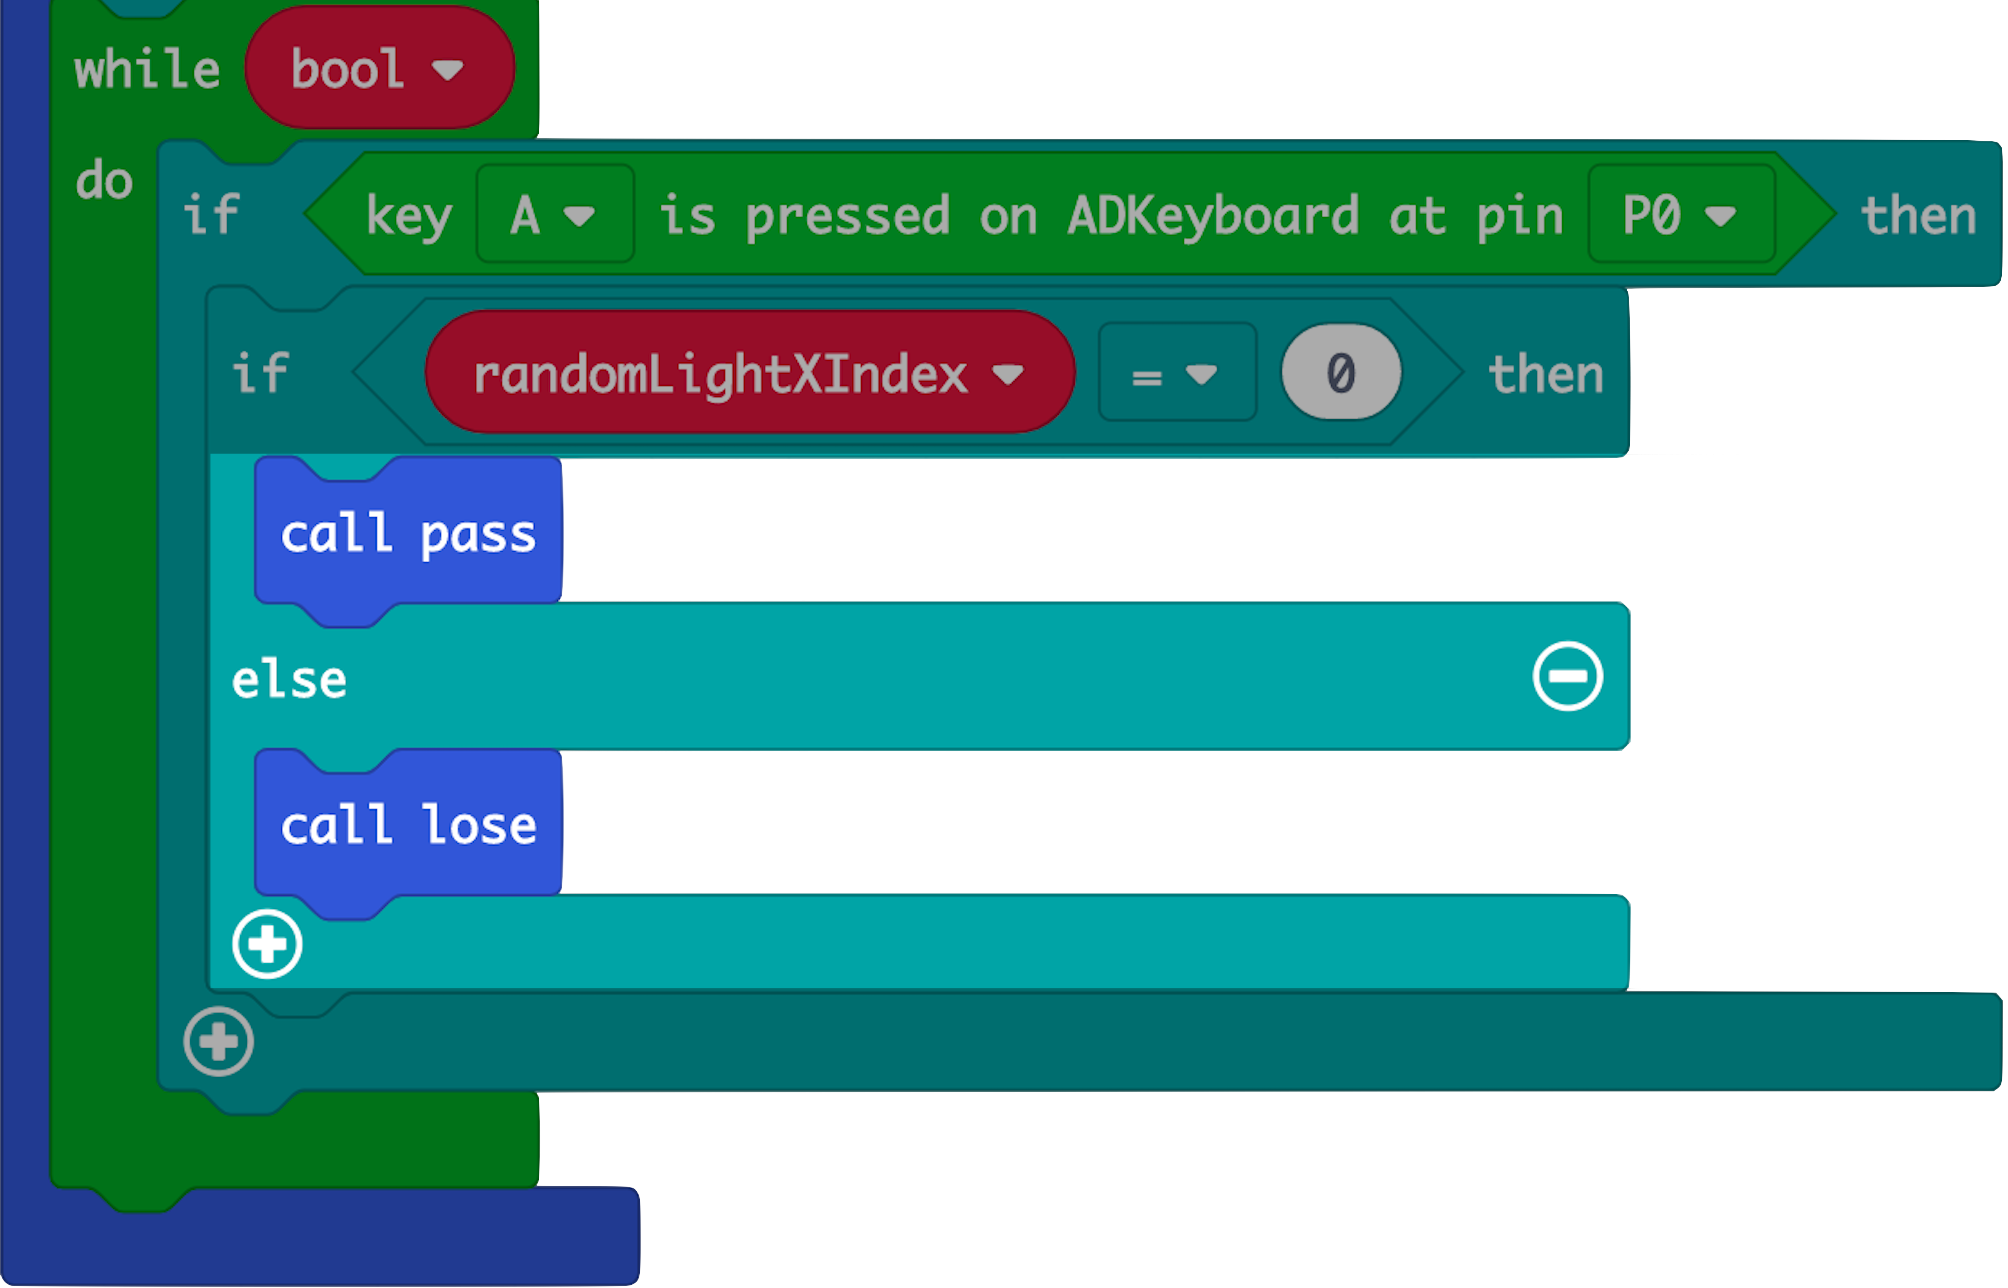
(a) We’ll do something similar for the other 4 buttons on the ADKeypad, but with different ‘if’ statement conditions.
(b) As the code sequence for 6(b) and 6(c) is the same for all 5 buttons, create 2 more functions - 'pass' and 'lose', to store what the program should do when the correct and wrong buttons are pressed respectively.
(c) We can call these functions later for the other buttons. This minimises repetitive code.
(d) Edit your code from step 6 to call these functions instead.
STEP 9
Check Other Button Presses
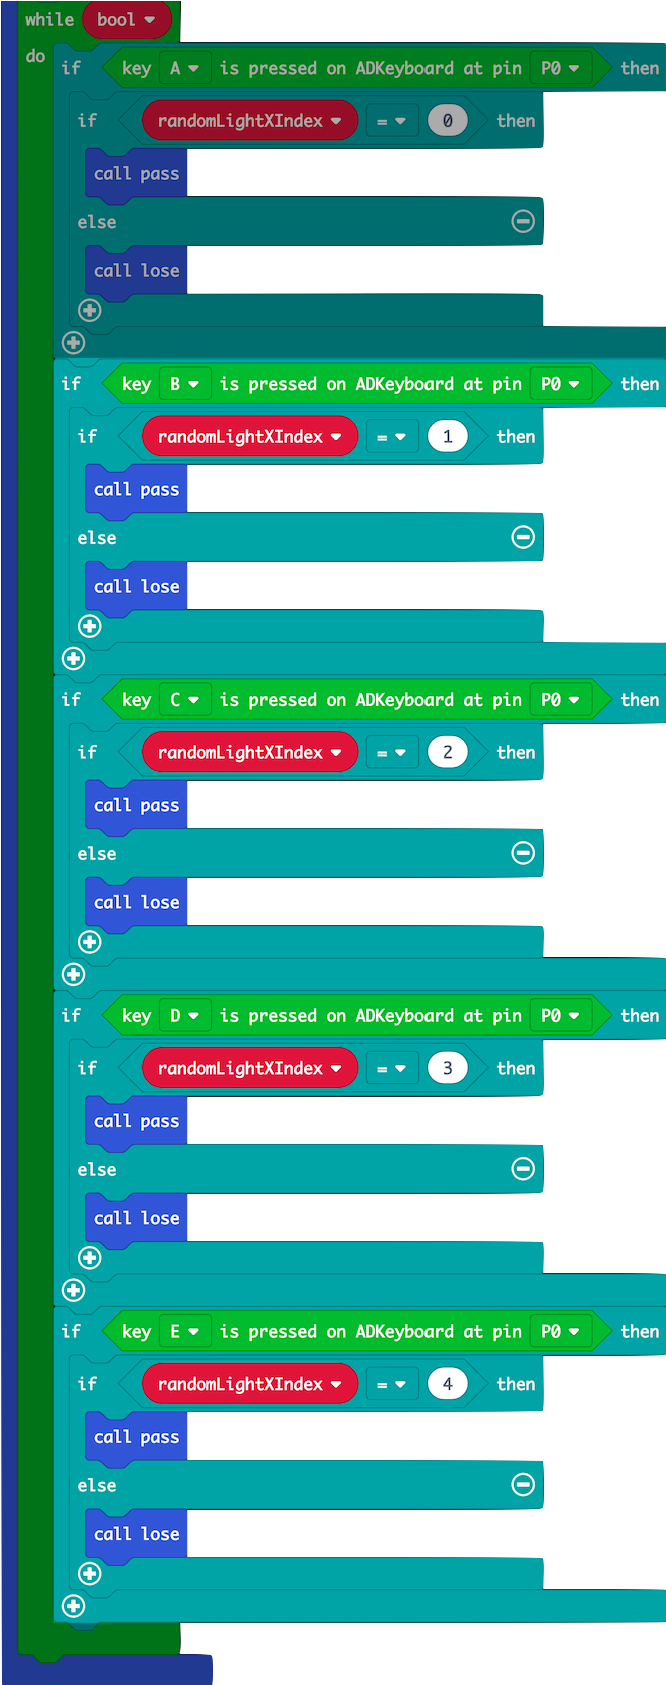
(a) Check if the 4 other ADKeypad buttons are pressed.
• Add under the ‘while’ loop, instead of under 'if key A is pressed’, to always check if the other buttons are pressed even if button A is not.
(b) Within each ADKeypad press 'if' statement, check if the button corresponds to the column of the lit up LED.
• B - 2nd column (randomLightXIndex = 1)
• C - 3rd column (randomLightXIndex = 2)
• D - 4th column (randomLightXIndex = 3)
• E - 5th column (randomLightXIndex = 4)
STEP 10
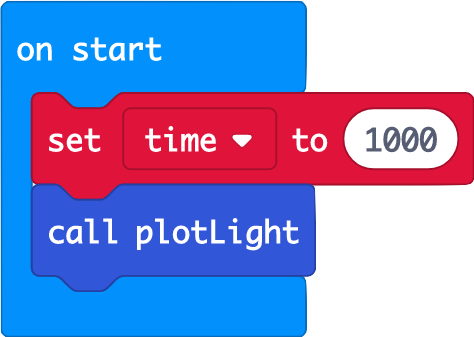
On Start
(a) Set the 'time' to 1000ms on start. It will decrease during the game (recall the math we did in step 3), making the game more difficult.
(b) Don't forget to call the 'plotLight' function when the program starts running to light up the very first LED. The game continues running by itself afterwards due to the recursiveness of the function. A new random LED automatically lights up every time the correct button is pressed!
STEP 11
Complete!
(a) And we're done, congratulations! Don't forget to use the microUSB cable to connect the top of your micro:bit to your laptop and click the ‘Download’ button on MakeCode.
(b) Now you can start clicking the ADKeypad buttons that correspond to column of the LED that lights up, to test your finger dexterity and psychomotor skills. Good luck!
(c) We hope you learnt more about variables, functions (especially recursive functions!), loops and booleans. Have fun!
STEP 12
Extensions
(a) If you want to challenge yourself, you can also add a counter to keep track of the points a player gets before he/she loses.
(b) Clue: Create a variable ‘counter’ and increase it whenever the correct button is pressed. Remember to display it before Game Over!
(c) Here are some additional resources if you want to find out more about:
• Recursive functions - http://pages.cs.wisc.edu/~calvin/cs110/RECURSION.html
• Execution contexts (to understand inner workings of recursion) - https://stackoverflow.com/questions/9384758/what-is-the-execution-context-in-javascript-exactly
Made this activity? Good Job! Now spread the word. Share a photo of your creation on social media with #letsgethacking #FingerDexterityGame