Pacman
Recreate a simpler version of the classic Pacman game on the micro:bit.

YOU WILL NEED
- 1 x BBC micro:bit
- 1 x Tinkercademy Breakout Board
- 1 x Micro USB cable
- 1 x ADKeypad
STEP 1
We’re going to recreate a simple version of the classic Pacman game on the micro:bit.
You'll learn about
• Using the ADKeypad with the micro:bit
• If-else conditional statements
• While loops
• Functions
STEP 2
Connecting the Components
(a) Slot the micro:bit into Tinkercademy breakout board.
(b) Connect the external components to the Tinkercademy breakout board.
• Connect the ADKeypad to pin0. Match the colours of the wires to that on the breakout board pins.
STEP 3
Importing Tinkercademy Extension
To detect button presses on the ADKeypad, we need to import a special package in MakeCode.
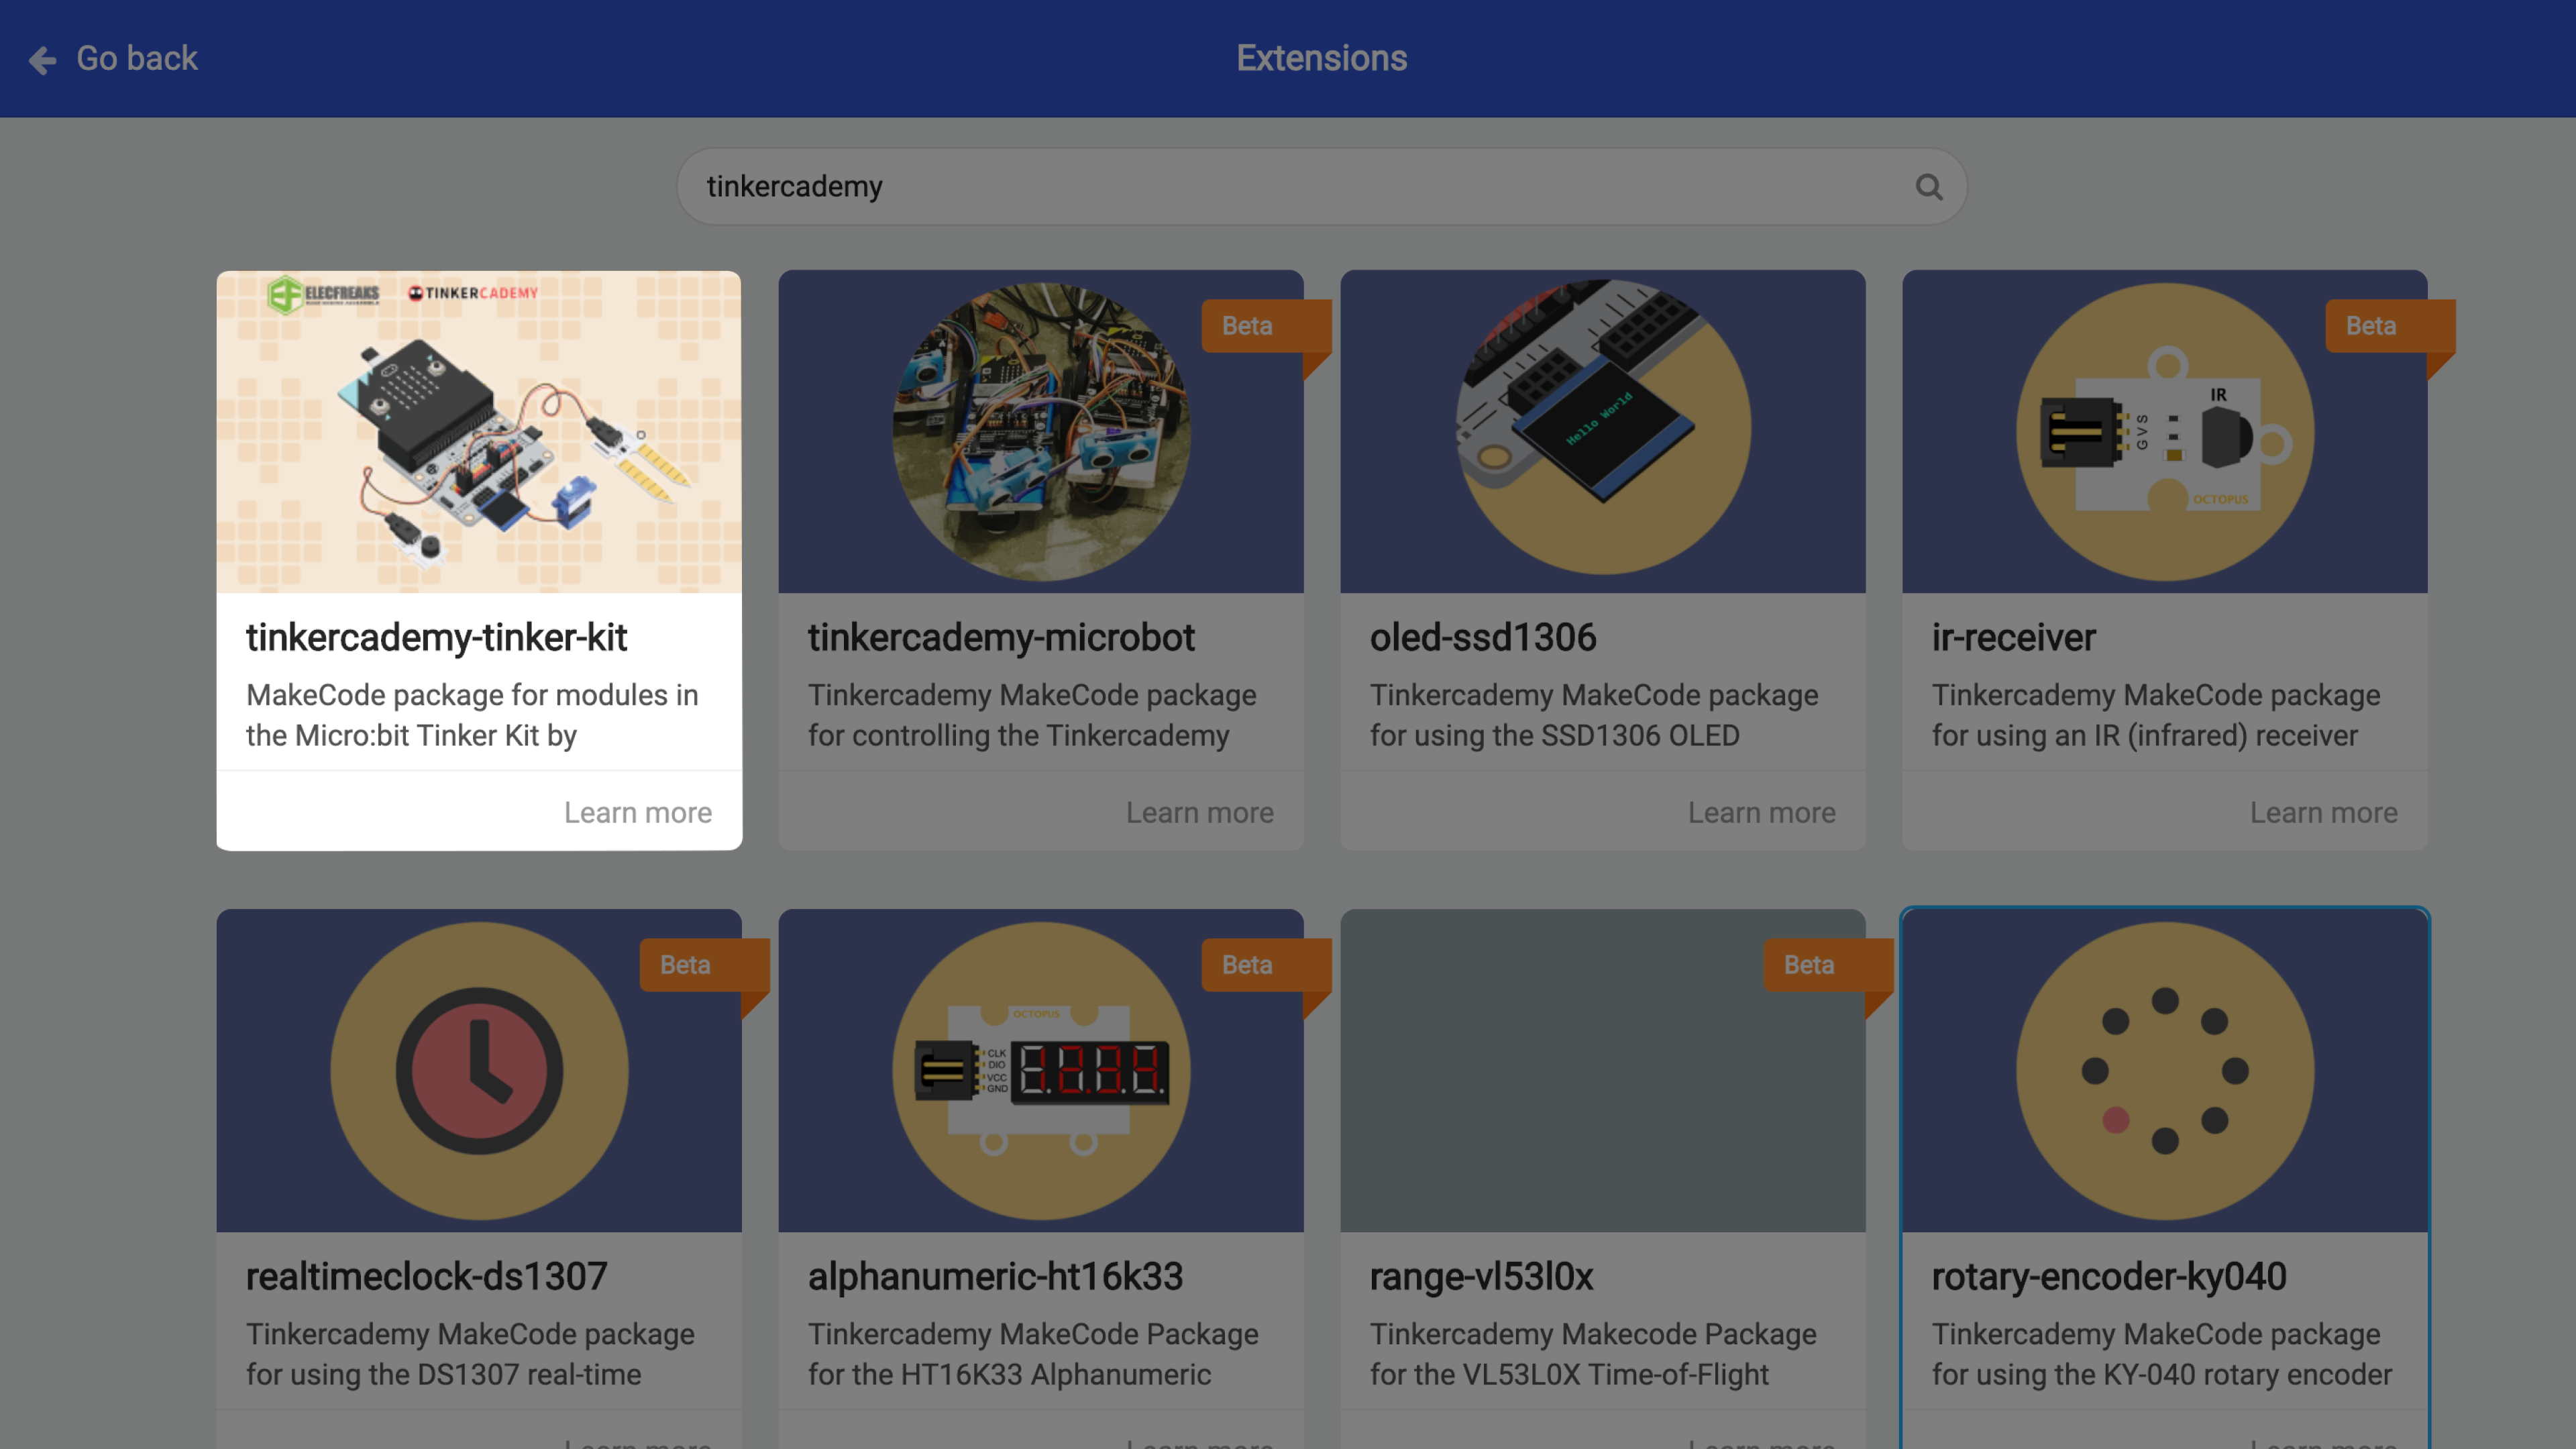
(a) Click on the ‘Advanced’ drawer, select 'Extensions'.
(b) Search ‘tinkercademy’ and click 'tinkercademy-tinker-kit' to import the Tinkercademy extension. You will see 2 new drawers - ‘OLED’ and ‘Tinkercademy’.
(c) You’ll need to re-import the extension again for new projects in the future.
STEP 4

On Start
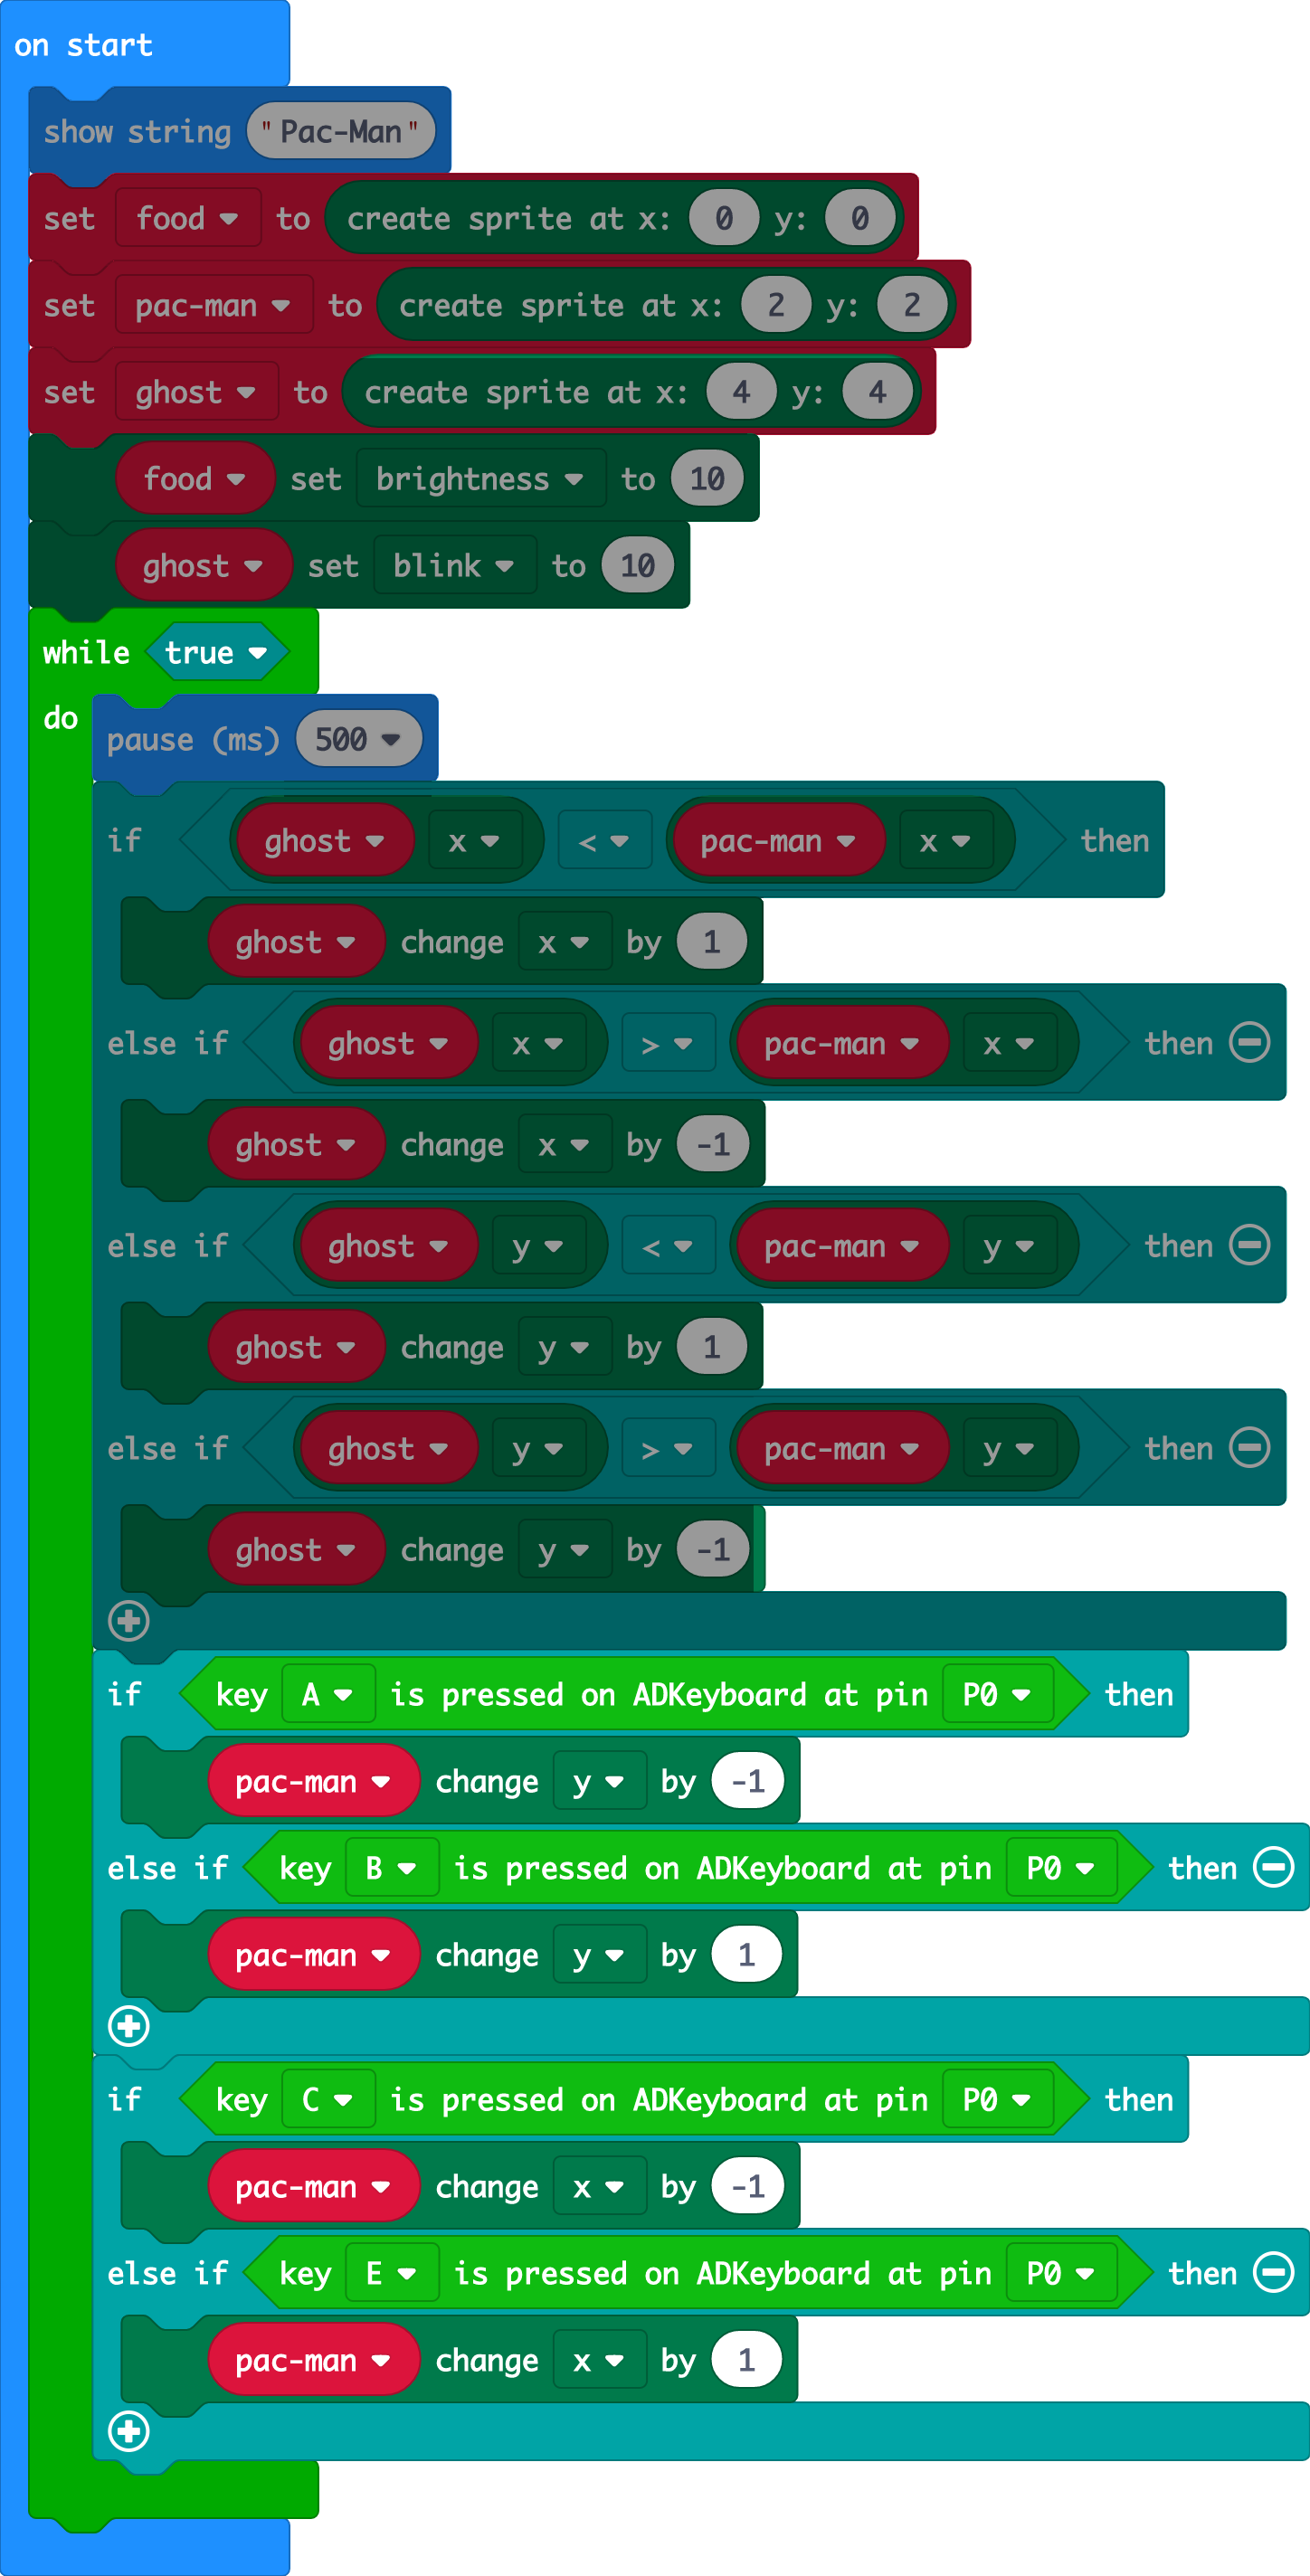
(a) Before the game starts, let the LEDs on the micro:bit display the name of the game, ‘Pac-Man’.
(b) Create 3 variables and name them as ‘pacman’, ‘ghost’ and ‘food’.
(c) Set position of pacman, ghost and food. They can be initalised to any position, but do note that there should be some distance between the pacman, ghost and food.
(d) To differentiate between pacman, ghost and food, set brightness of food to 10 and blink of ghost to 10.
(e) For (d), you can set the brightness and blink to any value you’re comfortable with. You can even try setting the ghost or pacman to be dimmer and the food to blink. Do note that a larger “blink” value would cause the sprite to blink faster.
STEP 5

Chasing the pacman
We use a while loop to ensure that the ghost is always chasing the pacman as long as the game is ongoing.
(a) Since the LEDs on the micro:bits can be represented using x and y coordinates, we can make use of it to determine which direction the ghost should move.
(b) Insert 4 if-else statements such that the ghost will move towards the pacman as shown in the picture. This is a conditional, everything under this block runs only when the condition is fulfilled, ie. If the ghost is on the right of the pacman (x of ghost > x of pacman), ghost will move left (x value of ghost should decrease).
STEP 6
Controls
(a) We can make use of the buttons on the ADKeypad to control the movement of the pacman. You can choose to use any buttons on the ADKeypad you’re comfortable with. In this case, ‘A’ will move the pacman down, ‘B’ will move it up, ‘C’ will move it left and ‘D’ will move it right.
(b) We will do this with if-else statements. If button ‘A’ if pressed on the ADKeypad on pin p0, change the y-coordinate of pacman by 1, moving the pacman down. Else-if ‘B’ is pressed, change the y-coordinate of pacman by -1, moving the pacman down.
(c) Repeat (b) to move pacman left and right, changing the buttons pressed and ‘y’ to ‘x’.
(d) Ensure that the ‘left-right’ and ‘up-down’ movements are in 2 separate if-else statements.
STEP 7
Food and score tracking
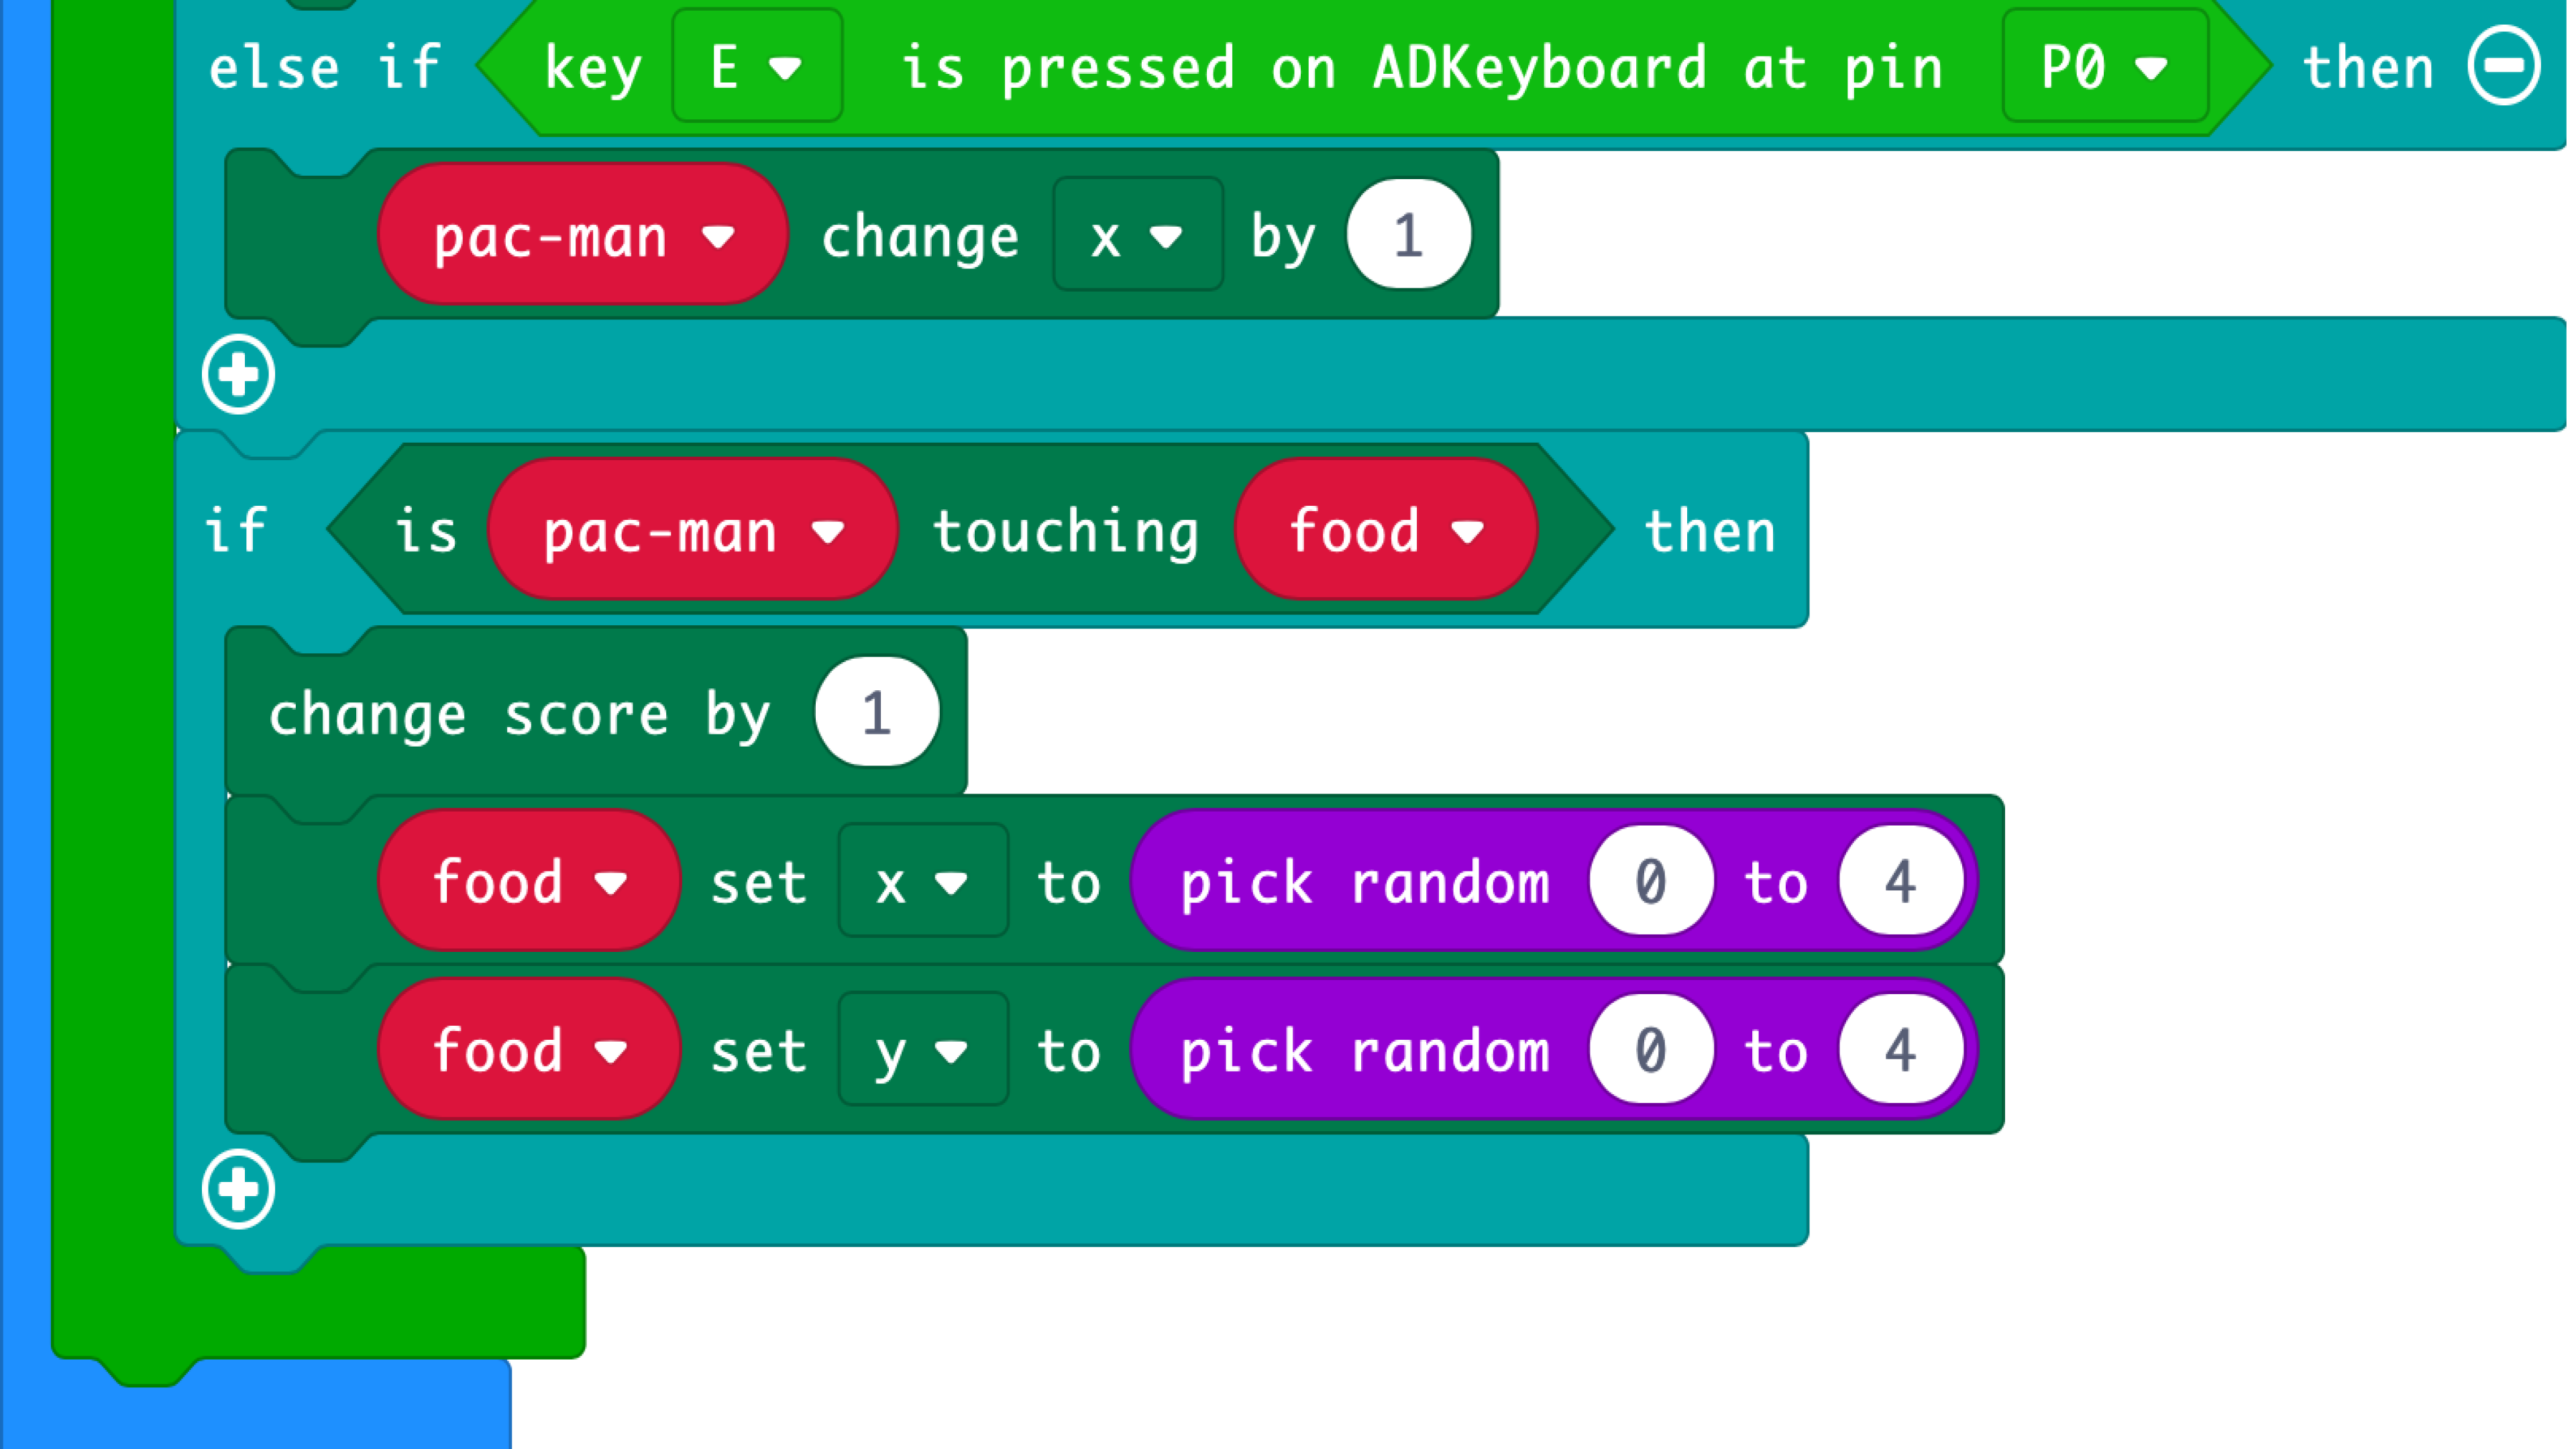
(a) Player will move on to the next level if pacman reaches the food without getting caught by the ghost. Score of player would also increase by 1. We use an if-else statement to do this. If pacman is touching food, then increase score by 1. Player proceeds to next level.
(b) We can re-generate the food for the next level by using the random number generator from the math drawer. Set the pick random from 0 to 4 for the x and y-coordinates of the food.
STEP 8

Ghost’s new position
(a) After generating the food, we need to generate a ghost for the next level and ensure that the ghost is not too near the food or at the same position as the food.
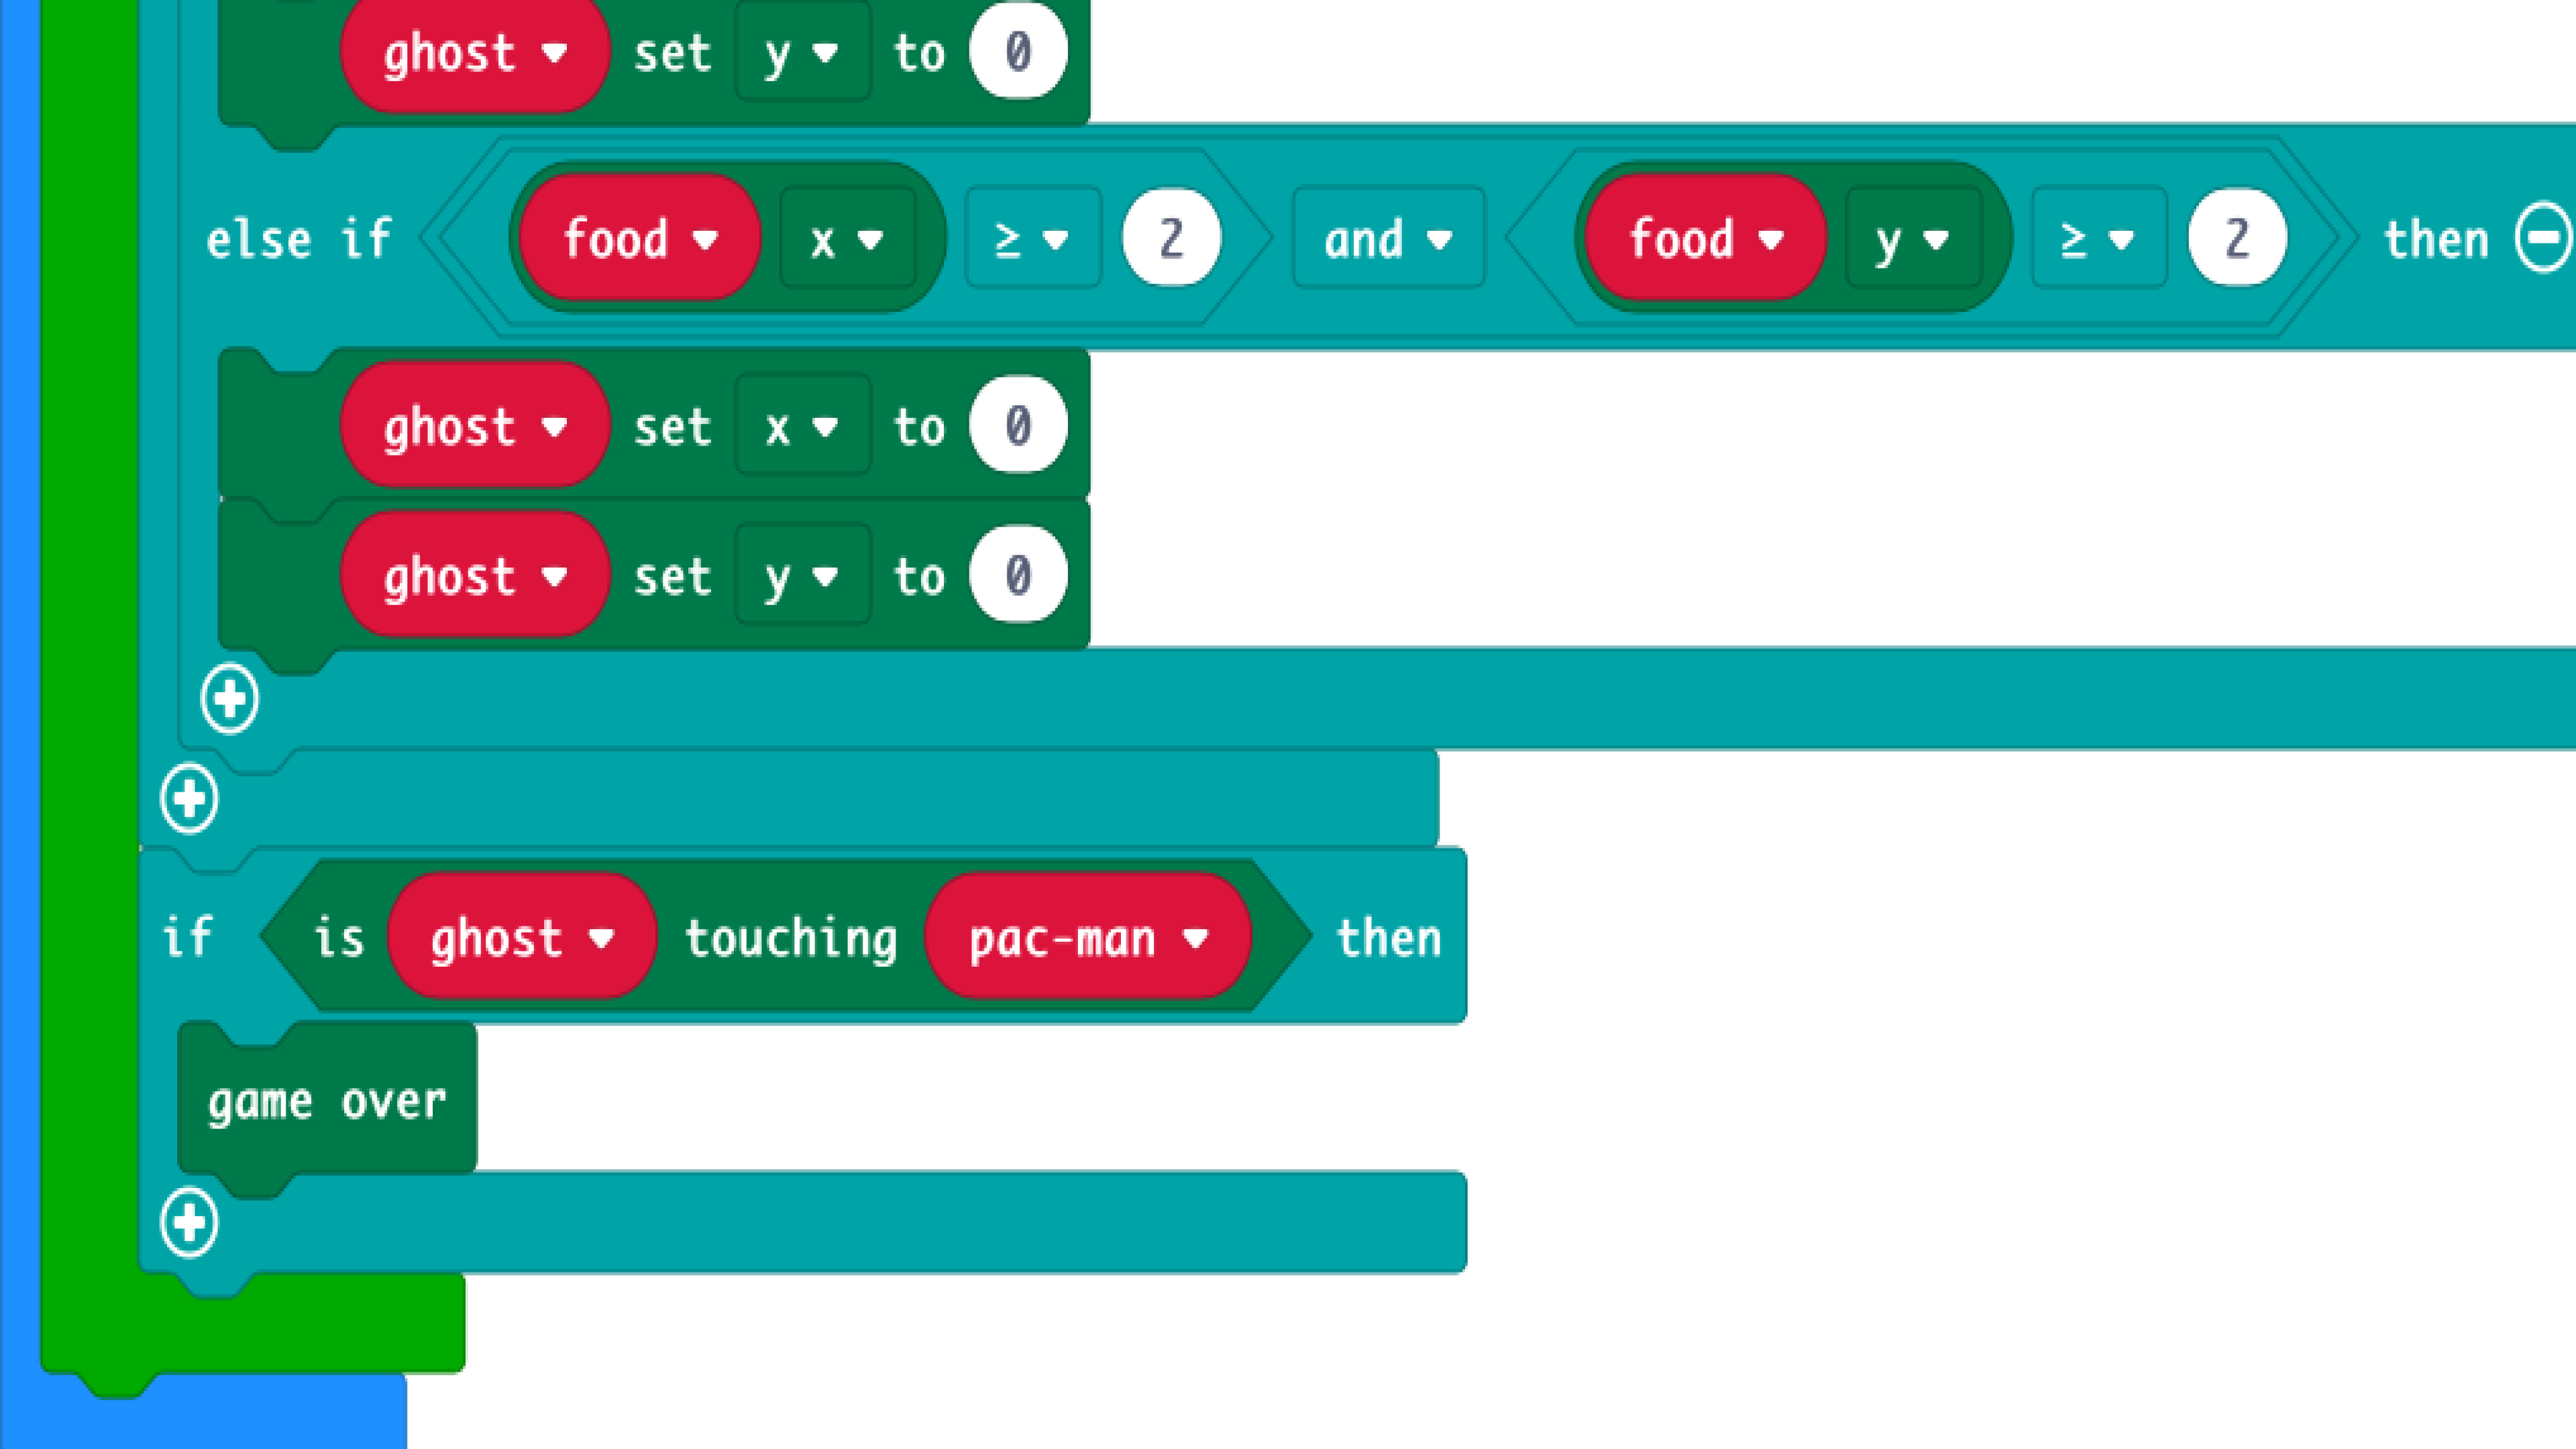
(b) We can do so by dividing the 25 LEDs on the micro:bit into 4 different quadrants. If the food is generated in the top left quadrant, the ghost will be positioned at the bottom right LED. If-else statements can be used to execute this.
STEP 9
Game Over
(a) The game ends when the pacman is caught by the ghost.
(b) Use an if-else statement. If “pacman touching ghost”, then game over. This game over function will display “GAME OVER”, followed by score of player, which should correspond with the number of times the food is eaten by the pacman.
STEP 10

Complete!
(a) Don’t forget to plug a micro USB cable from your laptop to the top of your micro:bit, and click ‘Download’ to download the code to your micro:bit.
(b) We hope you’ve learnt more about using and controlling external components, as well as loops and conditional statements.
(c) You can also try adding a restart button or using the micro:bit’s built-in accelerometer to control the direction of the pacman.
(d) You’ve completed your very own Pacman game. Enjoy playing!
Code and References
Made this activity? Good Job! Now spread the word. Share a photo of your creation on social media with #letsgethacking #Pacman