Ultrasonic sensor game
Build a working game using 3 ultrasonic sensors as controls, on makecode micro:bit, using javascript.
The game involves covering the correct ultrasonic sensor when the corresponding LED are lit up at the bottom (or second bottom when delay is very high) row of the LED screen of the micro:bit
YOU WILL NEED
- 3 x ultrasonic sensors
- 12 x female to female wires
- 1x micro:bit
- 1 x breakout board
STEP 1
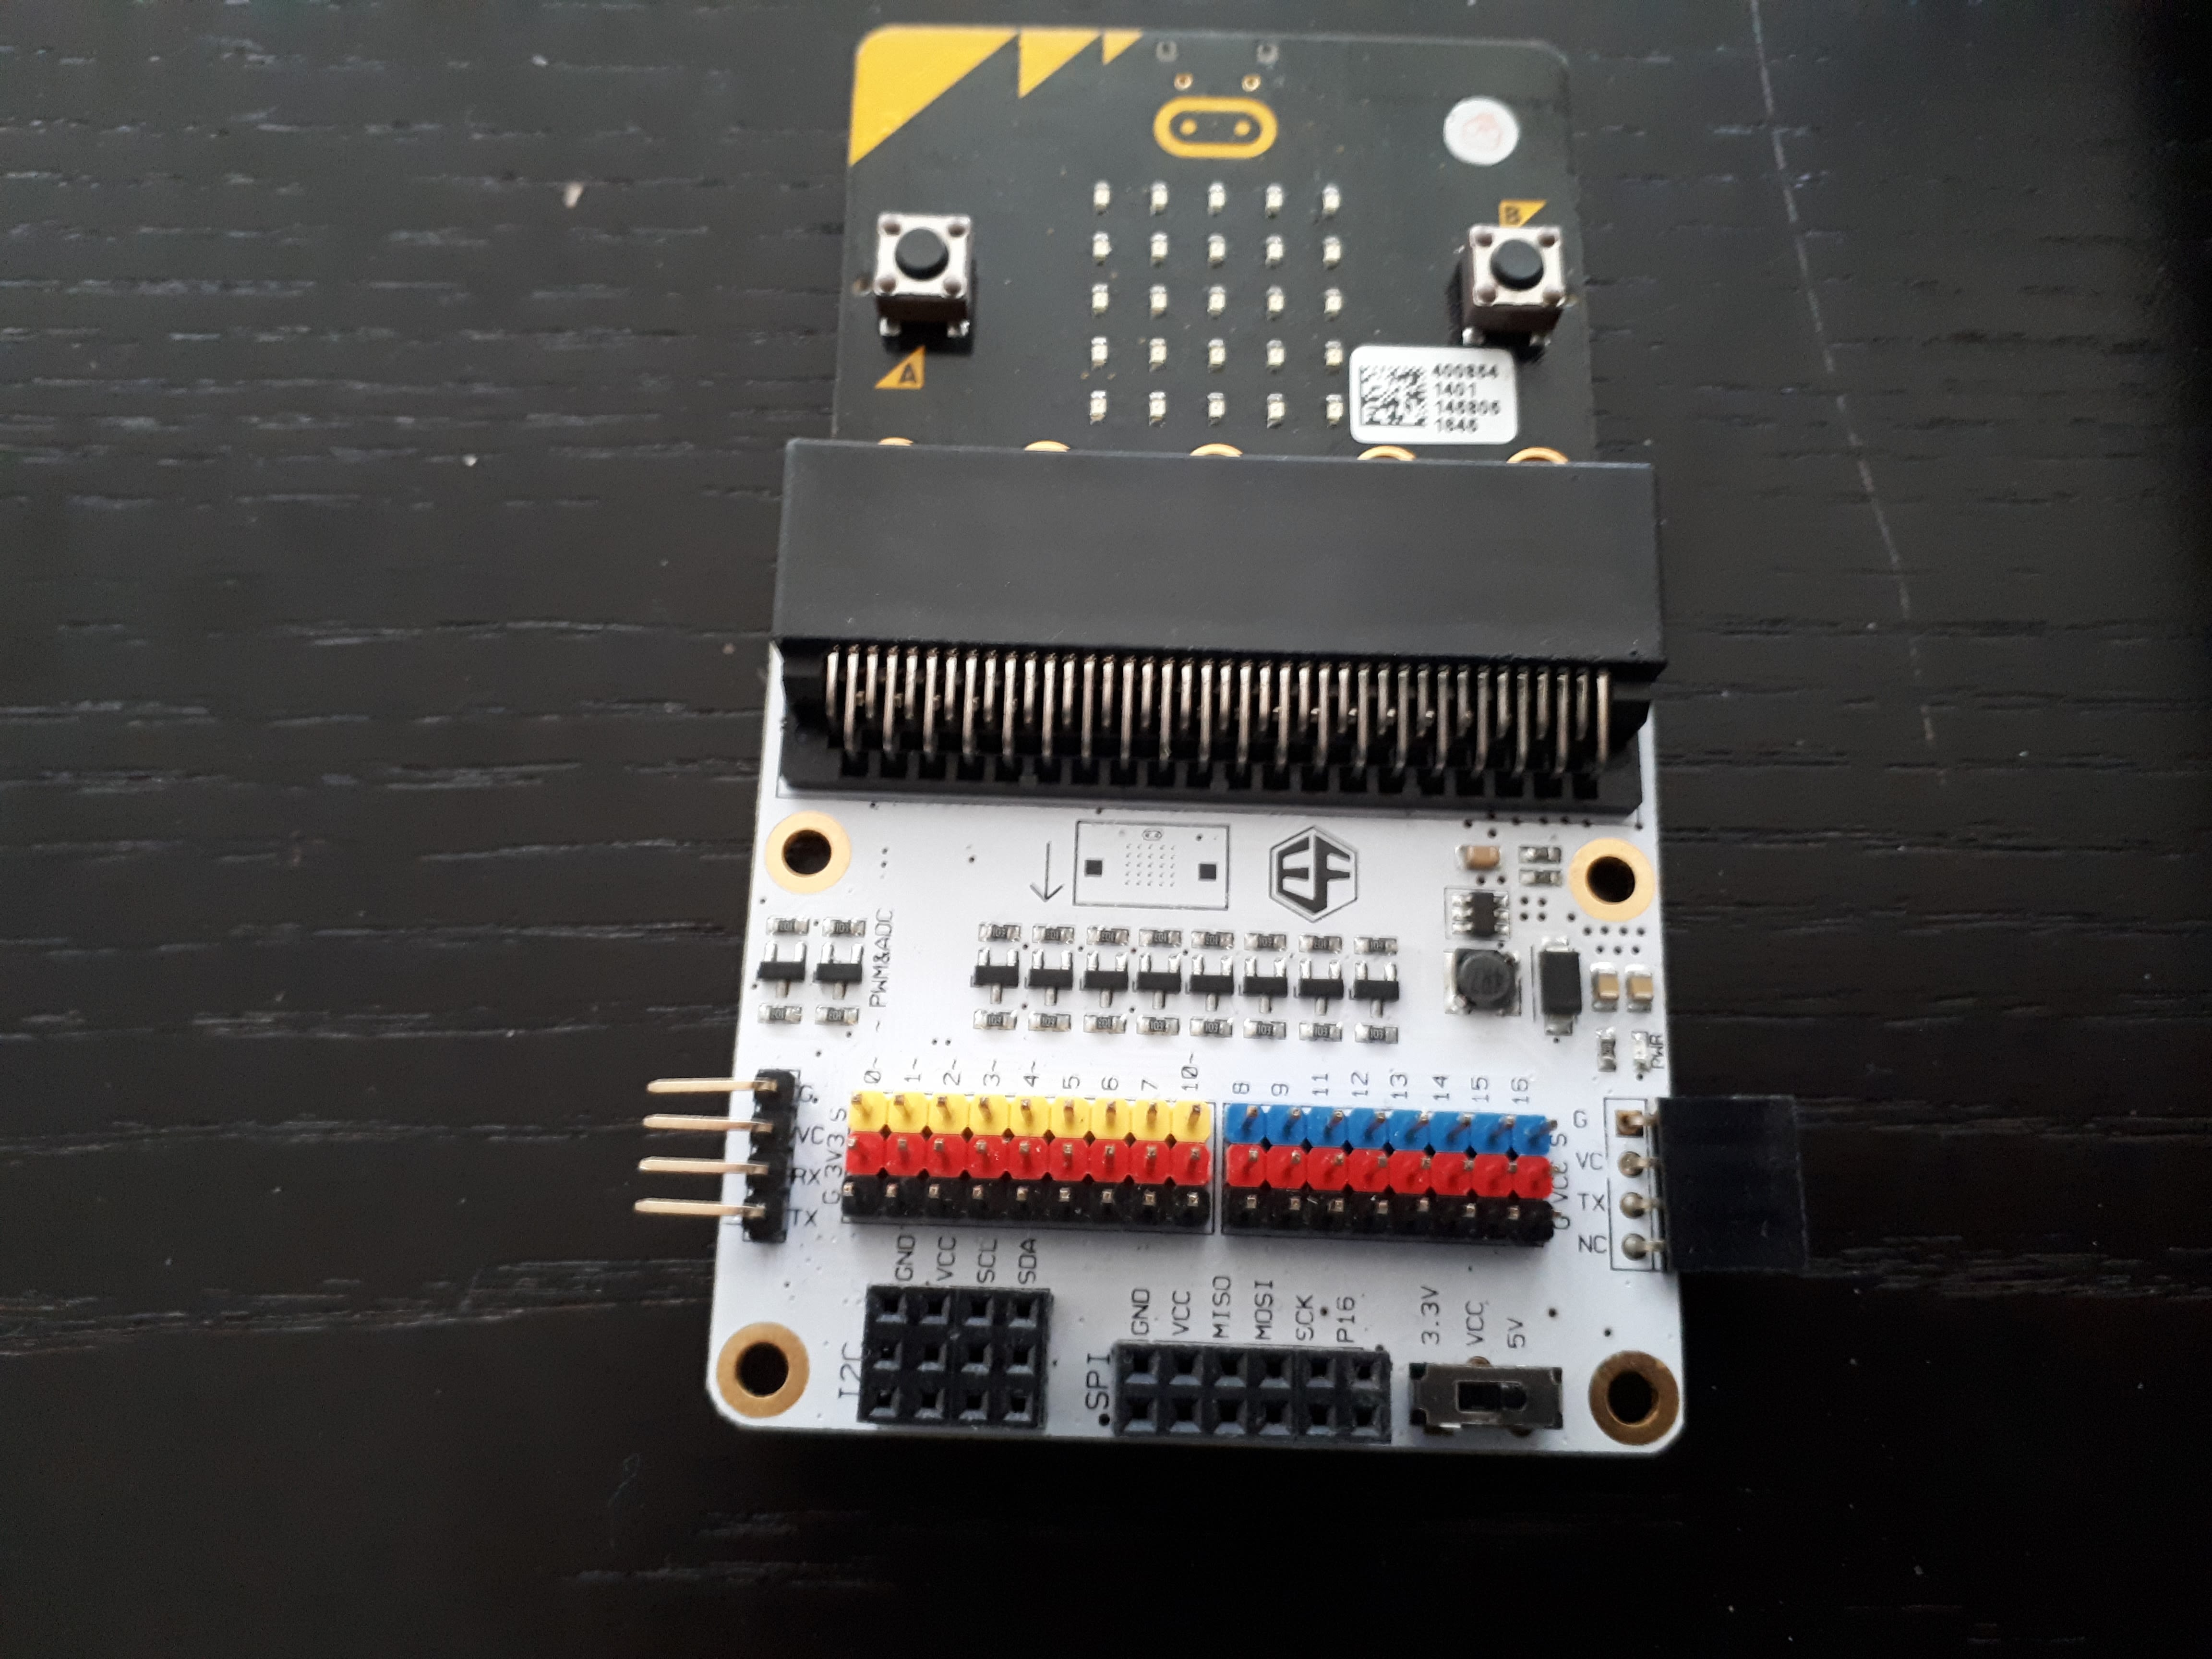
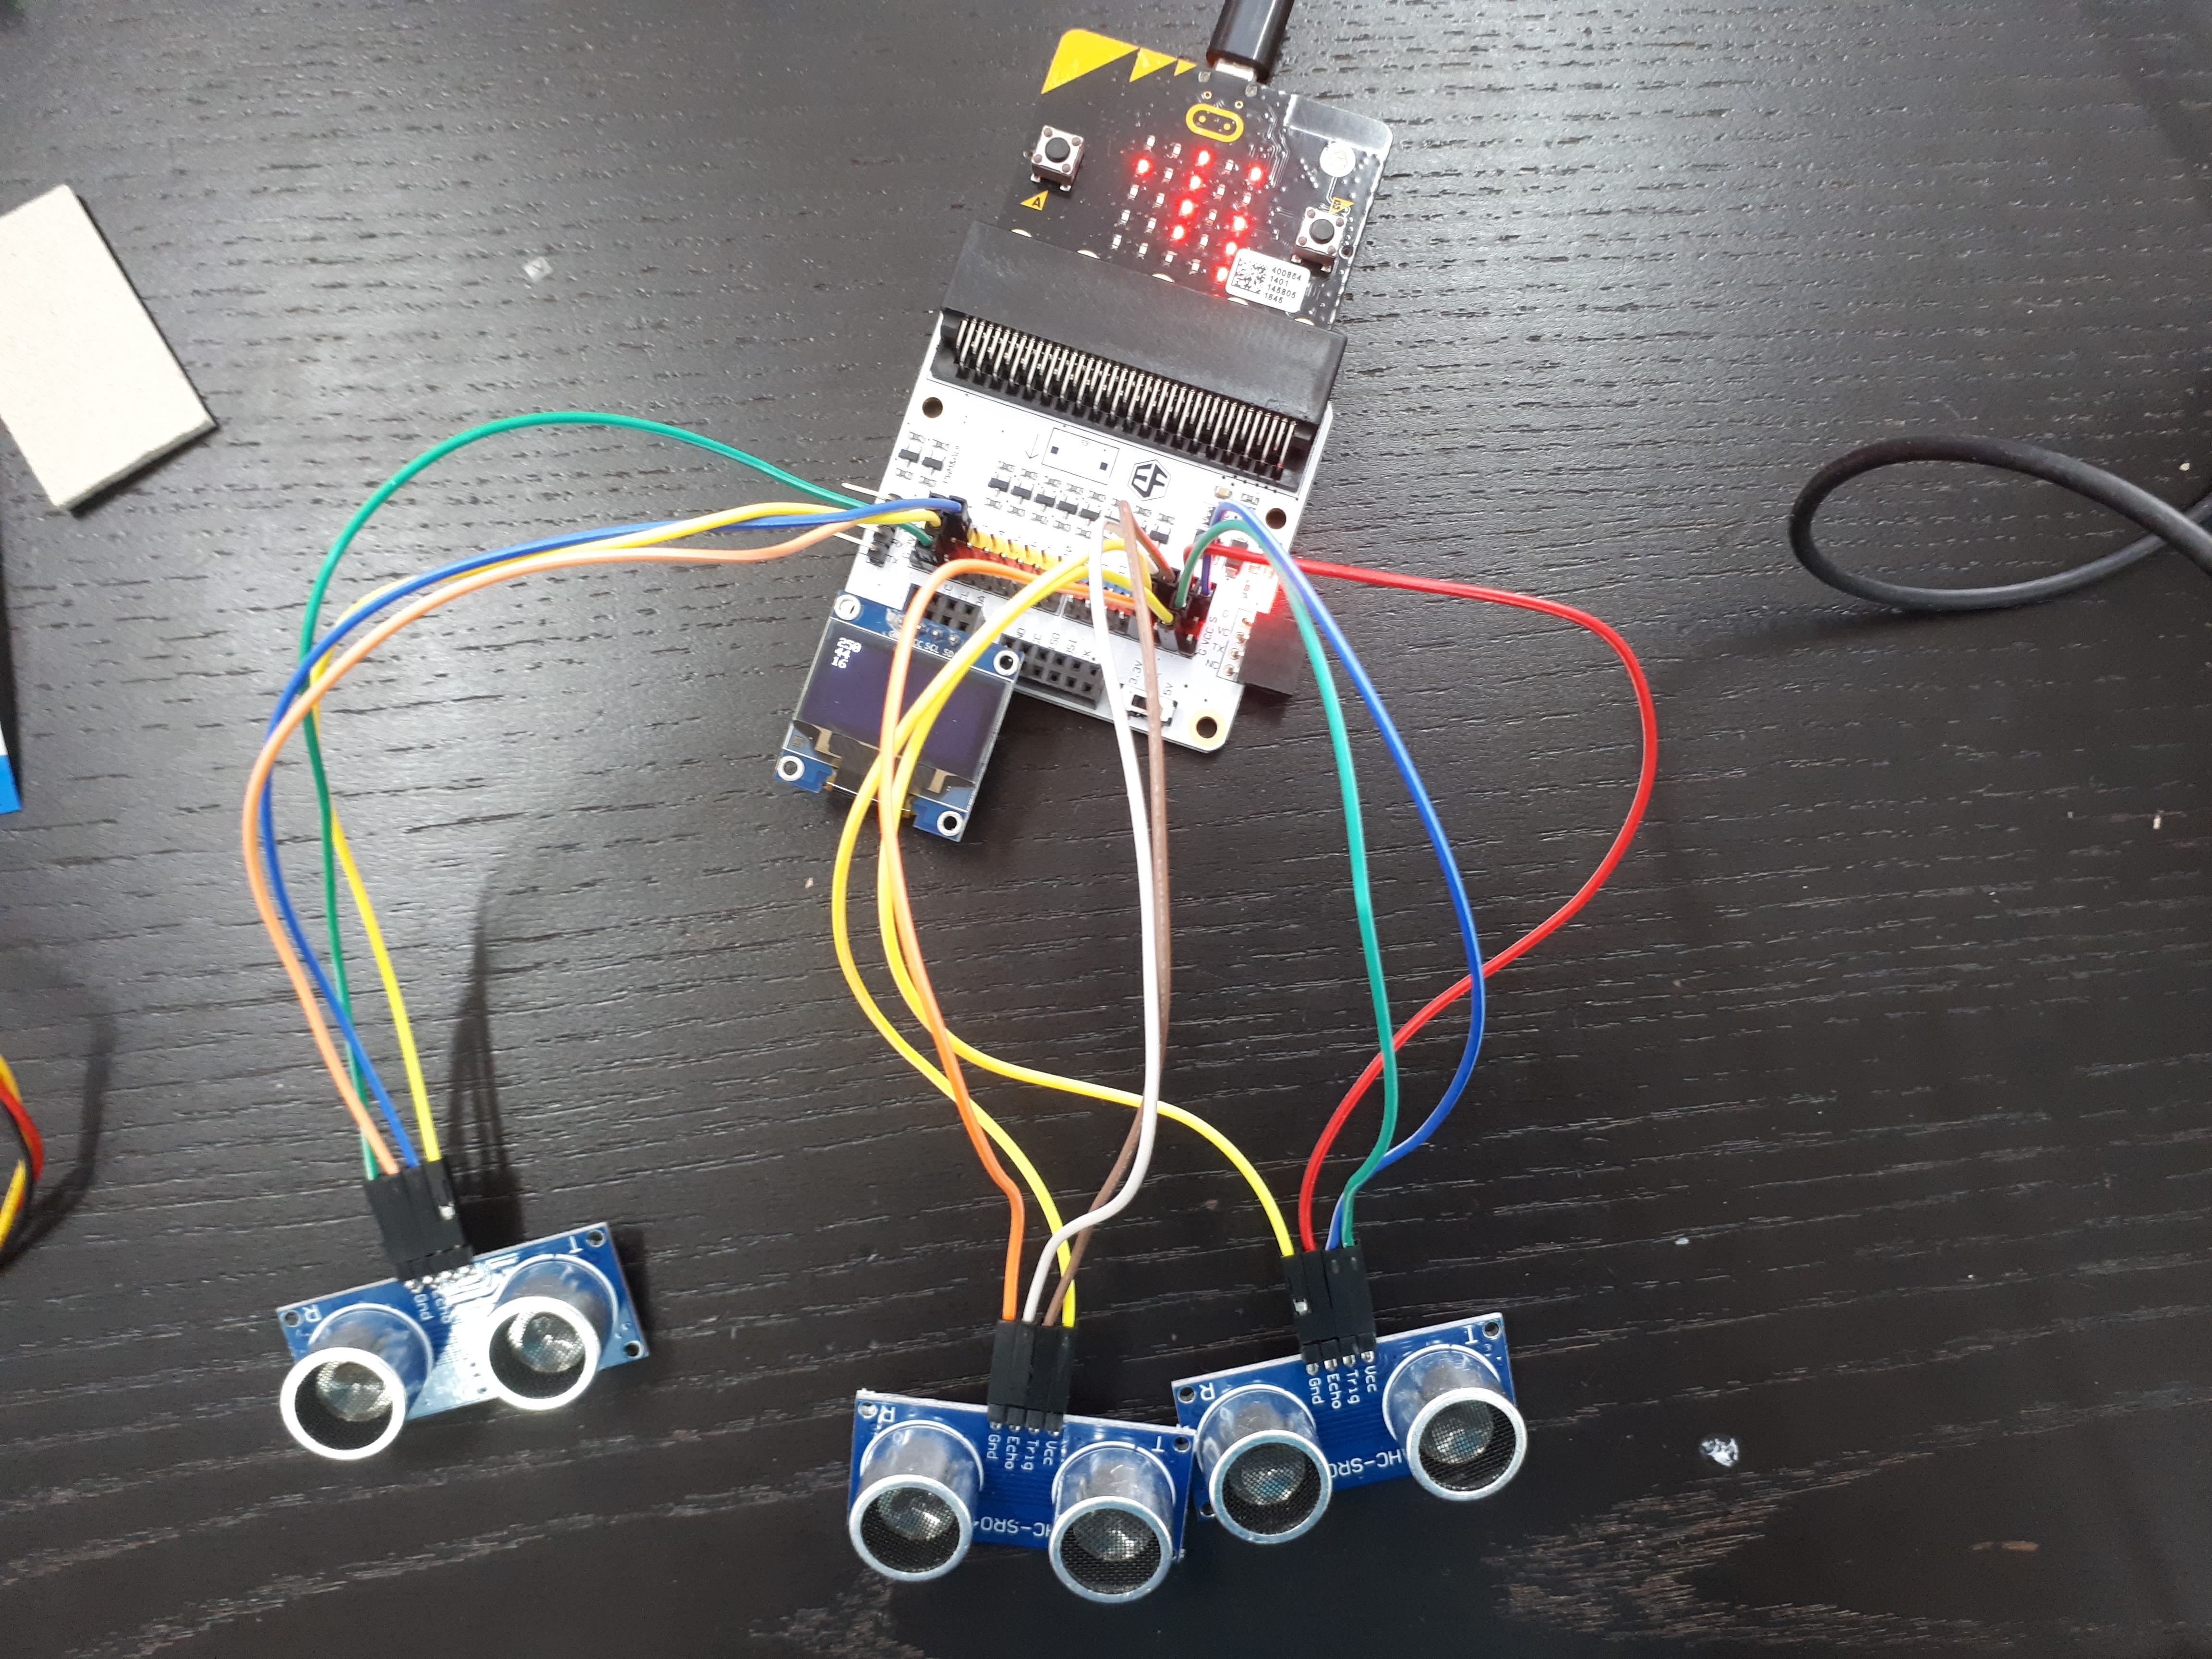
Insert the micro:bit into the breakout board, the colour of the breakout board does not matter.
Materials
1 x Micro:bit
1 x Breakout board
STEP 2
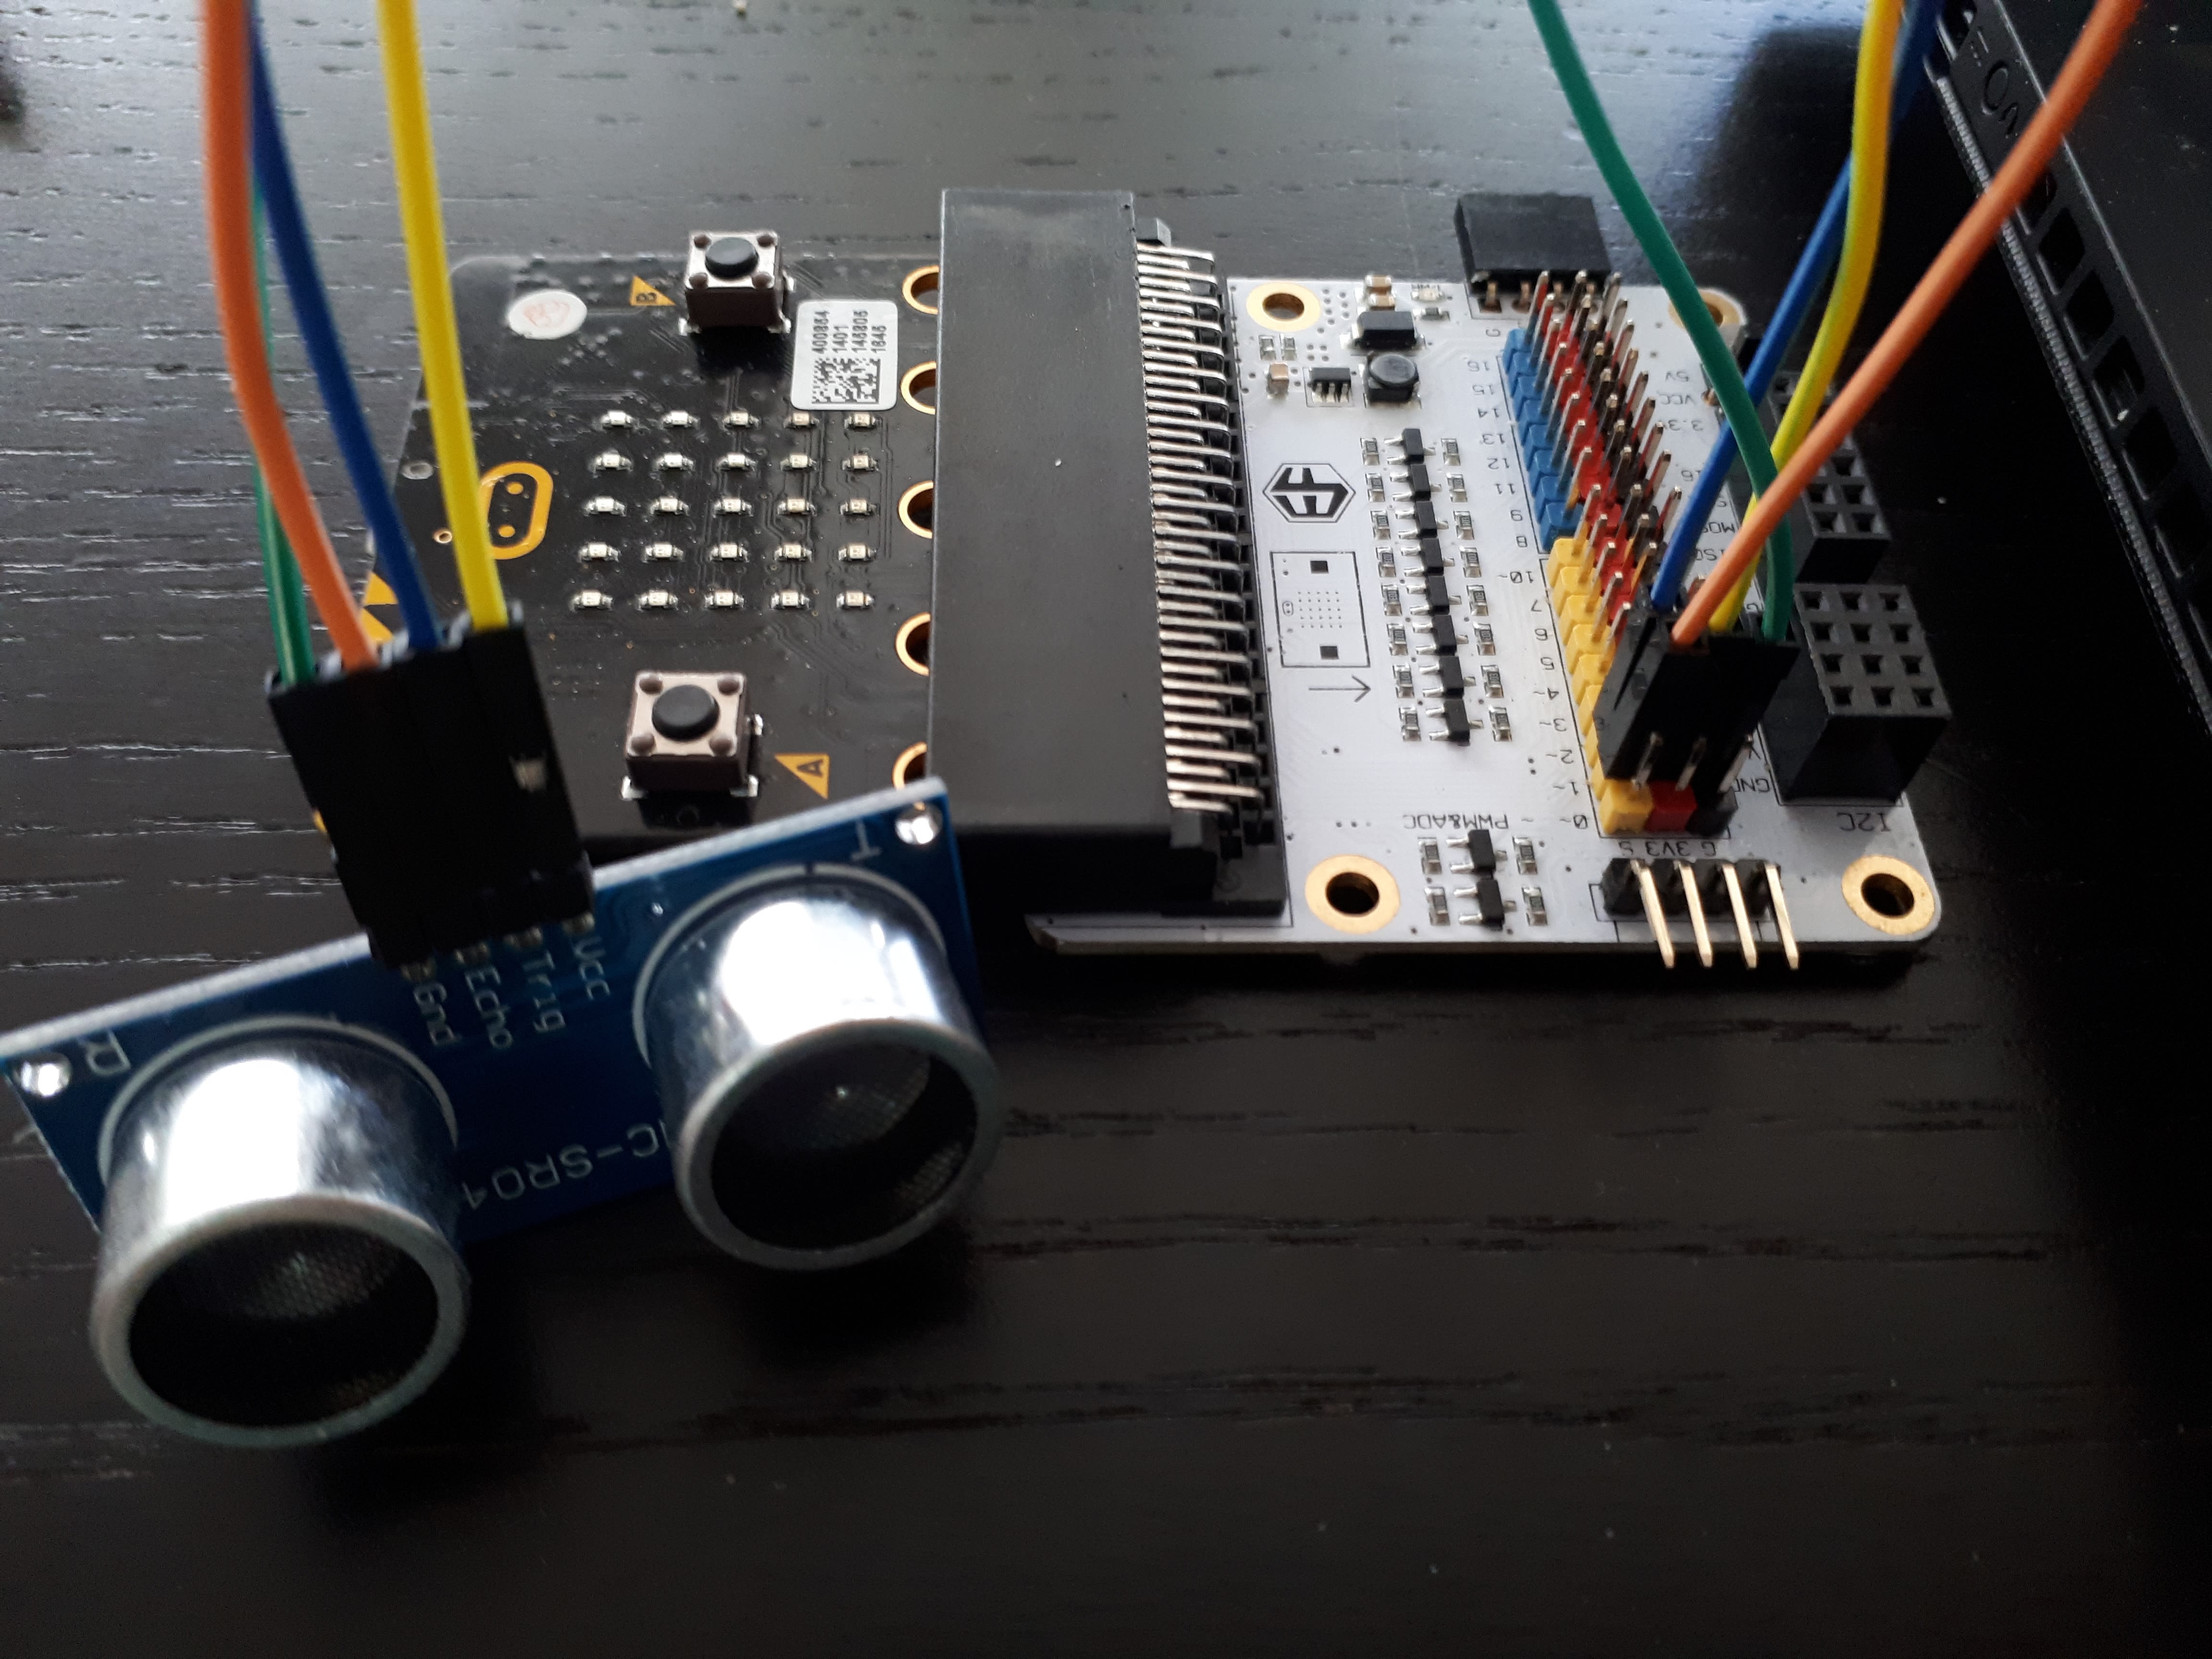
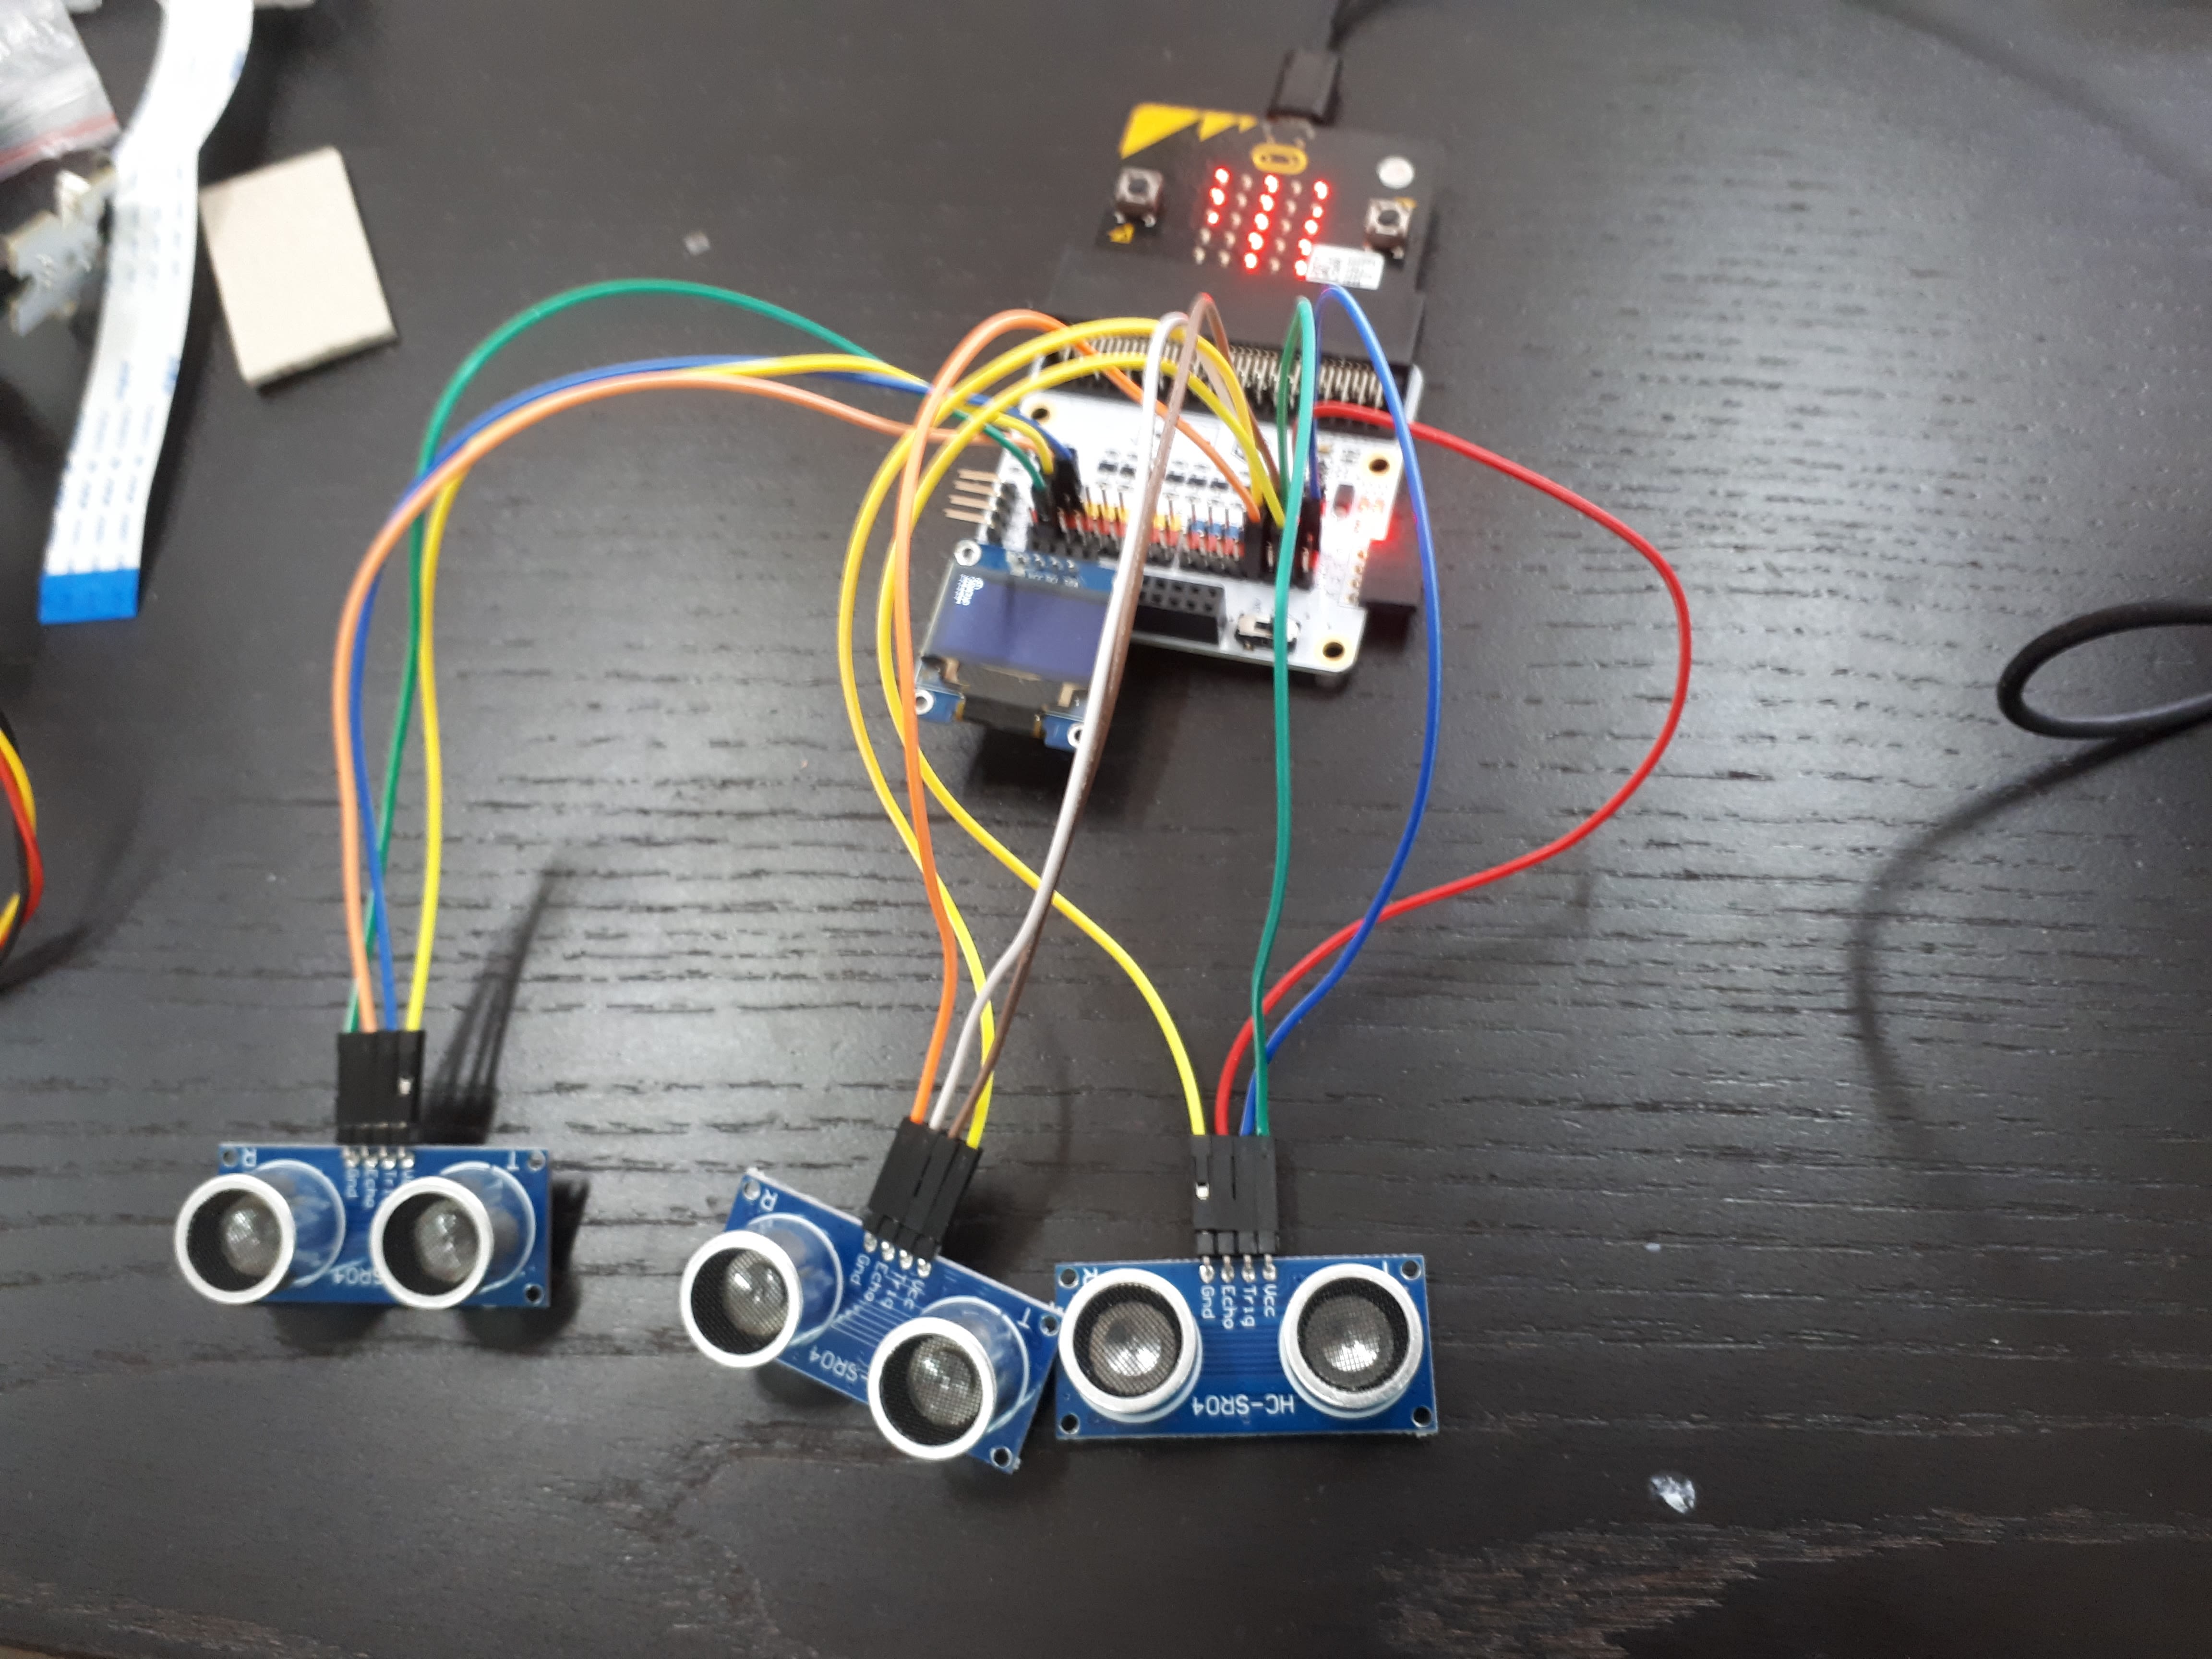
Connect one ultrasonic sensor to the breakout board as seen in the picture, in this format:
Gnd to black pin 1
Echo to yellow pin 1
Trig to yellow pin 2
Vcc to red pin 1
Materials
1 x ultrasonic sensor
4 x female to female wires
STEP 3
Similarly, for the second ultrasonic sensor, connect to the breakout board as seen in the picture.
Gnd to black pin 13
Echo to blue (yellow for the black breakout board) pin 13
Trig to blue (yellow for the black breakout board) pin 14
Vcc to red pin 13
Materials
1 x ultrasonic sensor
4 x female to female wires
STEP 4

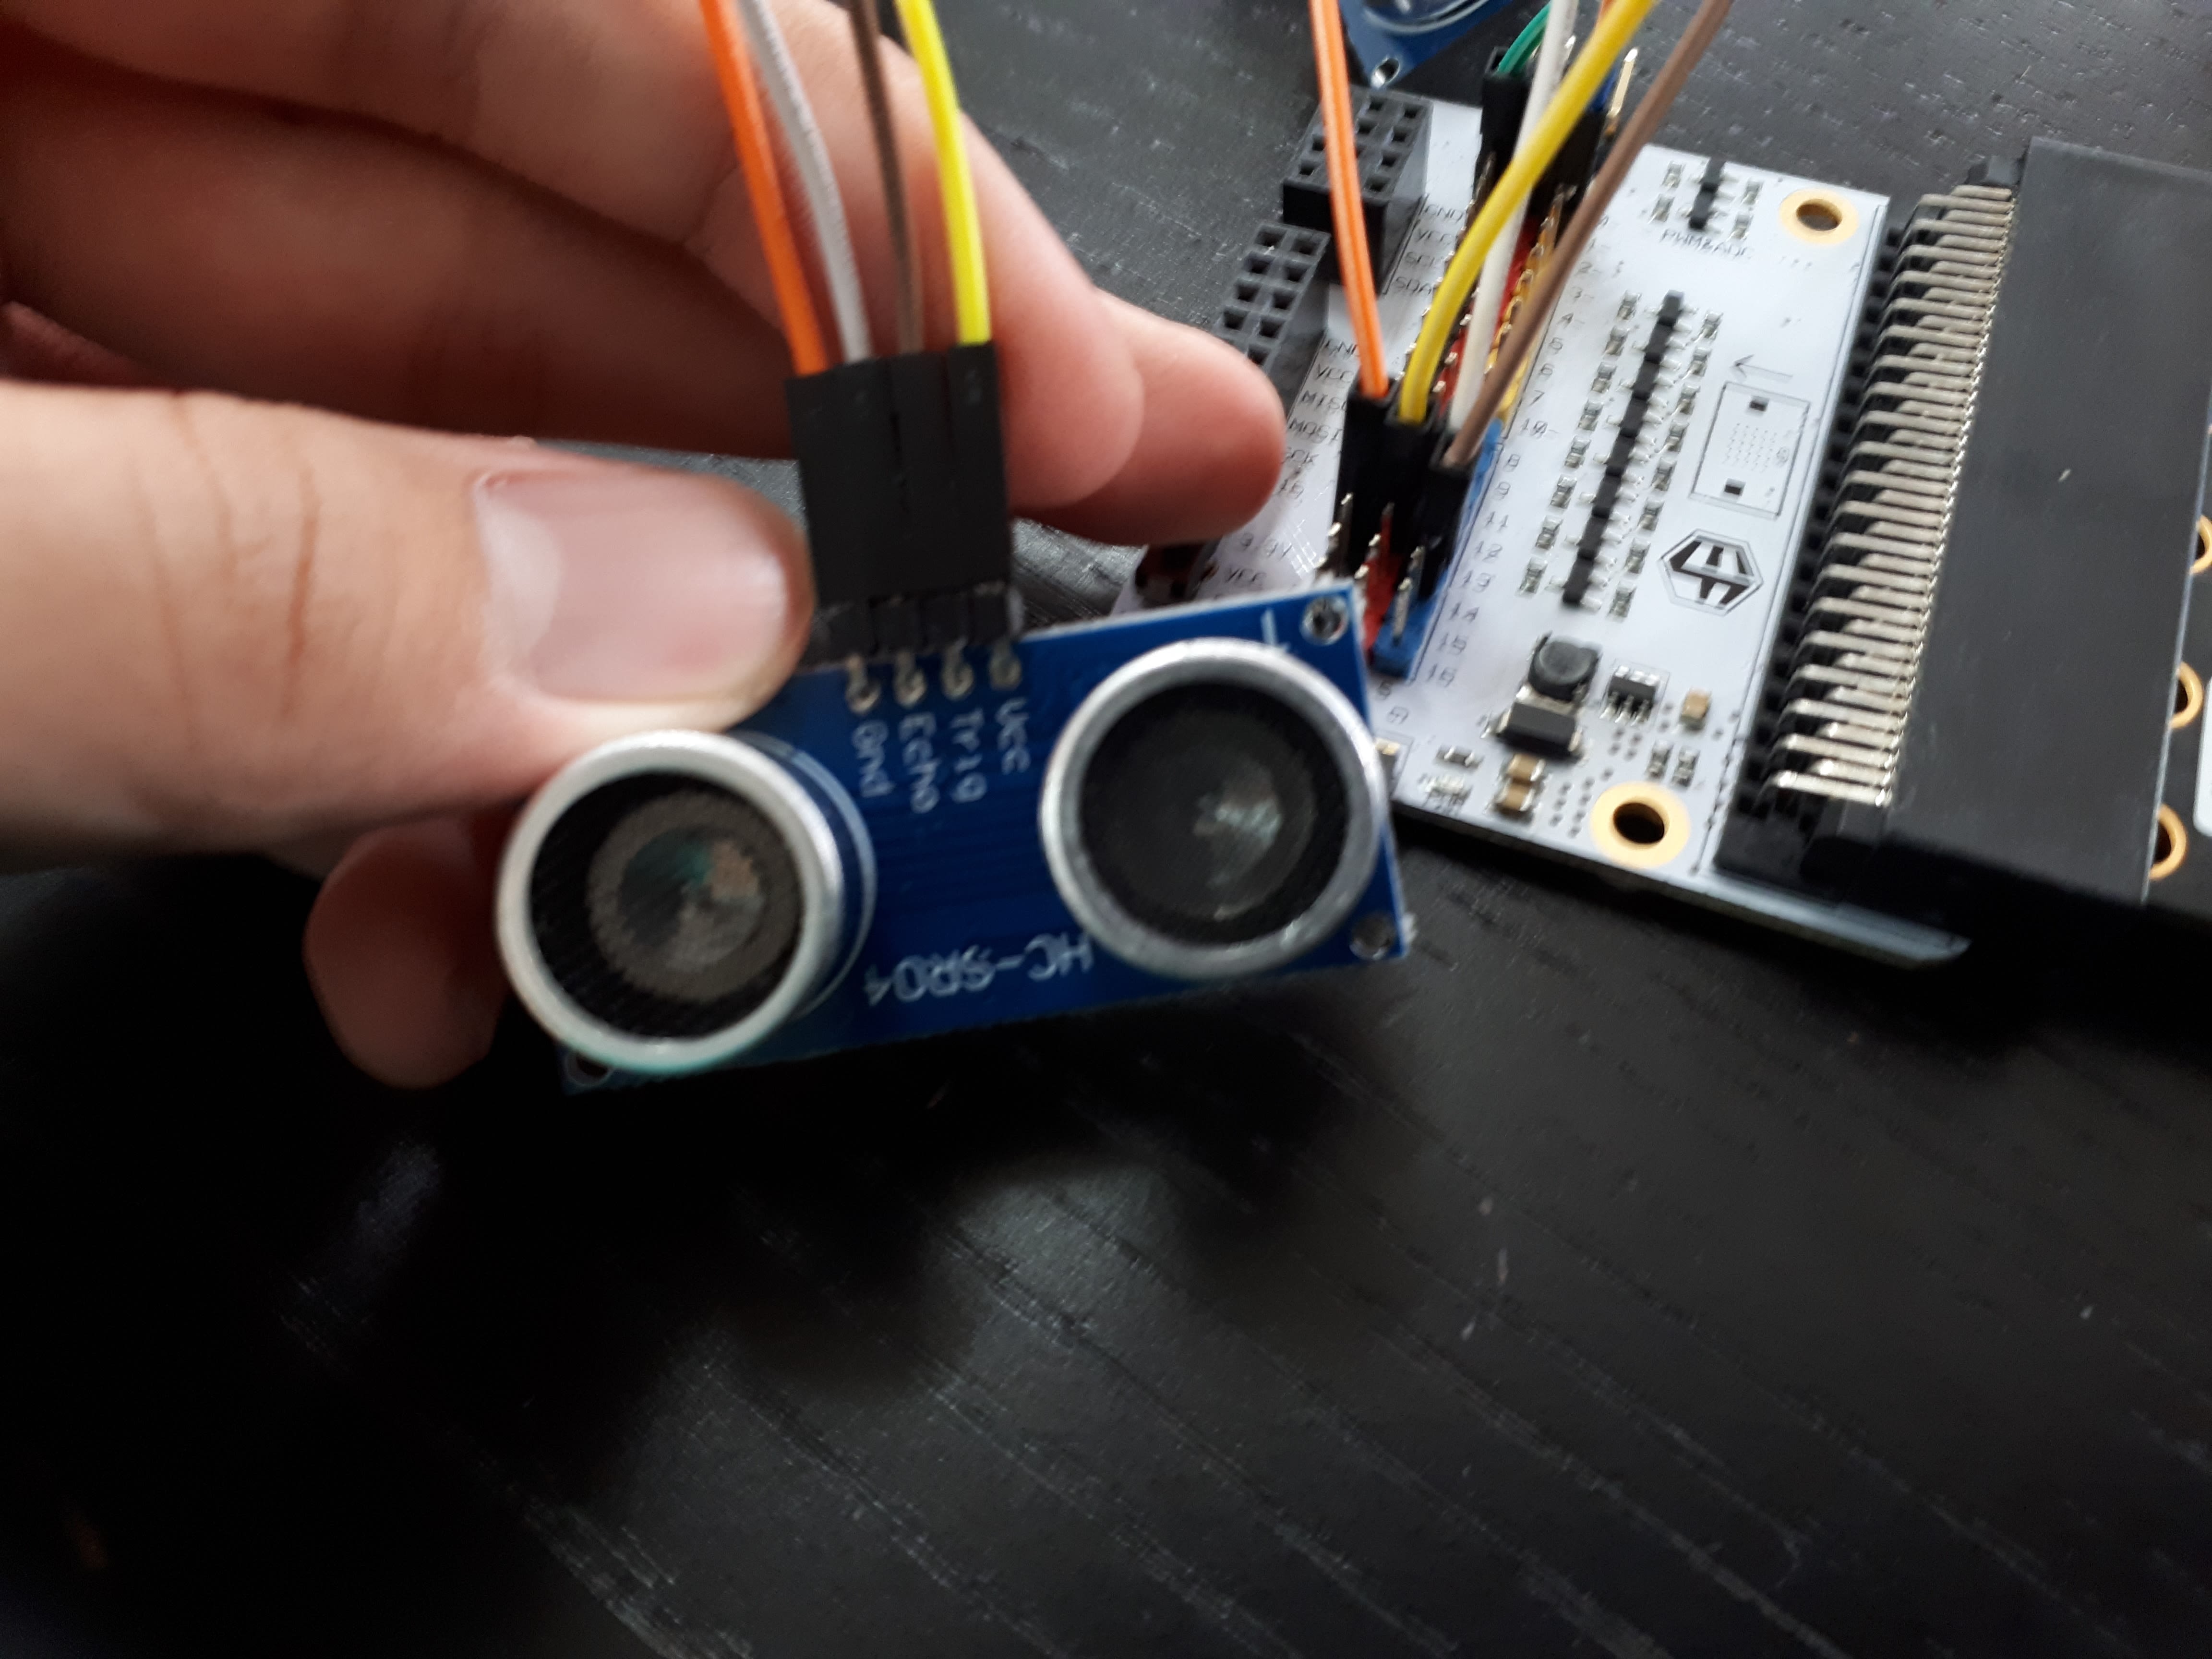
Similarly, for the third ultrasonic sensor, connect to the breakout board as seen in the picture.
Gnd to black pin 15
Echo to blue (yellow for the black breakout board) pin 15
Trig to blue (yellow for the black breakout board) pin 16
Vcc to red pin 15
Materials
1 x ultrasonic sensor
4 x female to female wires
STEP 5
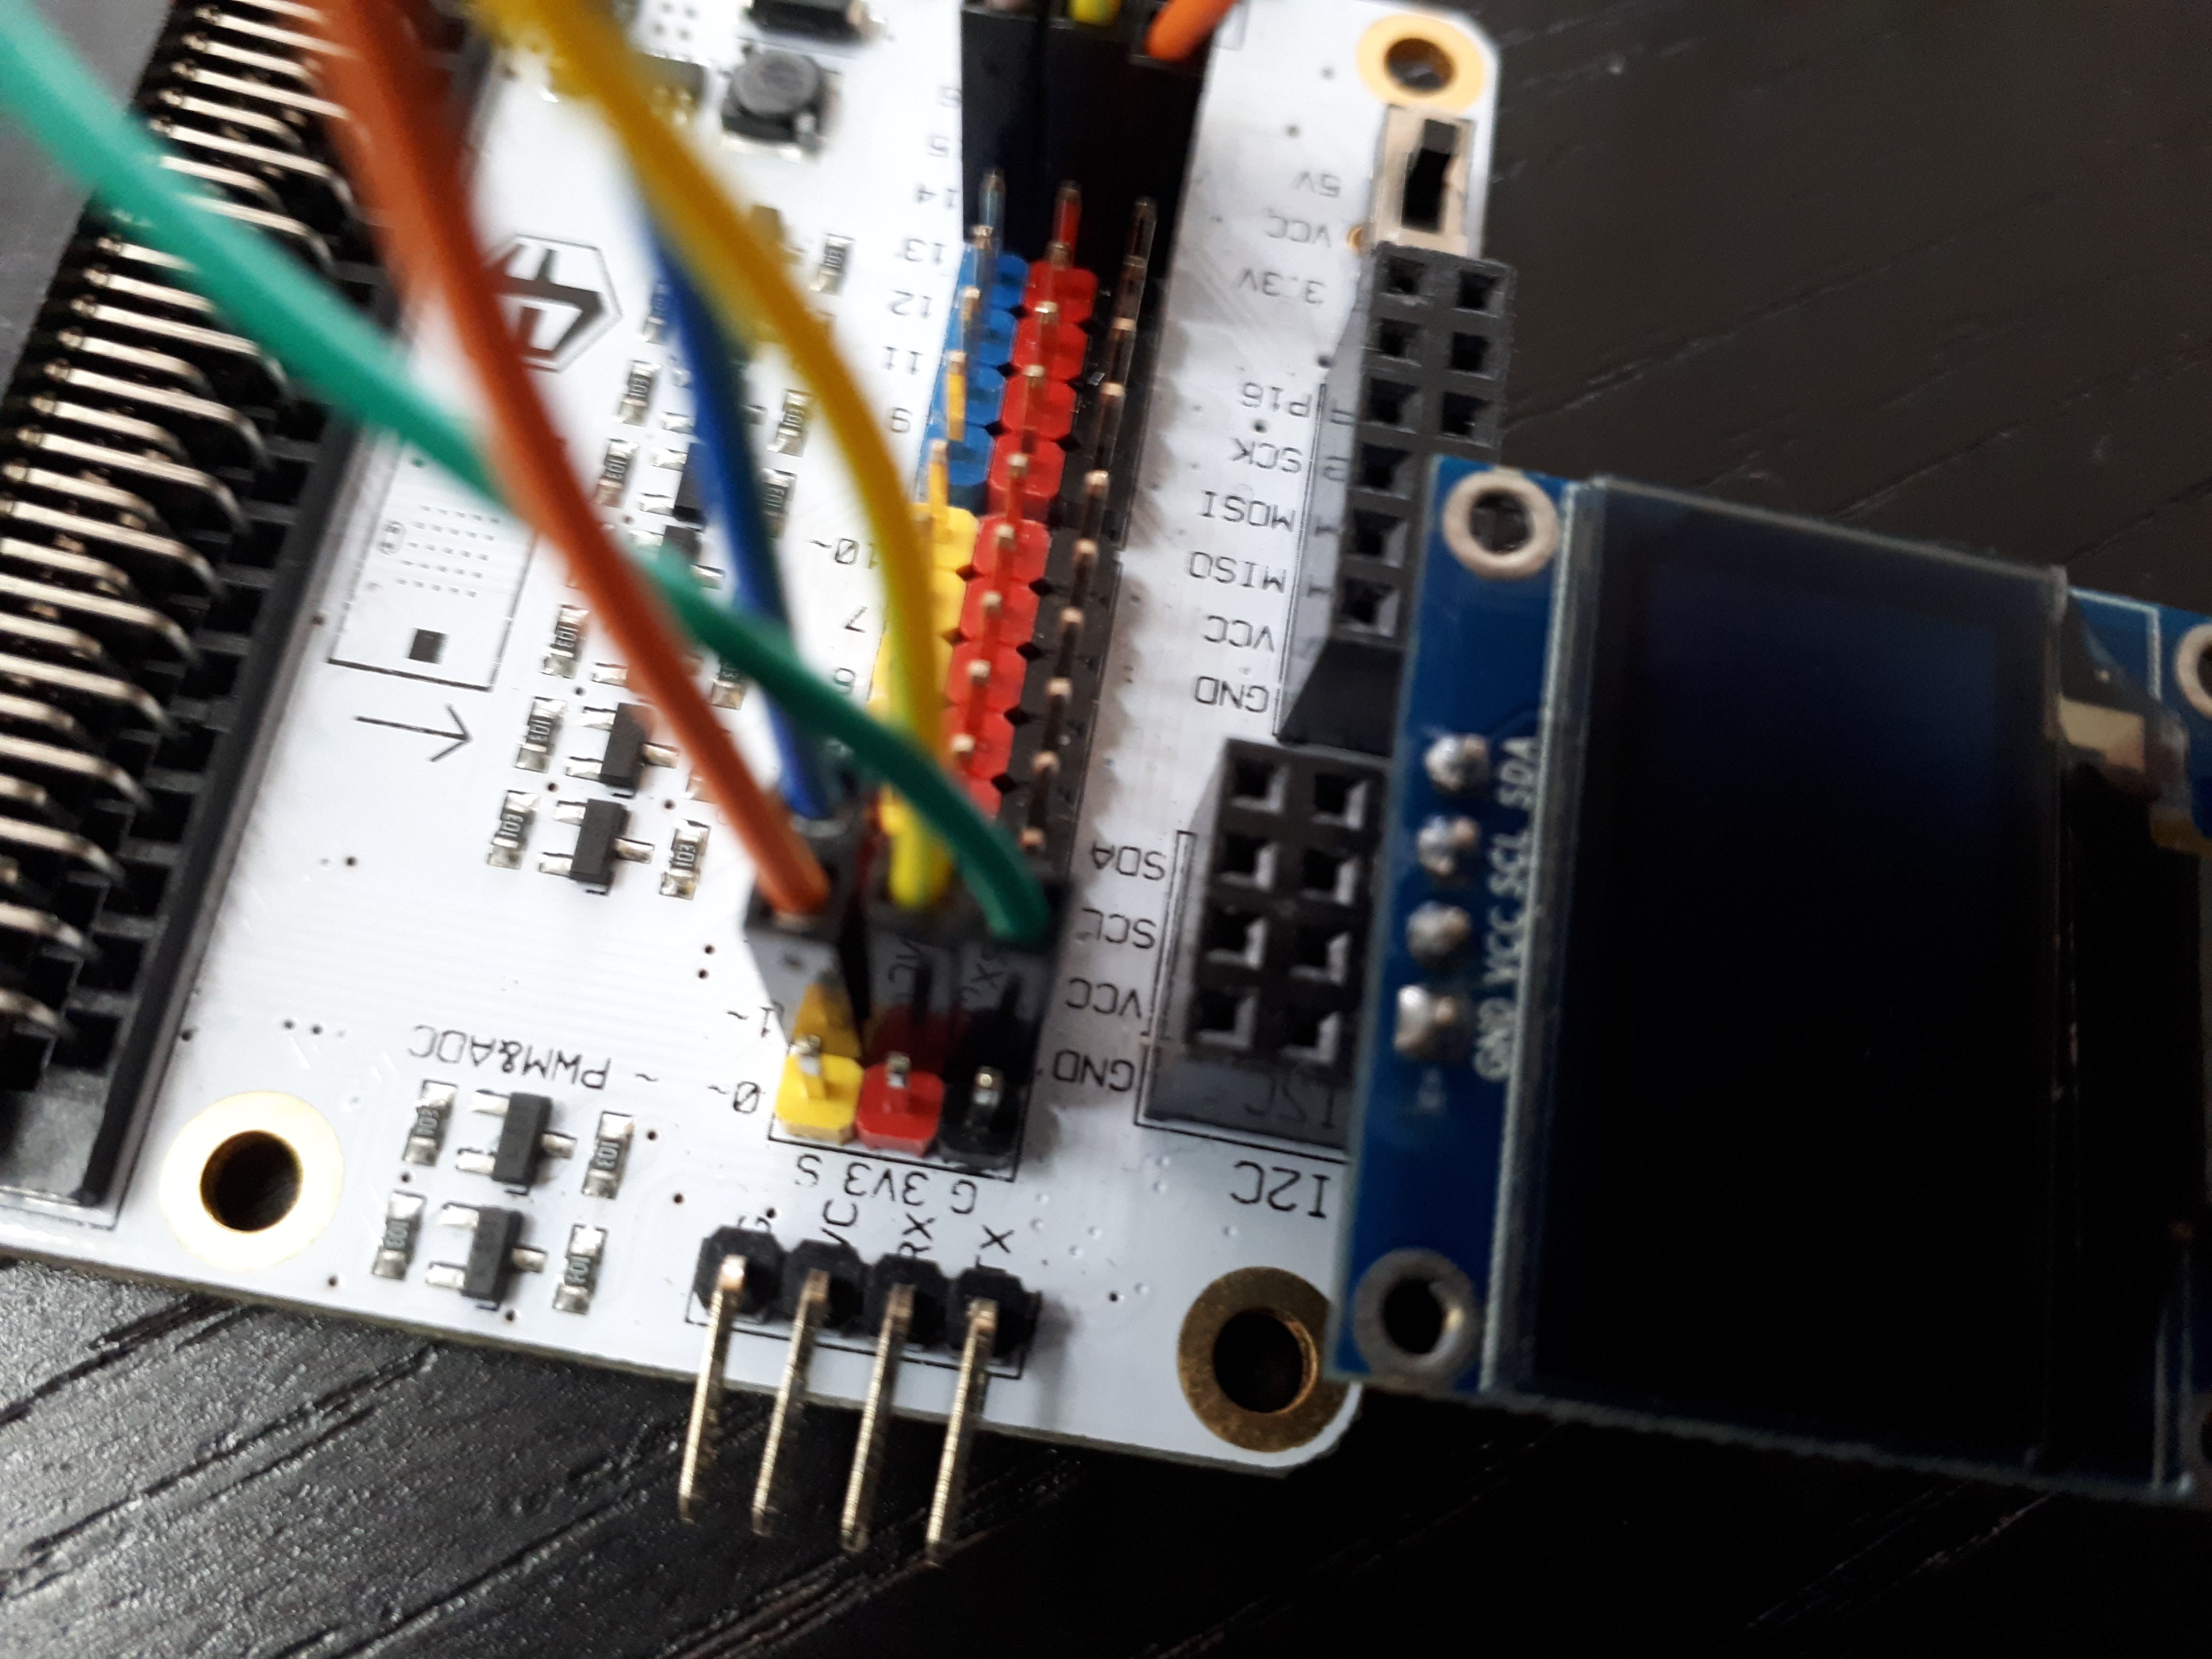
Insert the OLED screen to the breakout board via the I2C pins, any four in a row will do, just ensure that the orientation is correct.
GND to GND
SDA to SDA
Materials
1 x OLED screen
STEP 6
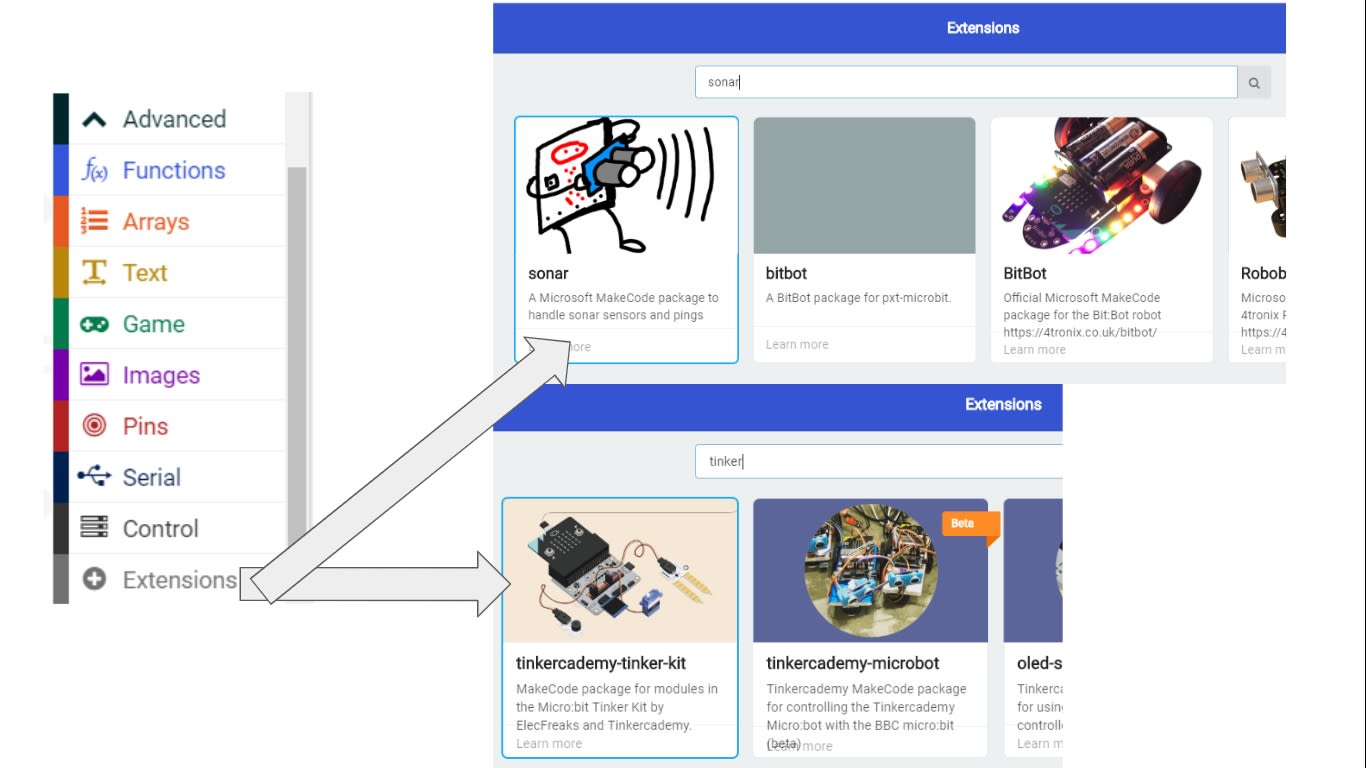
Go to micro:bit makecode, create a new project
Download the extensions "sonar" and tinkercademy-tinker-kit as seen in the picture
STEP 7

Define the arrays and variables at the start as shown in the picture, initialise the OLED as well afterwards
STEP 8
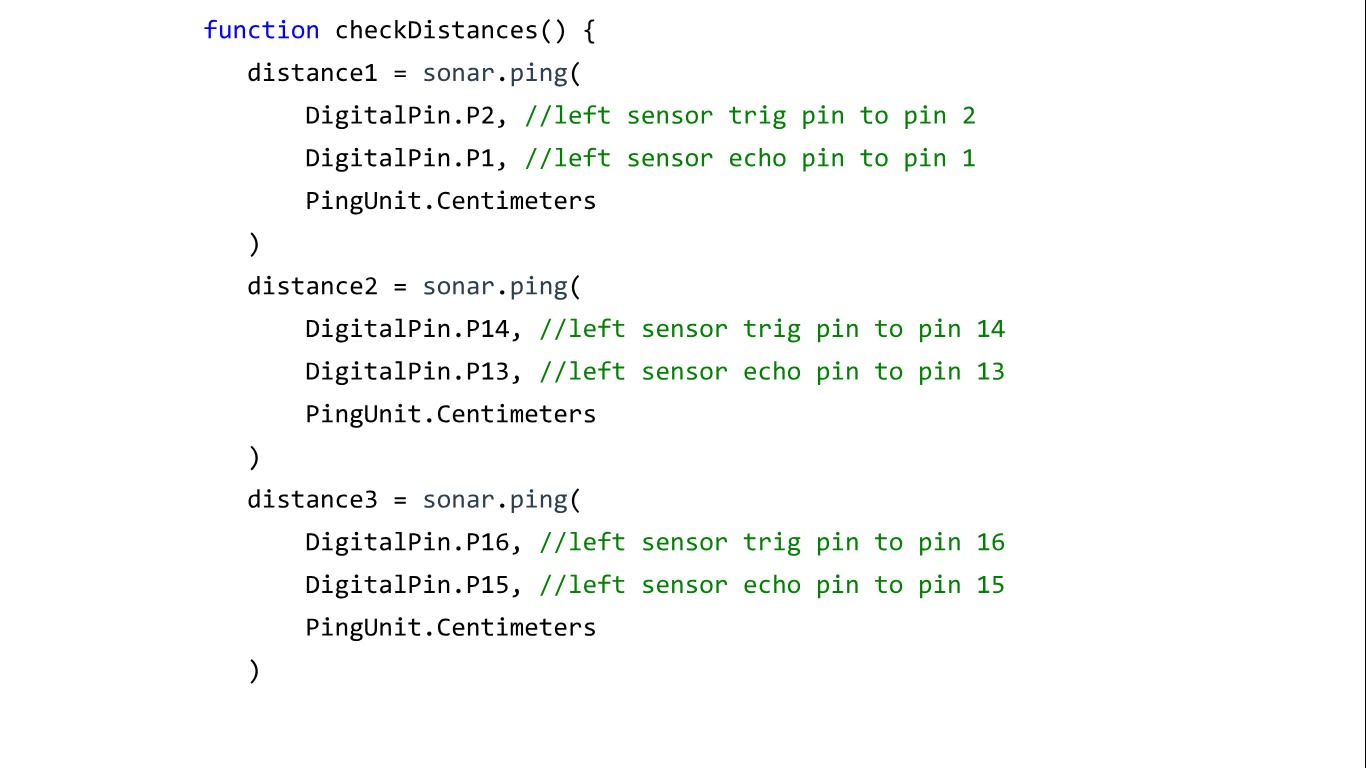
To read values from the ultrasonic sensor, we will be creating a function called "checkDistance" as seen in the picture.
In this example, the three distances measured by the ultrasonic sensors will simply be named as "distance1", "distance2" and "distance3". The "sonar" extension is used to retrieve the distance in cm from the sensors
STEP 9
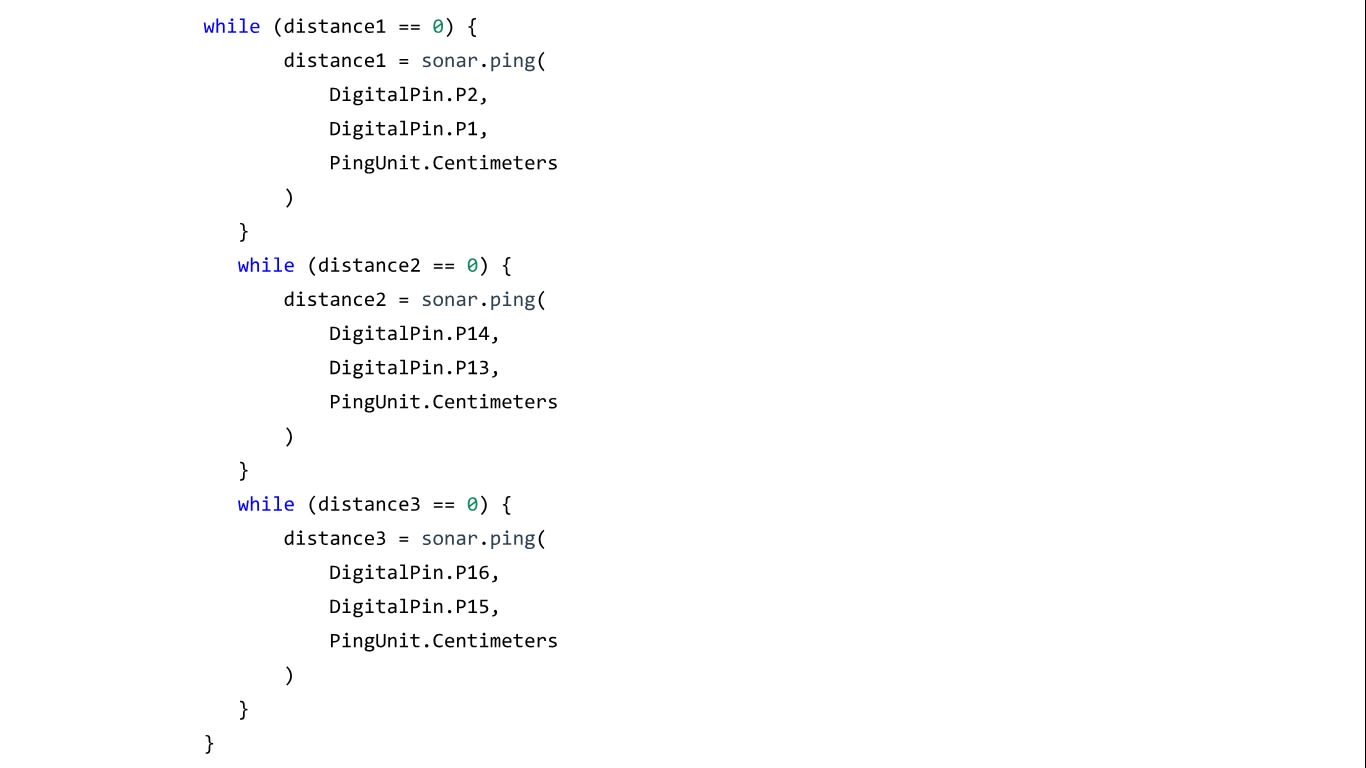
Also under the previous function created called "checkDistance", create 3 "while" loops to check if the ultrasonic sensors are working as intended.
Hence, while the ultrasonic sensor output "0", indicating that it is probably not working, the loop will continue to run until it gets a working ultrasonic sensor that outputs a value higher than 0
STEP 10
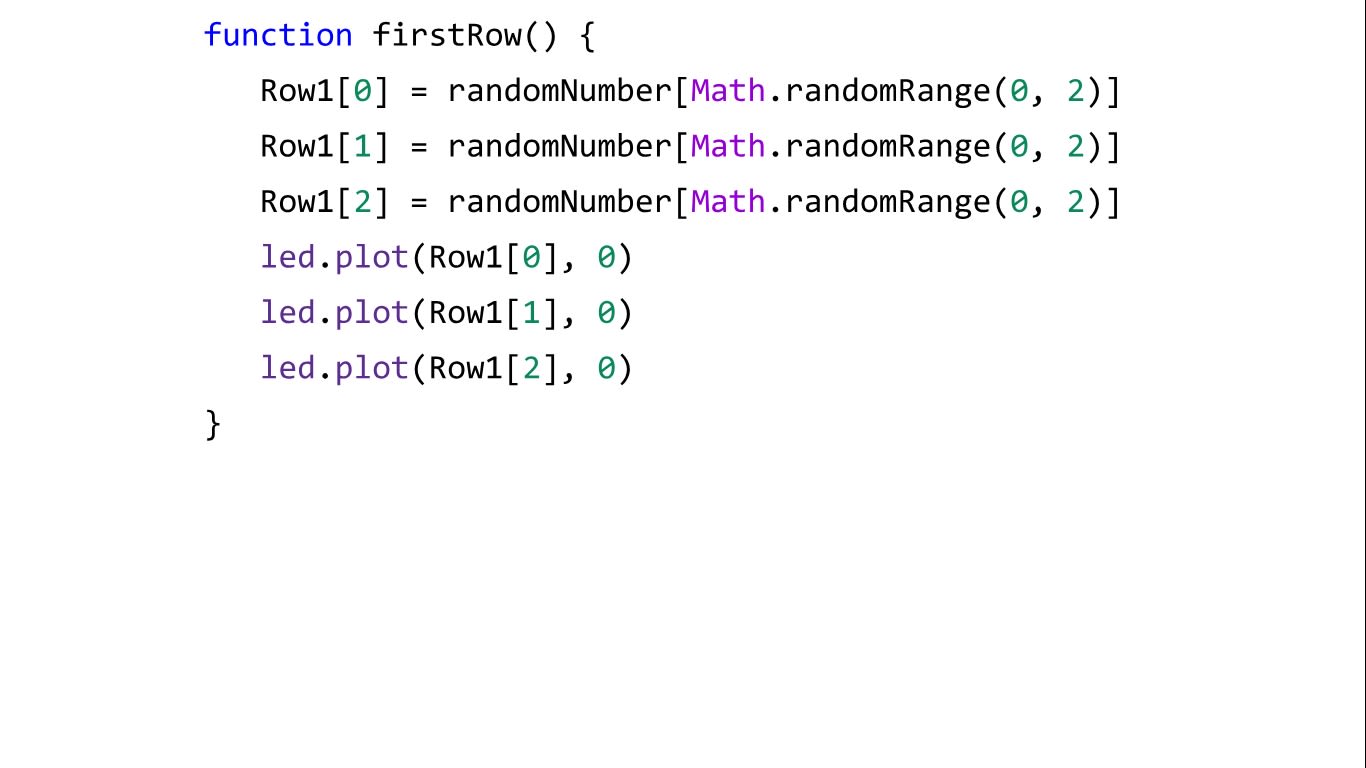
Create another function that will start the first row of LED lights, each element in the array lighting up one of the 3 possible LED light at random on the top row of the micro:bit
STEP 11
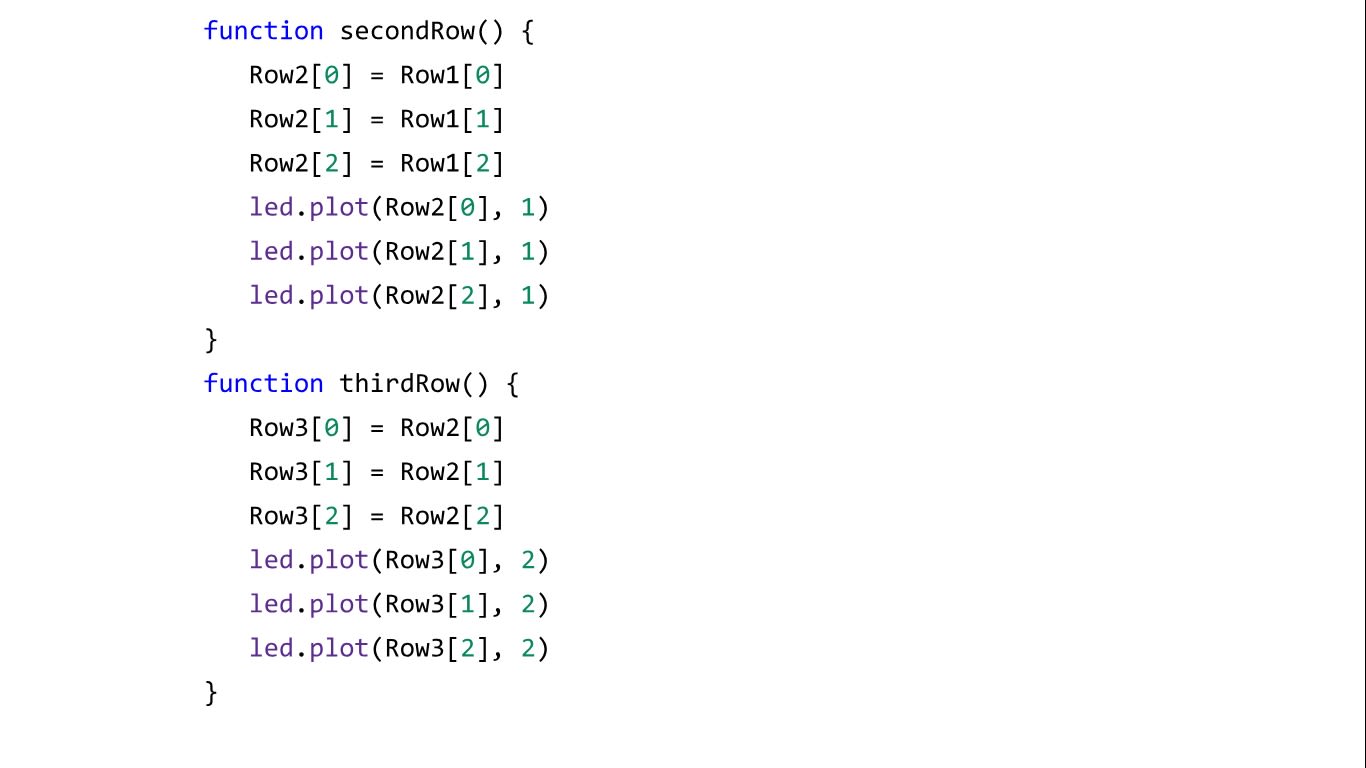
You will need to create another four functions in this step and the next step, that will be able to bring down the LED lights that were light up by the previous function.
These functions pass down the lighted LEDs in a relay format, row 1 passing to row 2, row 2 to row 3 etc.
STEP 12
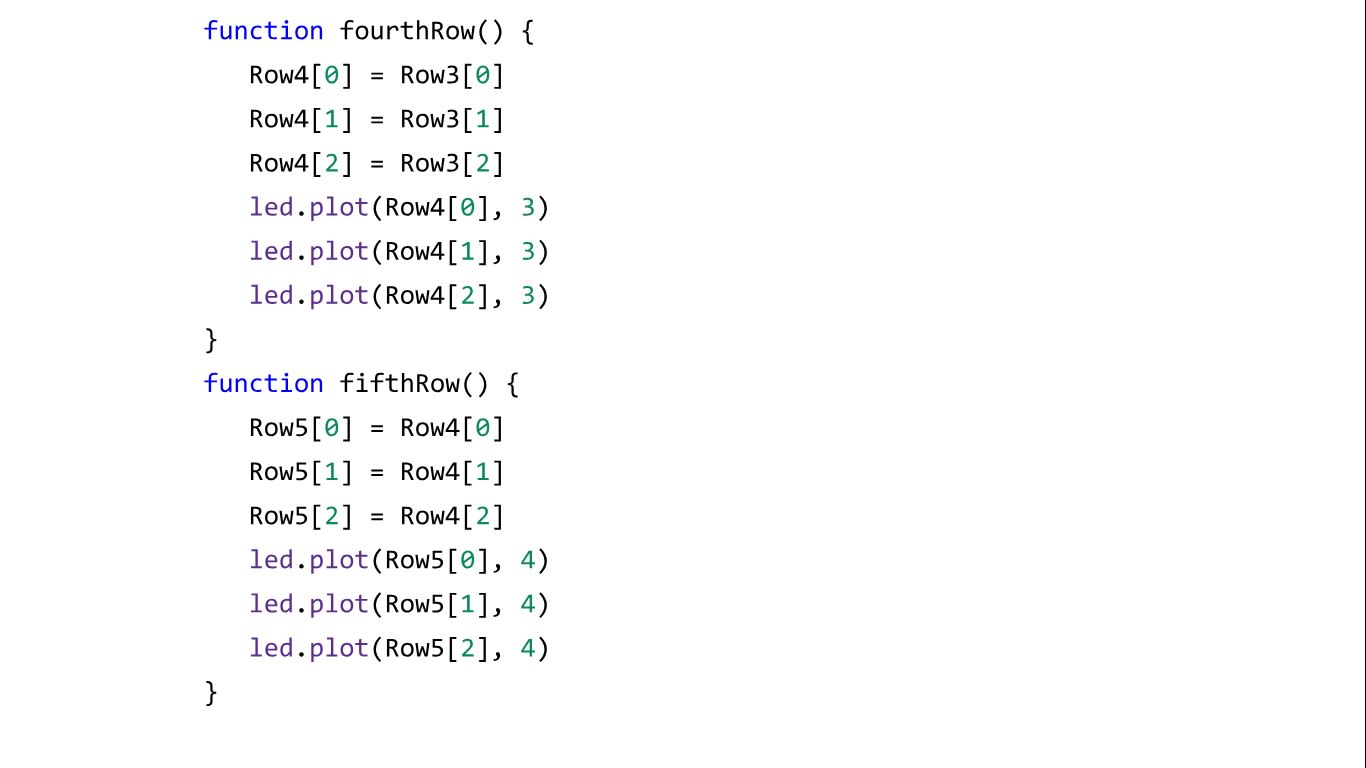
This is similar to the previous step
STEP 13
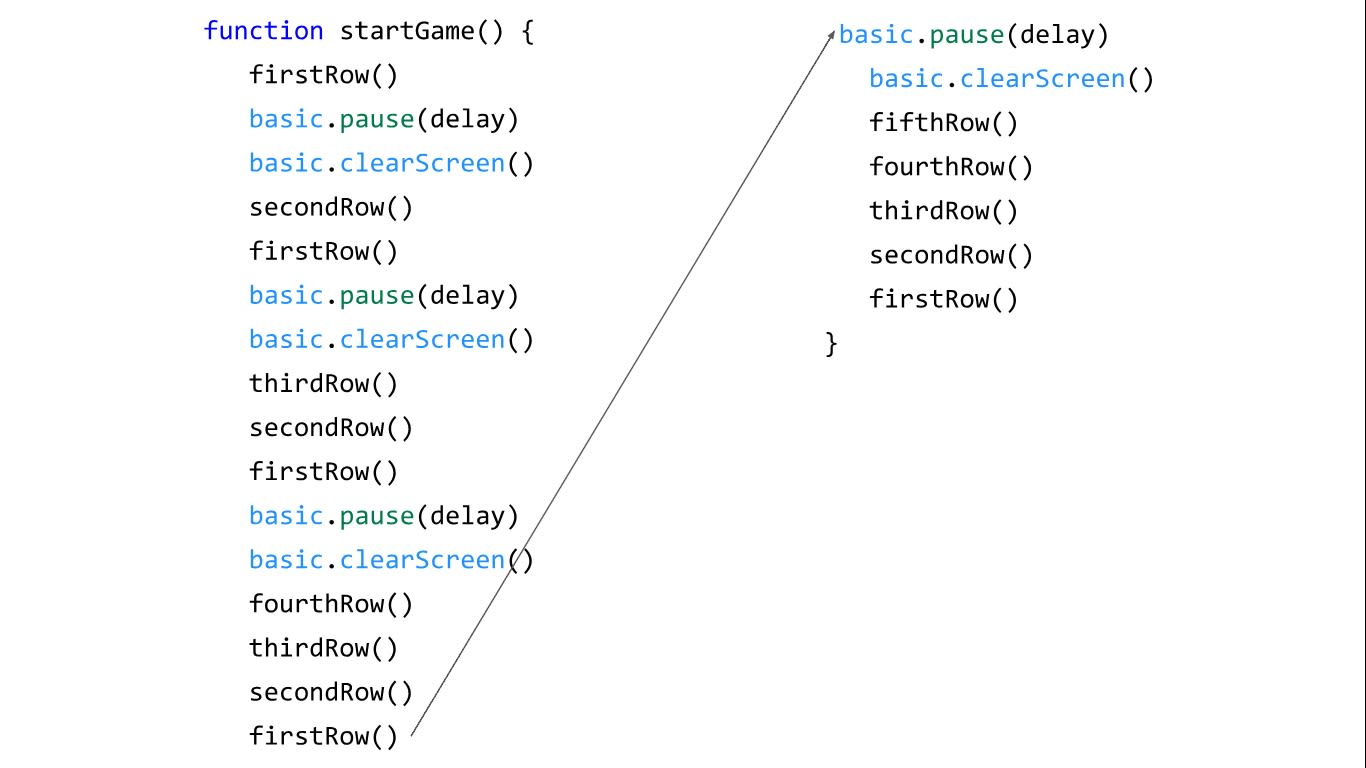
Next create this function that starts the game when called, it does so by rendering the most bottom row first, then the before and so on, before clearing screen and repeating the process until all five rows should have LEDs lit up
STEP 14

The last function you will need to create is the main code that will be running throughout the game, first create a neverending "for" loop in the function, and use OLED extensions to print out all the values obtained from the ultrasonic sensors on the OLED screen
STEP 15
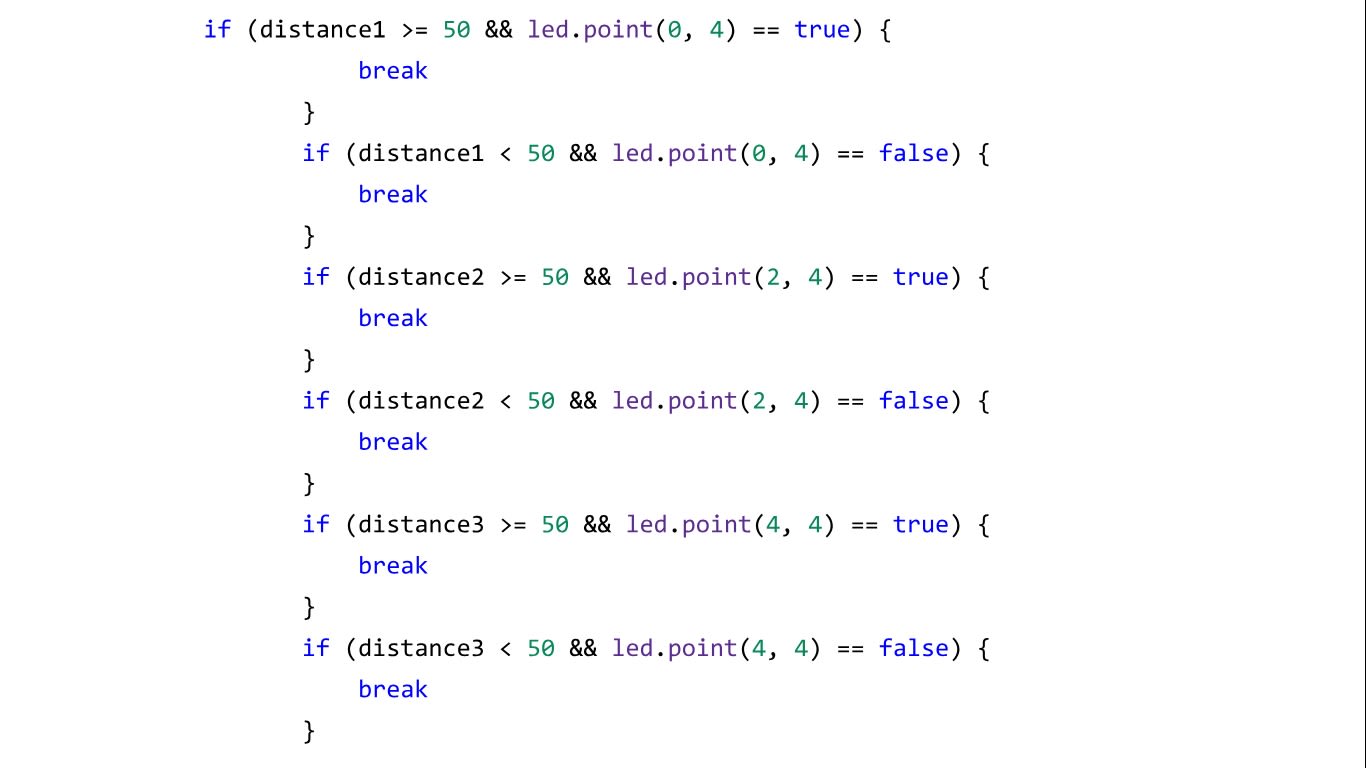
Also under the same function created in the previous step, add all the if statements to check if the player either covered any of the ultrasonic sensors before the LED reaches the bottom of the LED display, or failed to cover the correct ultrasonic sensors with the corresponding LED that are lit up.
STEP 16

Still in the same function, add the score to the counter, and run the code required to keep the game going, then adding a delay. Close the for loop and clear the screen, to show the score("counter"). This happens when any of the if statement created in the previous step is met, causimg the code to "break" out of the "for" loop to run the remaining code in the function. Remember to vlose the function with a bracket!
STEP 17
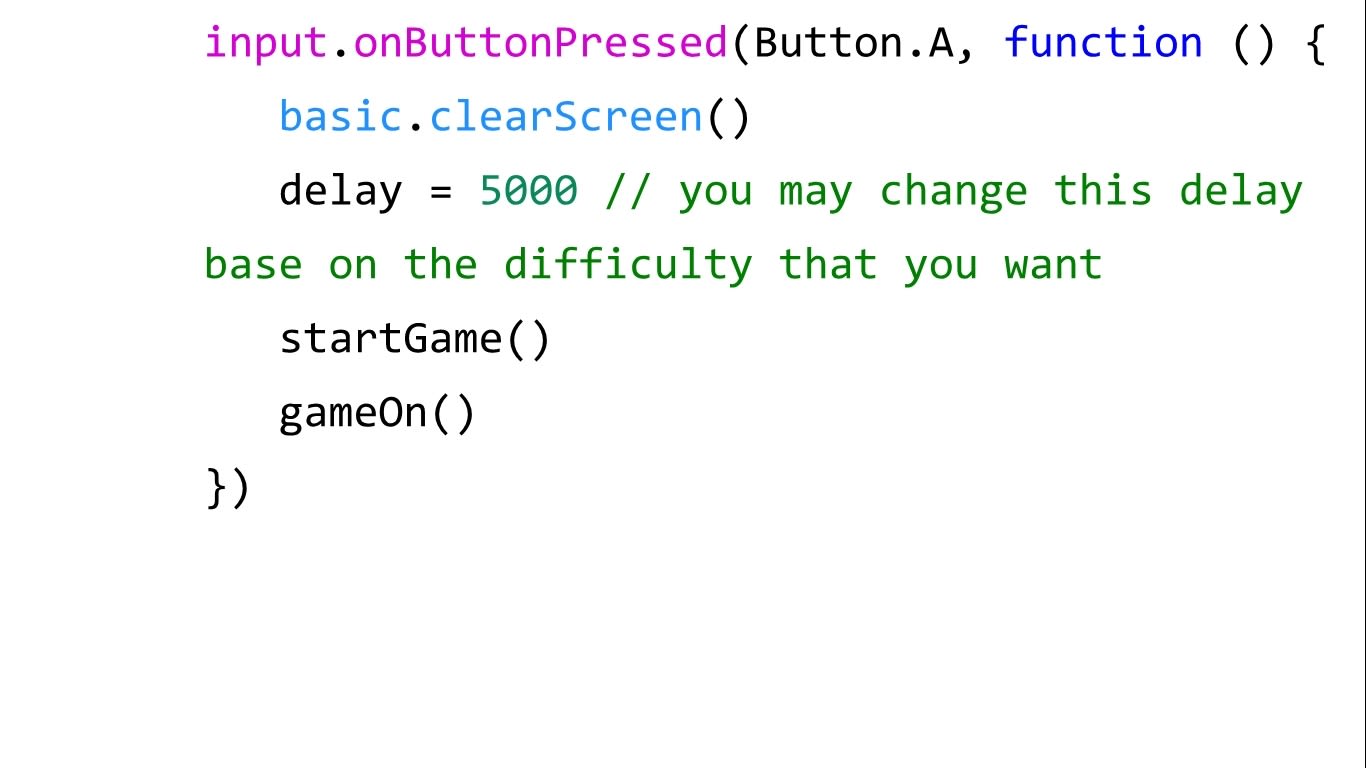
Finally, create the code shown, which will run the game when button A is pressed.
You may change the delay to whatever value you want, the smaller the delay, the harder the game will be.
The full code can be found here (in case yours doesn't work for whatever reason) : goo.gl/NTkDag
STEP 18
You have completed this project!
You may secure the parts in any way to allow you to play the game (I simple used bluetack to secure the parts).
To play the game: cover the correct ultrasonic sensor(s) that correspond to the LEDs lit at the bottom row (or the second bottom if your delay is set to a high value).
As pin 0 is not used in this tutorial, you may also add a buzzer if you want, to create sound when you pass each row of LEDs, or lose the game.
Made this activity? Good Job! Now spread the word. Share a photo of your creation on social media with #letsgethacking #Ultrasonicsensorgame